Integrity Scan
Table of Contents
- Introducing Elastio Integrity Scan
- Checking for Security Threats
- Using Elastio Integrity Scan (iscan) in Elastio CLI
- Using entropy detection in Elastio CLI
- Parsing the iscan scan output
Introducing Elastio Integrity Scan
Existing approaches to ransomware detection are applied to the system being protected. These solutions combine static analysis of executables for known malware and dynamic analysis of running processes for suspicious behavior.
In addition to requiring the deployment and maintenance of software on every host (system), these ransomware detection solutions must detect ransomware before it detonates and make quick decisions to allow or block a particular process or file write. On server-class systems, in particular, this can be computationally expensive, and the cost of a false positive is high.
Elastio is agentless for Amazon EC2 and Amazon EBS and has the added advantage of access to multiple point-in-time backups of the existing data and performs its analysis off-host. Not only does this allow us to perform more complex analysis than would be practical on the host system, but it also lets us leverage prior versions of the recovery points to identify suspicious patterns of changes across the entire system, not just one process or one write operation at a time.
Combined with the optimizations built into our ScaleZ storage engine, we’re able to do a much more thorough analysis of changes; thereby, producing a high-confidence signal as to the presence or absence of detonated ransomware. The ScaleZ optimizations allow us to compute very efficiently which regions of which files have changed since an earlier point in time. This means we can detect ransomware attacks and reliably detect which recovery points are tainted and those that are not to speed recovery efforts. We also include static analysis of executables for known malware to identify undetonated ransomware and most known malware variants within a recovery point.
Elastio’s active ransomware protection is part of any defense-in-depth strategy and ensure protection and recoverability at the recovery point level.
Checking for Security Threats
Elastio provides two approaches to check recovery points for vulnerabilities. The first is by using the Elastio CLI Integrity Scan (iscan) command. The second is to enable iscan from a data protection policy. Policies are defined in the Elastio Tenant and are applied to assets and include a protection schedule and integrity scan options. You can choose to run a security check for ransomware, malware or both. The default is both.
Using Elastio Integrity Scan (iscan) in Elastio CLI
Elastio Integrity Scan capability is available using the elastio iscan command within the Elastio CLI. It can be initiated like so:
elastio iscan
Note: On Amazon Linux 2 the ntfs-3g should be present, to install it run:
sudo yum install ntfs-3g
Integrity Scan (iscan) can be performed for:
- AWS EBS volume:
elastio iscan --ebs-volume-id <aws-eba-volume-id>
- AWS EBS snapshot:
elastio iscan --ebs-snapshot <aws-ebs-snapshot-id>
For AWS snapshots scans, when a scan is completed the following tag is propagated to the snapshot: elastio:iscan:clean if the snapshot is clean, and elastio:iscan:infected if the snapshot has been identified as infected.
- AWS EC2 instance:
elastio iscan --ec2-instance-id <aws-ec2-instance-id>
- AWS AMI:
elastio iscan --ami <aws-ami-id>
- AWS recovery point:
elastio iscan --aws-rp <aws-backup-rp-arn>
- AWS EFS:
elastio iscan --efs-id <aws-efs-id>
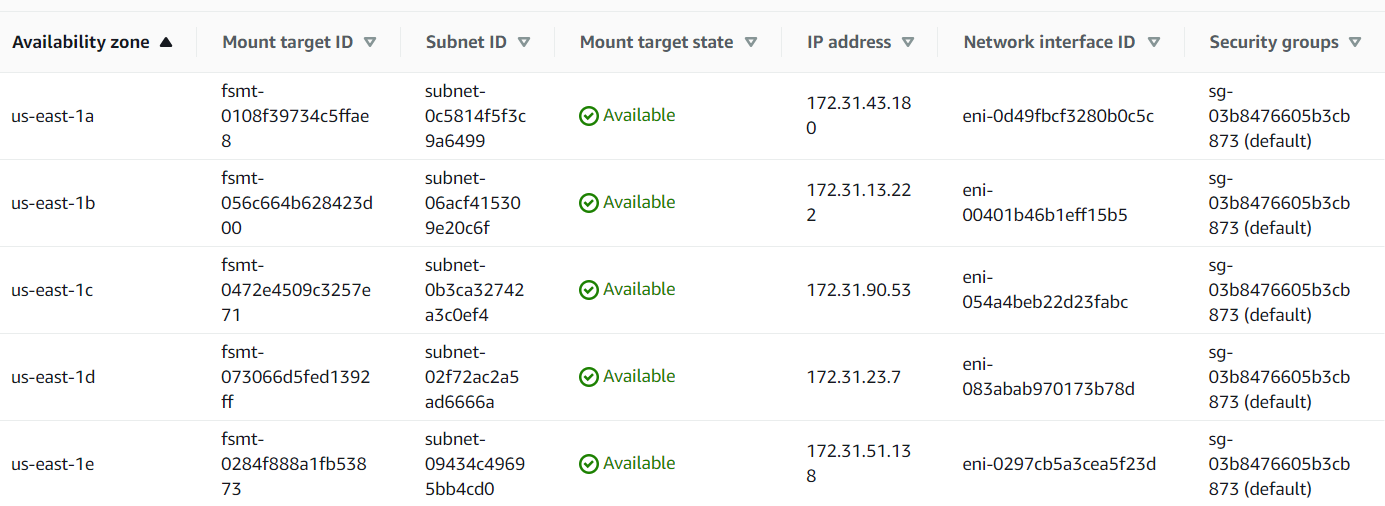
⚠️ Please, note: EFS mount points should be available in all availability zones, where Elastio vault is installed, for the scan to work correctly. Those can be configured at the time of EFS creation or by adding it at a later time. See example list of mount points below:
- AWS S3 bucket:
elastio iscan --s3-bucket <aws-s3-bucket-name>
⚠️ Important! ⚠️ S3 object count, when exceeding certain limits, can negatively impact Elastio S3 scan performance. We do not recommend using the S3 scanning feature on buckets with more than 10 million objects. If you need to scan more than 10M objects in a bucket, please contact Elastio support for assistance.
- Partial AWS S3 bucket scan:
elastio iscan --s3-bucket <aws-s3-bucket-name> --s3-prefixes <bucket-folder>
elastio iscan --s3-bucket <aws-s3-bucket-name> --s3-keys <bucket-file-path>
elastio iscan --s3-bucket <aws-s3-bucket-name> --s3-glob <bucket-file>*
- a local path:
elastio iscan --path <local-path>
- an Elastio recovery point, where the recovery point must be that of an EC2, EBS or block:
elastio iscan --rp <elastio-rp-id>
- Azure VM:
elastio iscan --azure-vm-id <azure-vm-id>
- Azure managed disk:
elastio iscan --azure-managed-disk-id <azure-managed-disk-id>
- Azure managed disk snapshot:
elastio iscan --azure-managed-disk-snap-id <azure-managed-disk-snapshot-id>
- Azure data protection recovery point:
elastio iscan --azure-data-protection-rp-id <azure-data-protection-rp-id>
- Azure recovery services recovery point:
elastio iscan --azure-recovery-services-rp-id <azure-recovery-services-rp-id>
Please, note: For the time being the scan results for the Azure assets can only be observed in Elastio CLI and will not appear in Elastio Tenant.
The output of the scan of a local path is presented on the screen and saved in a .gz file. This file contains the details of the scan.
Check a directory for malware only:
elastio iscan --malware-only <local-path>
Check a mount point for ransomware and malware:
elastio mount rp --rp <elastio-rp-id> <partition-name>:<mount-point>
elastio iscan <mount-point>
Using entropy detection in Elastio CLI
Using Elastio CLI you can now detect if there are any changes to the encryption of the files and directories on your machines. It can be used in background mode on Linux and Windows and in foreground on Linux machines.
You can use it by specifying ransomware-and-entropy-detection (ransomware + encryption detection) or full-and-entropy-detection (malware + ransomware + encryption detection) command line argument in the elastio iscancommand. See example command below.
sudo -E elastio iscan --ec2-instance-id <aws-ec2-instance-id> --vault <vault-name> --monitor --background ransomware-and-encryption-detection
Example report for EBS ransomware scan with entropy detection enabled:
{
   "schema":"v1",
   "scan_target":{
      "kind":{
         "kind":"path",
         "path":"/home/ubuntu/test-ed-scan",
         "meta":{
            "asset_source":"elastio:asset:generic-host:s:ip-172-31-40-19",
            "cpu_cores_count":4,
            "os_name":"Ubuntu"
         },
         "basic_meta":{
            "asset_id":"elastio:asset:file:s:generic-host:s:ip-172-31-40-19:/home/ubuntu/test-ed-scan",
            "timestamp":"2024-06-11T11:04:08.109171300Z"
         }
      },
      "name":"elastio:asset:file:s:generic-host:s:ip-172-31-40-19:/home/ubuntu/test-ed-scan"
   },
   "started":"2024-06-11T11:04:20.691576442Z",
   "finished":"2024-06-11T11:04:21.205944482Z",
   "child_job_id":"j-01j03fgsgf65ctn25b4fr497f2",
   "report_data":{
      "Ransomware":{
         "files":[

         ],
         "files_truncated":0,
         "summary":{
            "errors":[

            ],
            "deduplicated_errors":[

            ],
            "filesystem_traversal_errors":[

            ],
            "inaccessible_dir_entries":{
               "entries":[

               ],
               "total_inaccessible_entries":0
            },
            "total":72,
            "detected_rans":[

            ],
            "iscan_db_downloaded":true
         },
         "entropy_detection_summary":{
            "file_status":[
               {
                  "Suspicious":"/home/ubuntu/test-ed-scan/test-dir-2/file_example_ODS_10.ods"
               },
               {
                  "Encrypted":"/home/ubuntu/test-ed-scan/test-dir-2/file-sample_500kB.doc"
               },
               {
                  "Encrypted":"/home/ubuntu/test-ed-scan/test-dir-2/file-sample_1MB.odt"
               },
               {
                  "Encrypted":"/home/ubuntu/test-ed-scan/test-dir-2/file-example_PDF_1MB.pdf"
               },
               {
                  "Encrypted":"/home/ubuntu/test-ed-scan/test-dir-2/file-sample_1MB.rtf"
               },
               {
                  "Encrypted":"/home/ubuntu/test-ed-scan/test-dir-2/file_example_XLSX_5000.xlsx"
               },
               {
                  "Encrypted":"/home/ubuntu/test-ed-scan/test-dir-2/file_example_XLS_10.xls"
               },
               {
                  "Encrypted":"/home/ubuntu/test-ed-scan/test-dir-2/file-sample_500kB.docx"
               }
            ]
         },
         "billing_stats":{
            "files_scanned_size":25206980,
            "files_in_resource":74,
            "files_in_resource_size":25207494
         }
      }
   }
}
Please note: The list of encrypted files is limited to 100 entries.
Parsing the iscan scan output
Once the iscan job completes, a json output will be provided, that can be then parsed to automate responses in case a threat is identified. For iScans in Elastio CLI, you will need to pass the flags in order to get the job results to stdout: --no-progress --output-format json and redirect the job progress to a file using 2>> <filename>. This way the progress of the job will be written to a file, and the job result will be passed to stdout for further parsing. Example command to scan “/tmp/resources/malware/” can be found below:
sudo -E elastio --no-progress --output-format json iscan --path <local-path> -vv 2>> ./stderr.log
You need to look for "infected" and "suspicious" in malware scan being > 0 and "detected_rans" for ransomware scan containing a list of ransomware. See the example of iscan output with no findings below:
{
  "filesystem_warnings": [],
  "results": {
    "succeeded_scans": [
      {
        "target": {
          "kind": {
            "kind": "path",
            "path": "/home/sam/tmp/resources/malware",
            "meta": {
              "asset_source": "elastio:asset:generic-host:s:hostname",
              "cpu_cores_count": 16,
              "os_name": "Ubuntu"
            }
          },
          "name": "/home/sam/tmp/resources/malware"
        },
        "malware": {
          "summary": {
            "errors": [],
            "deduplicated_errors": [],
            "total": 1,
            "clean": 0,
            "infected": 0,
            "suspicious": 0,
            "encrypted": 1,
            "incomplete": 0,
            "corrupted": 0,
            "server_errors": 0,
            "database_status": {
              "is_updated": true,
              "update_timestamp": "2023-12-21T03:41:30Z"
            }
          },
          "report_attachment_id": "a-00000000000000000000000000"
        },
        "ransomware": {
          "summary": {
            "errors": [],
            "deduplicated_errors": [],
            "total": 1,
            "detected_rans": [],
            "iscan_db_downloaded": false
          },
          "report_attachment_id": "a-00000000000000000000000000"
        }
      }
    ],
    "failed_scans": [],
    "filesystem_warnings": {
      "filesystem_warnings": [],
      "warnings_skipped": 0
    },
    "unscannable_targets": []
  },
  "artifacts": [
    {
      "report": {
        "path": "/tmp/iscan--home-sam-tmp-resources-malware-2023-12-21T09-28-21Z-mal.json",
        "attachment_id": "a-00000000000000000000000000"
      },
      "debug_info": null
    },
    {
      "report": {
        "path": "/tmp/iscan--home-sam-tmp-resources-malware-2023-12-21T09-28-21Z-rans.json",
        "attachment_id": "a-00000000000000000000000000"
      },
      "debug_info": {
        "path": "/tmp/iscan--home-sam-tmp-resources-malware-2023-12-21T09-28-21Z-rans-debug.json.gz",
        "attachment_id": "a-00000000000000000000000000"
      }
    }
  ]
}
In case of a job failure, then using this iScan mode, the output will contain the error that the job exited with, see example below:
{
  "error": [
    "An AWS error occurred when performing the following request: DescribeInstancesRequest { dry_run: None, filters: None, instance_ids: Some([\"i-000000000000000\"]), max_results: None, next_token: None }",
    "AWS error occurred with code: 'InvalidInstanceID.NotFound', message: 'The instance ID 'i-000000000000000' does not exist'"
  ]
}