Scan assets for ransomware and malware exposure
Table of Contents
- Use Elastio Protection Policy to scan your assets
- Integrate Elastio into an AWS Backup plan
- Scan replicated AWS recovery points using Elastio
- Scan your assets with Elastio CLI
- Use entropy detection in Elastio CLI
- Enable Threat Detection in a Protection Policy with backups enabled
Elastio helps defend your data from ransomware and malware attacks by detecting ransomware, crypto miners, trojans and other malware hiding in backups. Our malware engine is updated daily with the latest known malware. It detects evidence of a ransomware attack in the recovery points with deterministic and statistical analysis against all files in the backup. Elastio protects against over 1,000 known ransomware.
Use Elastio Protection Policy to scan your assets
Elastio provides two policy types: Protection Policies to secure assets through backups and cyber threat scans, and Retention Policies for managing recovery point duration and granularity, ensuring alignment with business retention and data compliance requirements.
The Policies page is accessible either through the menu of Elastio Tenant on the top-right corner or through the Onboarding page.
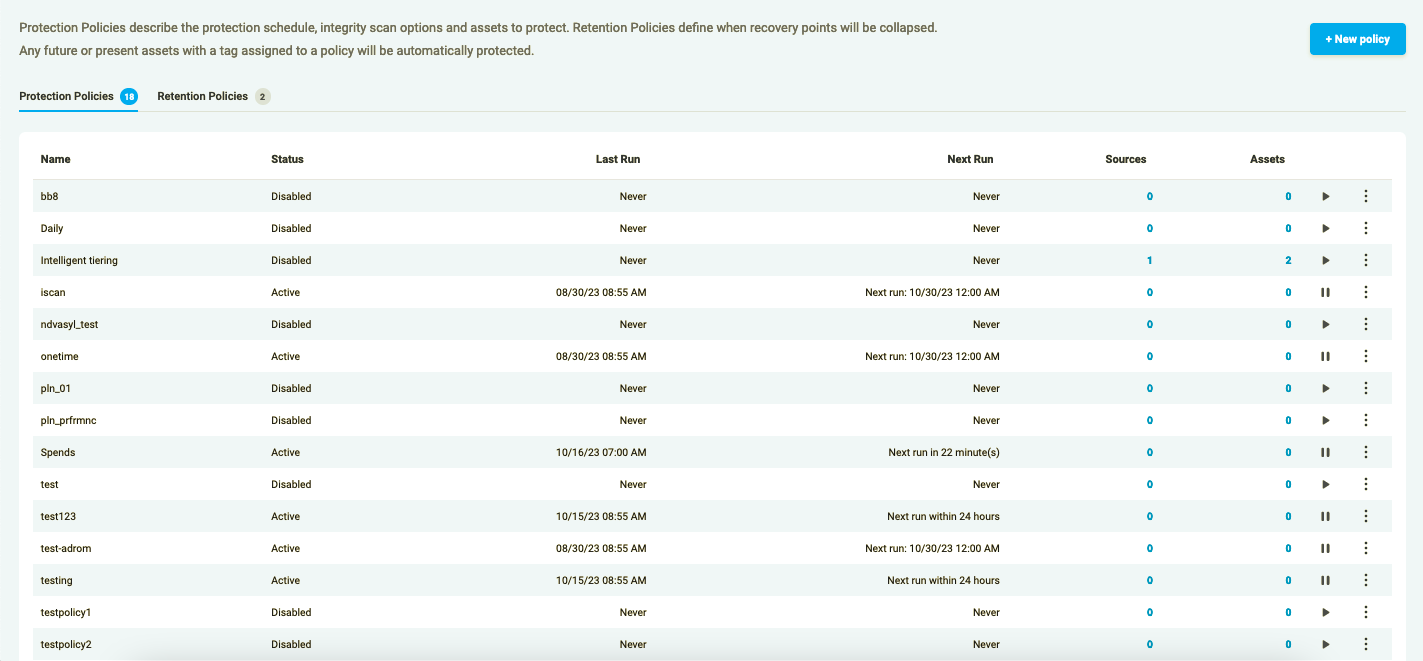
Figure 1: Policies Page layout
A Protection Policy is a way of scheduling Elastio backups for certain assets in your AWS account enabled with Elastio.
Protection Policies are flexible policies in which you can define schedule for your backups and select Integrity Scan to be run against the recovery point(s) after the completion of the backups. They are created either for specific Assets or for Assets with associated tags. For now it is possible to create a policy for AWS EC2 and AWS EBS.
Policies can be reused and applied to different assets by their IDs or associated tags.
A protection policy can be paused, resumed, edited, executed and deleted from this page. To modify your Policy, press the 3 dots button on the right of the Policies table row.
For detailed instructions, please proceed to the Policies page
Integrate Elastio into an AWS Backup plan
When creating an AWS Backup plan, you can integrate Elastio into the backup flow by adding certain tags. Depending on the tag key-value pair, you will be able to enable ingest,live scan or ingest + scan with Elastio for your AWS Backup recovery points. To do this, follow the instructions below.
Go to AWS Backups / Backup Plans, press the “Create backup plan” button.
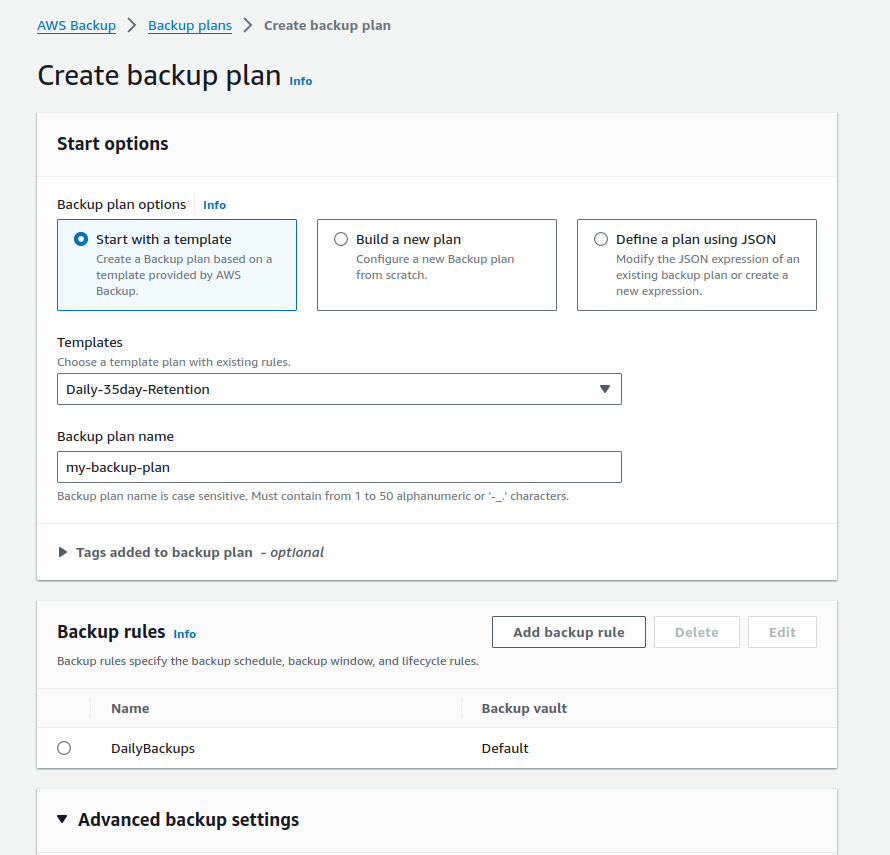
Figure 1: Create AWS Backup plan
Select a template, or create a plan from scratch. When selecting a template, one or more Backup Rule(s) will appear in the dedicated section.
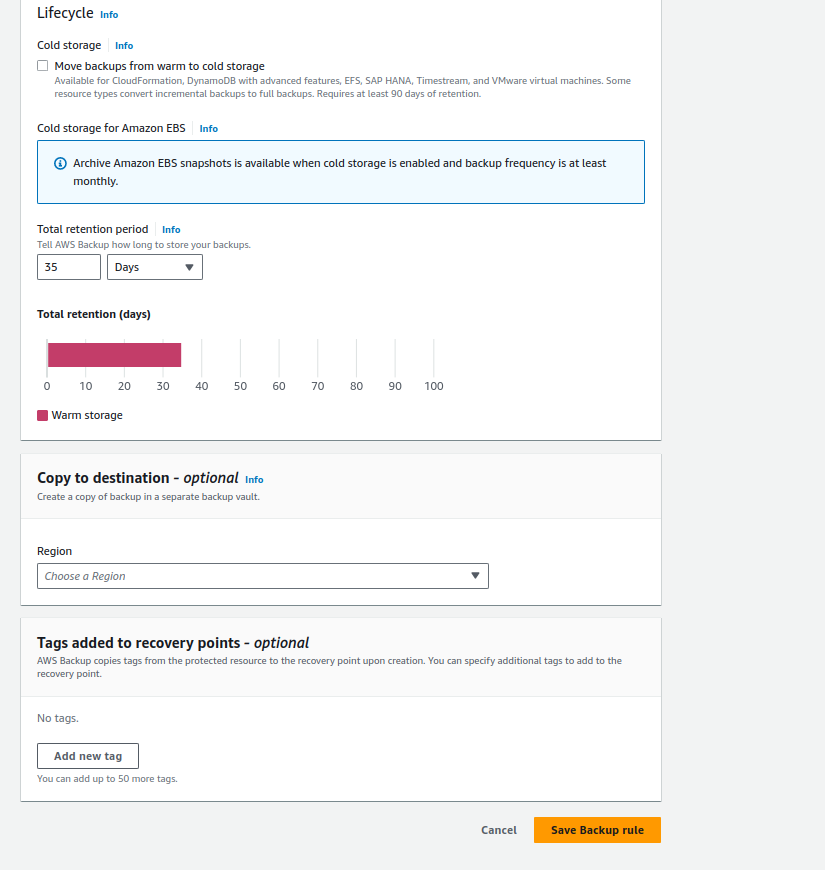
Figure 2: Backup Rules
Pick a Backup Rule. Scroll down to the “Tags added to recovery points” section. Press the “Add new tag” button. Enter one of the following key - value pairs depending on your needs.
- to scan resulting AWS recovery points with Elastio:
Key: elastio:action
Value: scan
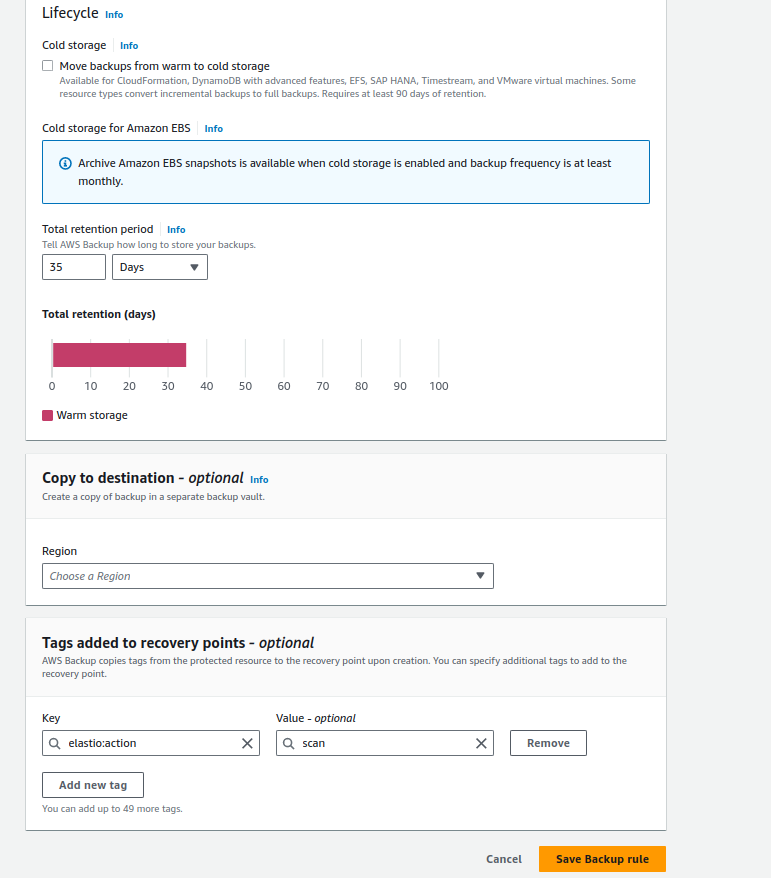
Figure 10: AWS backup with scan by Elastio enabled
- to ingest AWS recovery points into Elastio:
Key: elastio:action
Value: ingest
- to ingest and scan AWS recovery points with Elastio:
Key: elastio:action
Value: ingest-and-scan
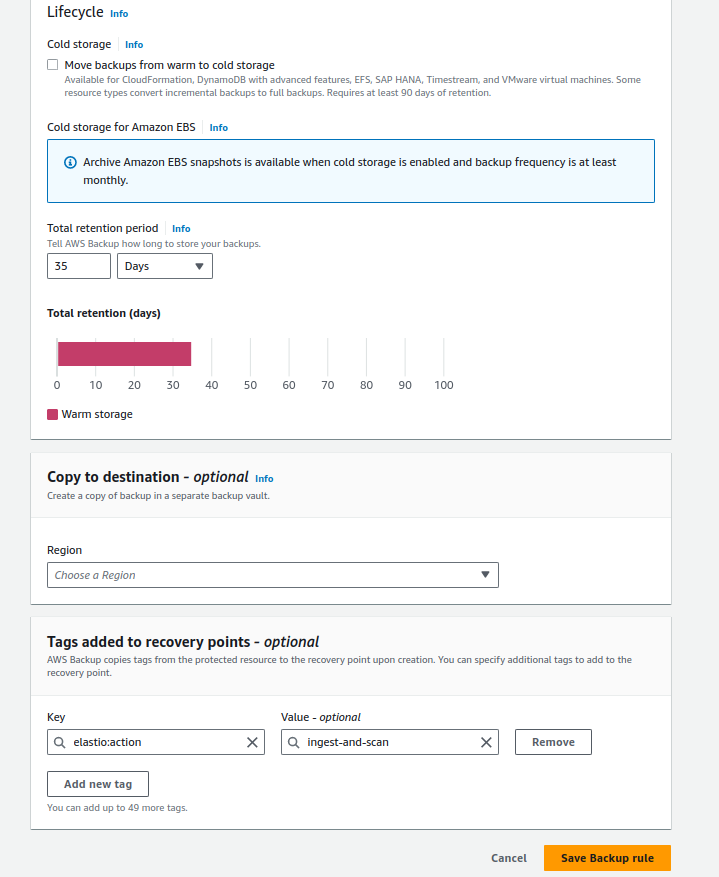
Figure 11: AWS backup with ingest and scan by Elastio enabled
Additionally, you can control what types of scan will be performed on the resulting AWSB recovery points. This can be done through the elastio:scans tag:
- to scan for malware:
Key: elastio:scans
Value: malware
- to scan for ransomware:
Key: elastio:scans
Value: ransomware
- to detect entropy:
Key: elastio:scans
Value: ransomware entropy
⚠️ Important! ⚠️ If you intend to run entropy detection scan, ransomware scan should also be enabled, as the entropy detection is an add-on to the ransomware scan.
- to run FS check:
Key: elastio:scans
Value: fs-check
Several scans can be added through the value field, they should be space separated like so:
Key: elastio:scans
Value: malware fs-check
Once you’ve specified the tags for all Backup Rules, where it’s needed, save the policy and add some assets into it. Elastio will pick up the AWS recovery points by tags automatically and process them depending on the tag value.
Scan replicated AWS recovery points using Elastio
In the cases where you want to isolate your production workflows, but still get the assets in the production environment scanned, you can replicate the created recovery points to a different account and/or region, using a vault there. To use Elastio on the recovery points, the target vault should be located in the same AWS account and region where Elastio is deployed. Recovery test should be used to scan the resulting recovery points in the target account.
First, create an AWS Backup vault in the target AWS account. Please take into account that AWS account and region should contain and Elastio Cloud Connector.
Please note, the vault should be created using a customer-managed KMS key.
Then, in the production account, create an AWS Backup plan.
To create a new AWS Backup policy, go to AWS Backups / Backup Plans, press the “Create backup plan” button.
Figure 1: Create AWS Backup plan
Select a template, or create a plan from scratch. When selecting a template, one or more Backup Rule(s) will appear in the dedicated section.
Figure 2: Backup Rules
Pick a Backup Rule.
To replicate AWS recovery points to a vault in a different account/region when creating an AWS Backup plan in the “Copy to Destination” section select the desired region and then insert the vault ARN.
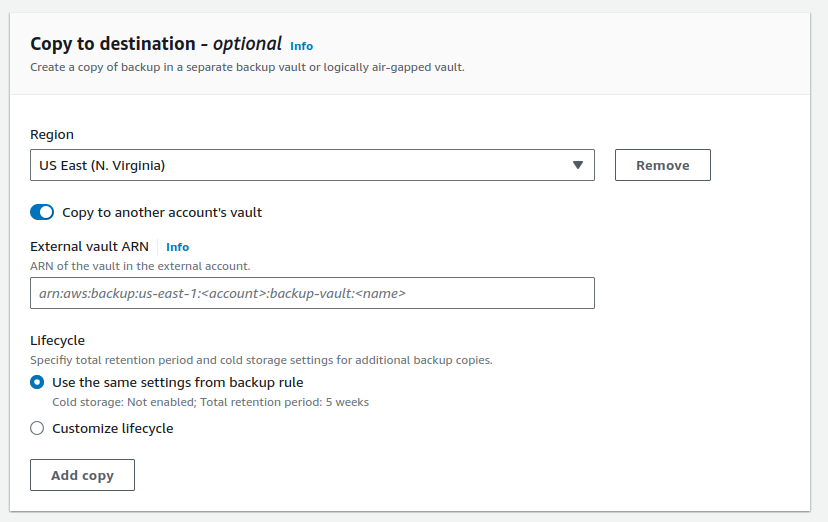
Copy to destination option
Scroll down to the “Tags added to the recovery points” section. In here you will to add a tag:
Key: elastio:restore-test
Value: scan
Save the plan.
Then go back to the target AWS account, here you will need to create a Restore test plan. Instructions on how to that can be found here.
Scan your assets with Elastio CLI
The second way of checking recovery points for threats is to use the Elastio CLI iscan command.
Elastio Integrity Scan capability is available using the elastio iscan command within the Elastio CLI. It can be initiated like so:
elastio iscan
Elastio iScan is recommended to be used on Linux based machines. It can be run to check for either malware, ransomware or both. The default behavior is to check for both malware and ransomware. You can scan various AWS resources using Elastio iScan, such as AWS S3 buckets, AWS EBS snapshots, AWS AMIs, AWS EFS, local paths and Elastio recovery points. Note, that the latest version of elastio CLI needs to be installed in order to produce the best results. You will have to compete the placeholders with proper ID/name before you run the command.
Below, you can find example commands ro run Elastio iScan for different types of resources:
- AWS AMI:
elastio iscan --ami <ami>
- AWS EBS volume:
elastio iscan --ebs-volume-id <ebs-volume-id>
- AWS EBS snapshot:
elastio iscan --ebs-snapshot <ebs-snapshot-id>
- AWS EC2 instance:
elastio iscan --ec2-instance-id <ec2-instance-id>
- AWS RP:
elastio iscan --aws-rp <aws-rp>
- AWS EFS:
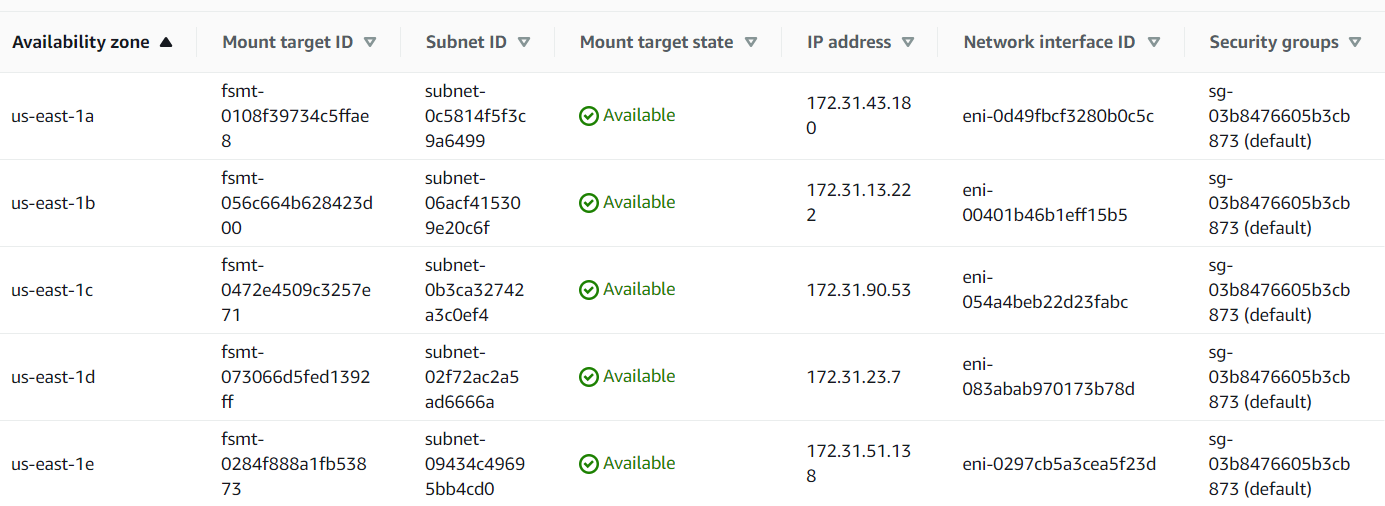
elastio iscan --efs-id <efs-id>
⚠️ Please, note: EFS mount points should be available in all availability zones, where Elastio vault is installed, for the scan to work correctly. Those can be configured at the time of EFS creation or by adding it at a later time. See example list of mount points below:
- AWS S3 bucket:
elastio iscan --s3-bucket <s3-bucket>
⚠️ Important! ⚠️ S3 object count, when exceeding certain limits, can negatively impact Elastio S3 scan performance. We do not recommend using the S3 scanning feature on buckets with more than 10 million objects. If you need to scan more than 10M objects in a bucket, please contact Elastio support for assistance.
- an Elastio recovery point:
elastio iscan --rp <rp-id>
- a local path:
elastio iscan --path <path>
to check a directory for malware only:
elastio iscan --malware-only <path>
- a mount point:
elastio mount rp –rp dgwmvmc2eiqlrqmltrw4q8nk /dev/sda1:/mnt
elastio iscan /mnt
- Azure VM:
elastio iscan --azure-vm-id <azure-vm-id>
- Azure managed disk:
elastio iscan --azure-managed-disk-id <azure-managed-disk-id>
- Azure managed disk snapshot:
elastio iscan --azure-managed-disk-snap-id <azure-managed-disk-snap-id>
- Azure data protection recovery point:
elastio iscan --azure-data-protection-rp-id <azure-data-protection-rp-id>
- Azure recovery services recovery point:
elastio iscan --azure-recovery-services-rp-id <azure-recovery-services-rp-id>
Please, note: For the time being the scan results for the Azure assets can only be observed in Elastio CLI and will not appear in Elastio Tenant.
The output is presented on the screen and saved in a .gz file. This file contains the details of the scan.
Use entropy detection in Elastio CLI
Using Elastio CLI you can now detect if there are any changes to the encryption of the files and directories on your machines. It can be used in background mode on Linux and Windows and in foreground on Linux machines.
You can use it by specifying ransomware-and-entropy-detection (ransomware + encryption detection) or full-and-entropy-detection (malware + ransomware + encryption detection) command line argument in the elastio iscancommand. See example command below.
sudo -E elastio iscan --ec2-instance-id i-030a57a36160577eb --vault default --monitor --background ransomware-and-encryption-detection
Example report for EBS ransomware scan with entropy detection enabled:
{
   "schema":"v1",
   "scan_target":{
      "kind":{
         "kind":"path",
         "path":"/home/ubuntu/test-ed-scan",
         "meta":{
            "asset_source":"elastio:asset:generic-host:s:ip-172-31-40-19",
            "cpu_cores_count":4,
            "os_name":"Ubuntu"
         },
         "basic_meta":{
            "asset_id":"elastio:asset:file:s:generic-host:s:ip-172-31-40-19:/home/ubuntu/test-ed-scan",
            "timestamp":"2024-06-11T11:04:08.109171300Z"
         }
      },
      "name":"elastio:asset:file:s:generic-host:s:ip-172-31-40-19:/home/ubuntu/test-ed-scan"
   },
   "started":"2024-06-11T11:04:20.691576442Z",
   "finished":"2024-06-11T11:04:21.205944482Z",
   "child_job_id":"j-01j03fgsgf65ctn25b4fr497f2",
   "report_data":{
      "Ransomware":{
         "files":[

         ],
         "files_truncated":0,
         "summary":{
            "errors":[

            ],
            "deduplicated_errors":[

            ],
            "filesystem_traversal_errors":[

            ],
            "inaccessible_dir_entries":{
               "entries":[

               ],
               "total_inaccessible_entries":0
            },
            "total":72,
            "detected_rans":[

            ],
            "iscan_db_downloaded":true
         },
         "entropy_detection_summary":{
            "file_status":[
               {
                  "Suspicious":"/home/ubuntu/test-ed-scan/test-dir-2/file_example_ODS_10.ods"
               },
               {
                  "Encrypted":"/home/ubuntu/test-ed-scan/test-dir-2/file-sample_500kB.doc"
               },
               {
                  "Encrypted":"/home/ubuntu/test-ed-scan/test-dir-2/file-sample_1MB.odt"
               },
               {
                  "Encrypted":"/home/ubuntu/test-ed-scan/test-dir-2/file-example_PDF_1MB.pdf"
               },
               {
                  "Encrypted":"/home/ubuntu/test-ed-scan/test-dir-2/file-sample_1MB.rtf"
               },
               {
                  "Encrypted":"/home/ubuntu/test-ed-scan/test-dir-2/file_example_XLSX_5000.xlsx"
               },
               {
                  "Encrypted":"/home/ubuntu/test-ed-scan/test-dir-2/file_example_XLS_10.xls"
               },
               {
                  "Encrypted":"/home/ubuntu/test-ed-scan/test-dir-2/file-sample_500kB.docx"
               }
            ]
         },
         "billing_stats":{
            "files_scanned_size":25206980,
            "files_in_resource":74,
            "files_in_resource_size":25207494
         }
      }
   }
}
Please note: The list of encrypted files is limited to 100 entries.
Enable Threat Detection in a Protection Policy with backups enabled
Alternatively, you can use “Backup and scan option” to ensure backups as well as data integrity. Follow these steps to enable recovery point scanning after every scheduled backup.
Proceed to the Policies page, press the “+New policy” button.
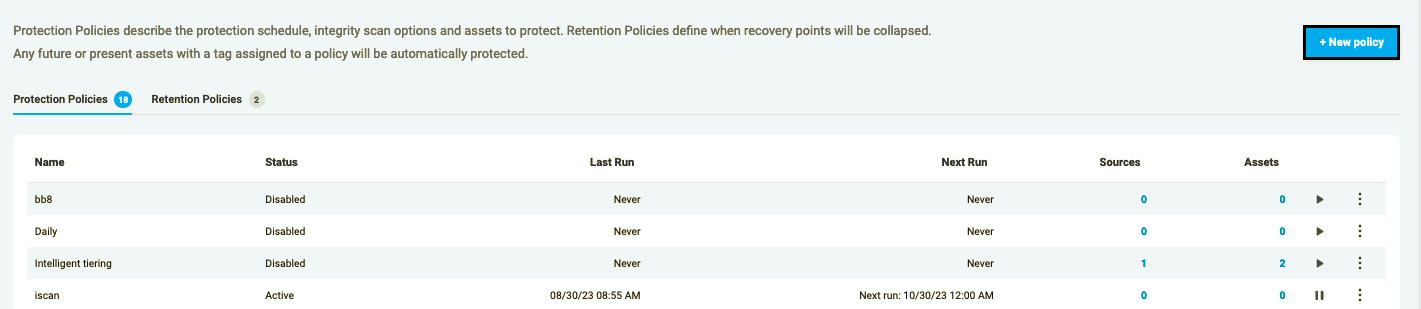
Figure 1: Add New Policy
Add a name to your policy and define a schedule for it.
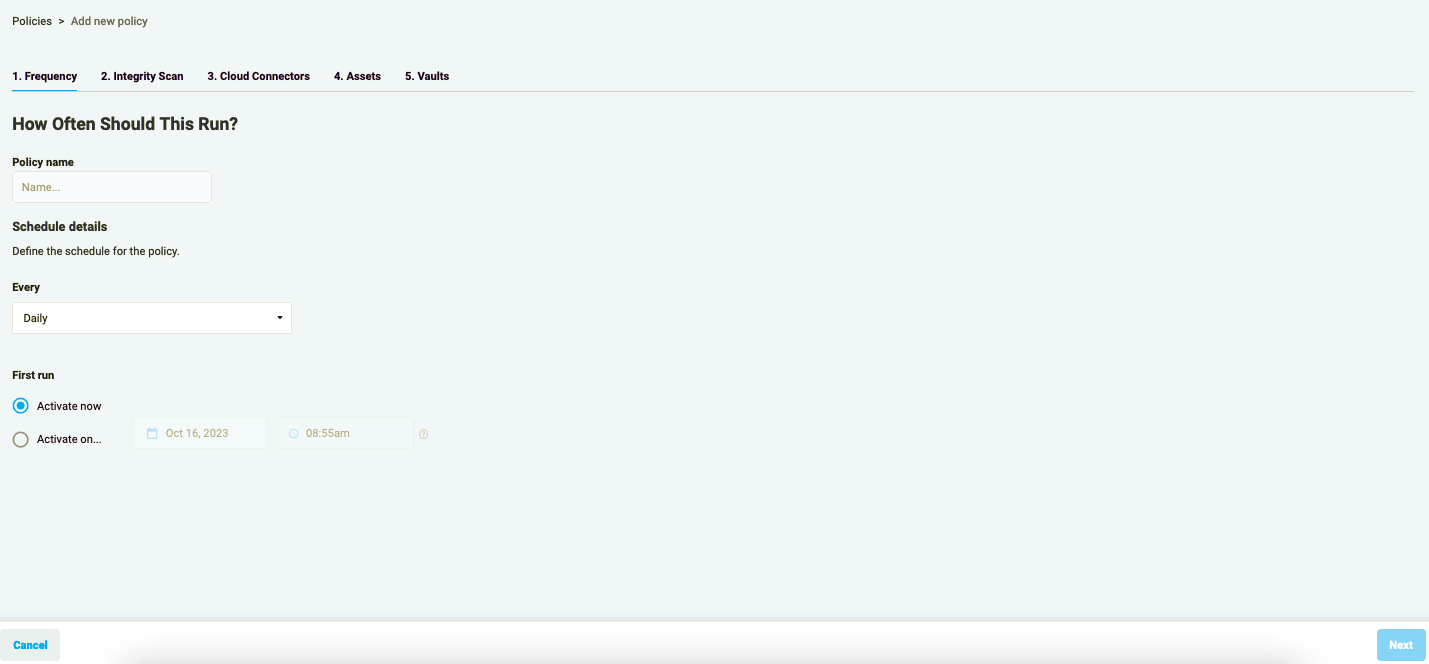
Figure 2: Add policy schedule
Select “Scan and backup with Elastio” option in the Scan option drop-down.
Set an integrity scan to run against the recovery point after every backup. You can choose to run a check for ransomware, malware or both.
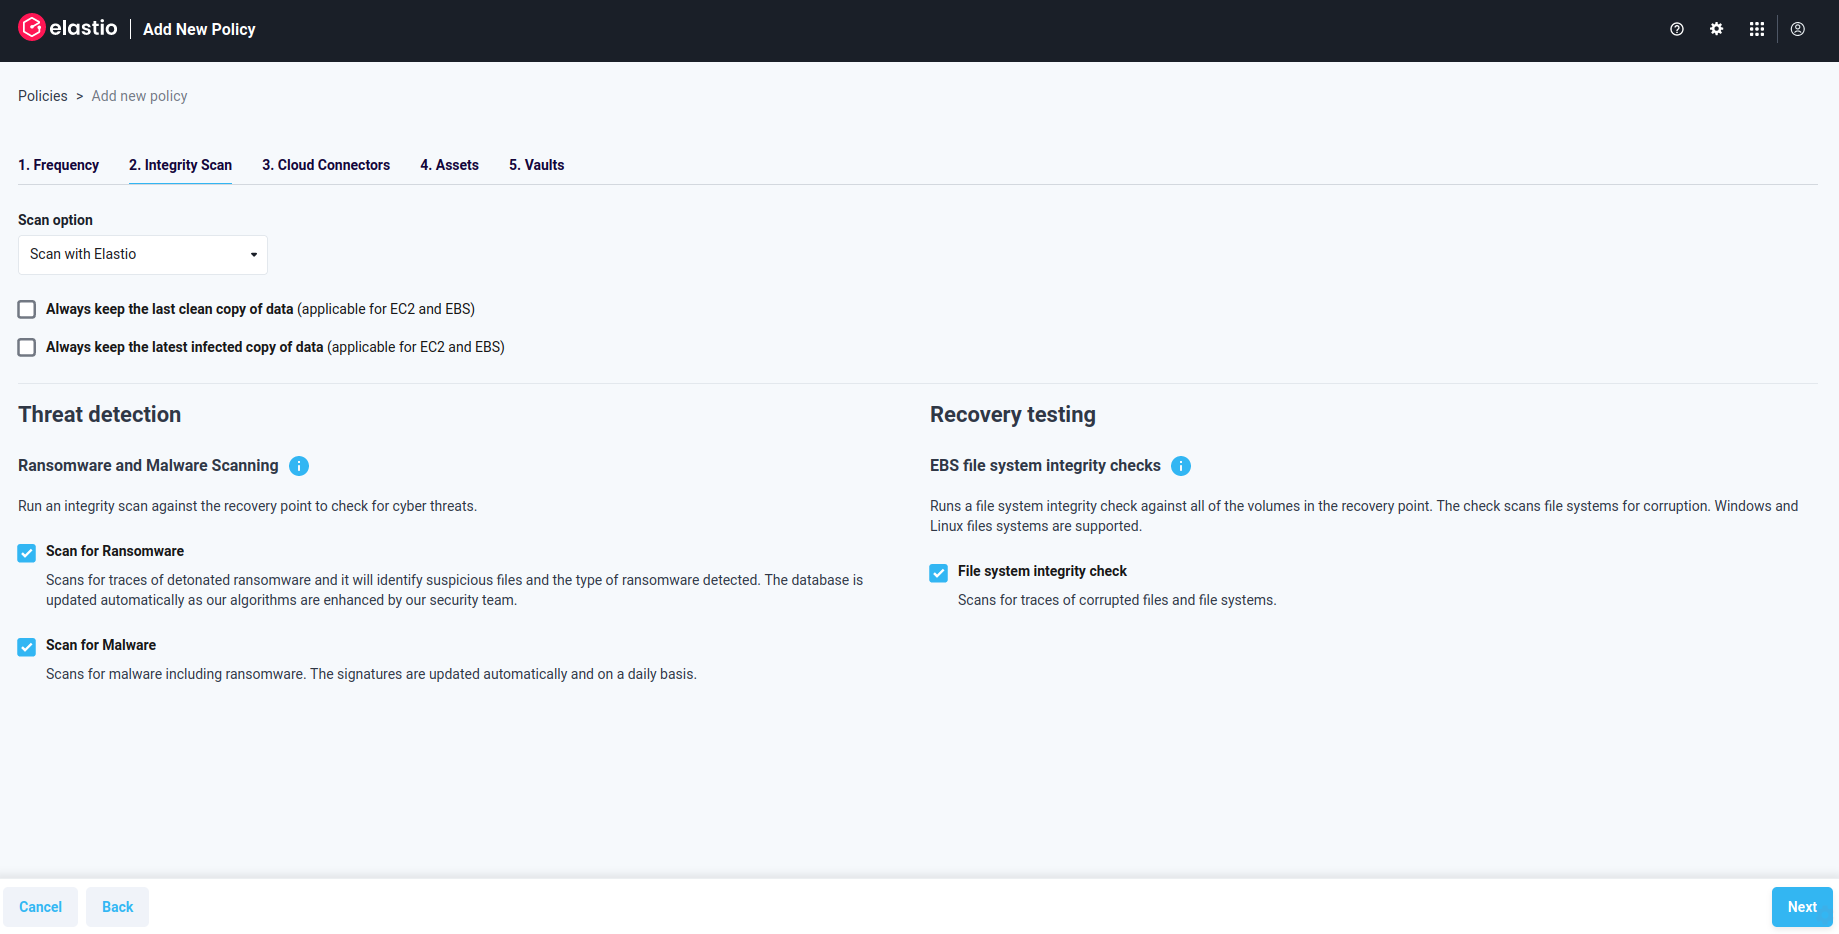
Figure 3: Add New Policy - Integrity Scan
Furthermore, you have the option to activate the EBS file system check. When all required options are selected, complete policy creation following all the steps and saving it.
After the policy is run at least once, navigate to the Reports page to check the details for each ransomware and malware checks performed.
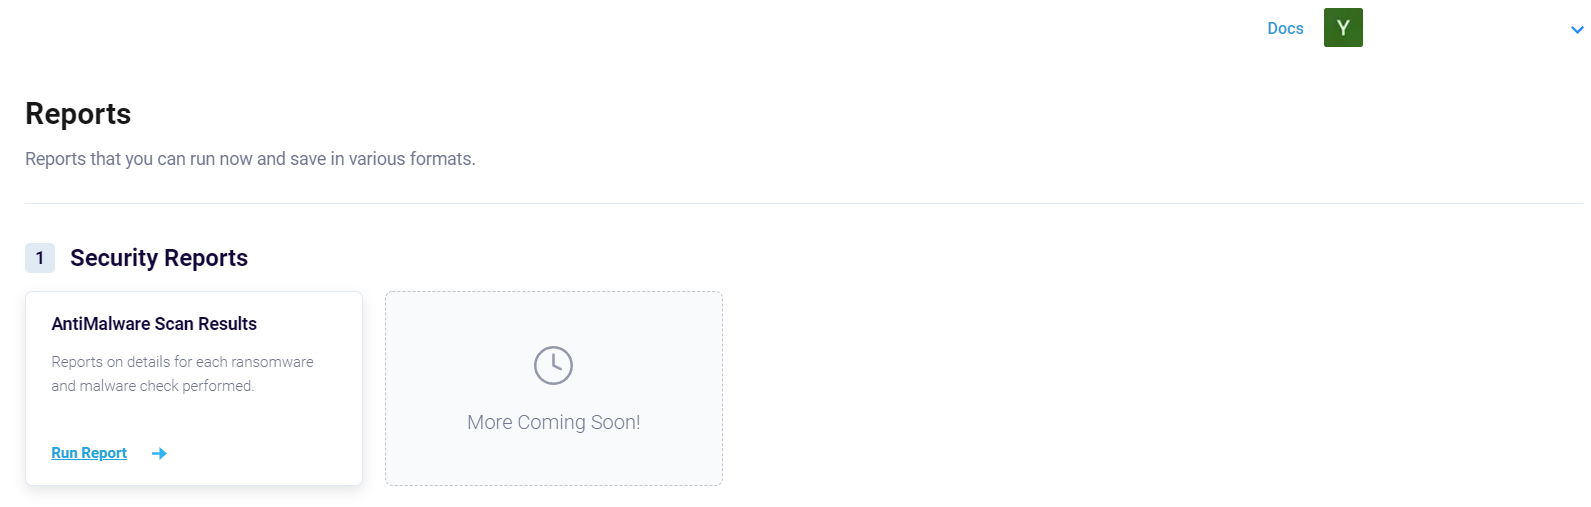
Figure 4: Reports page
Click the Run Report button to see all Anti-Malware Scan Results.
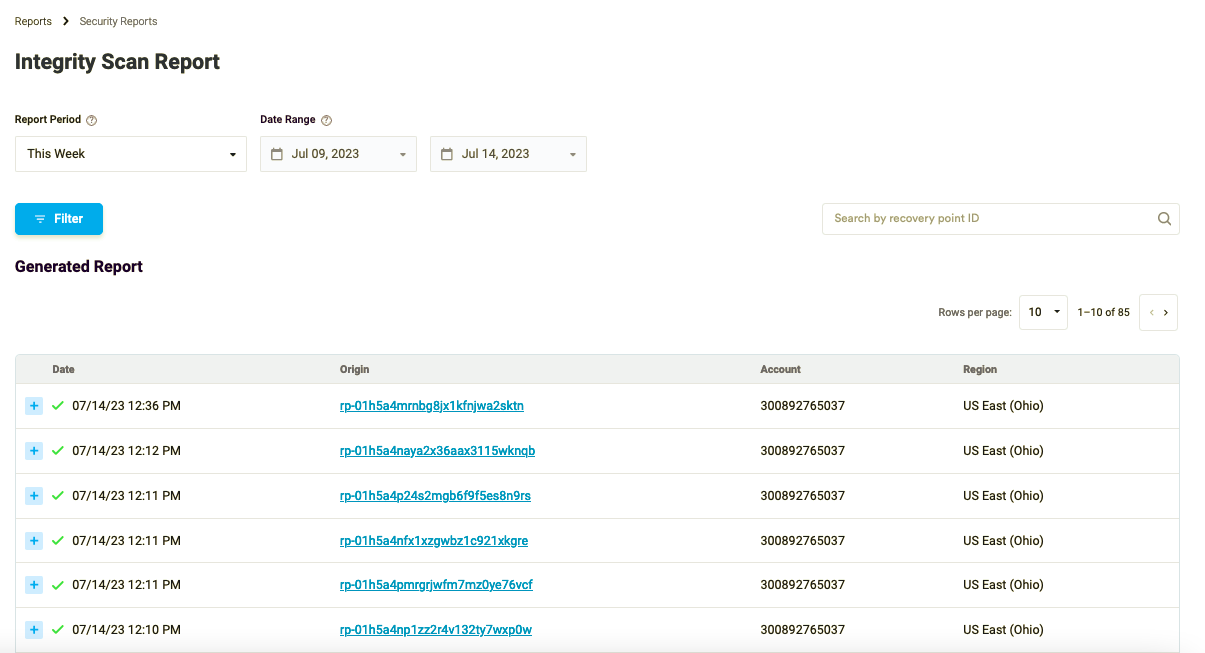
Figure 5: Anti-Malware Scan Results
By clicking on the recovery point ID you will be redirected to the Asset page that carries the details on the asset that has been backed up.
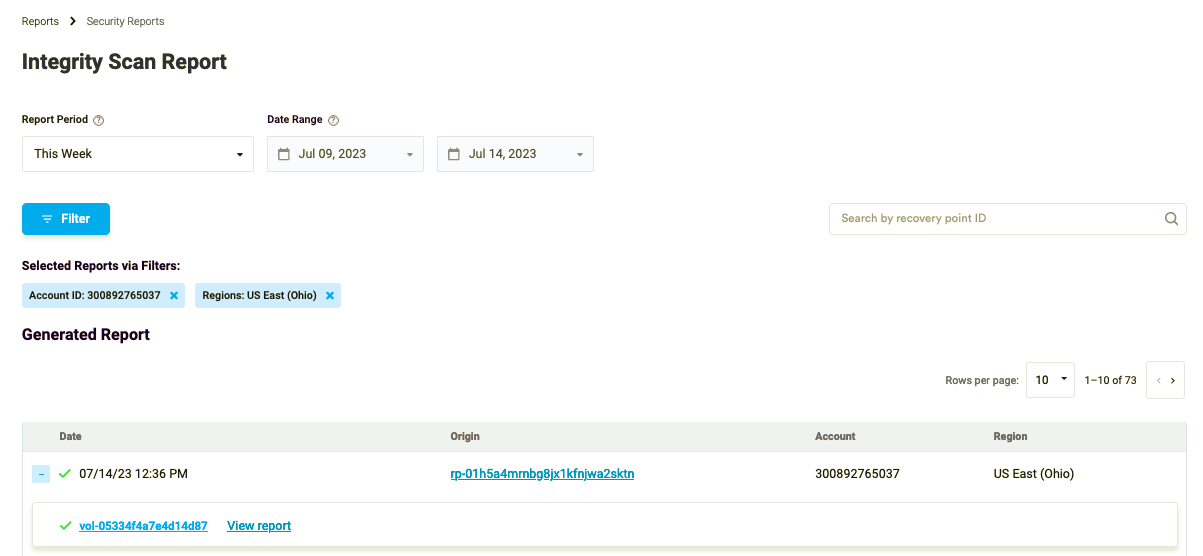
Figure 6: Recovery Point to Asset page
Expand the row with the scan by clicking the “+” button. Then by clicking on the asset ID proceed to the Malware and Ransomware Scan Results.
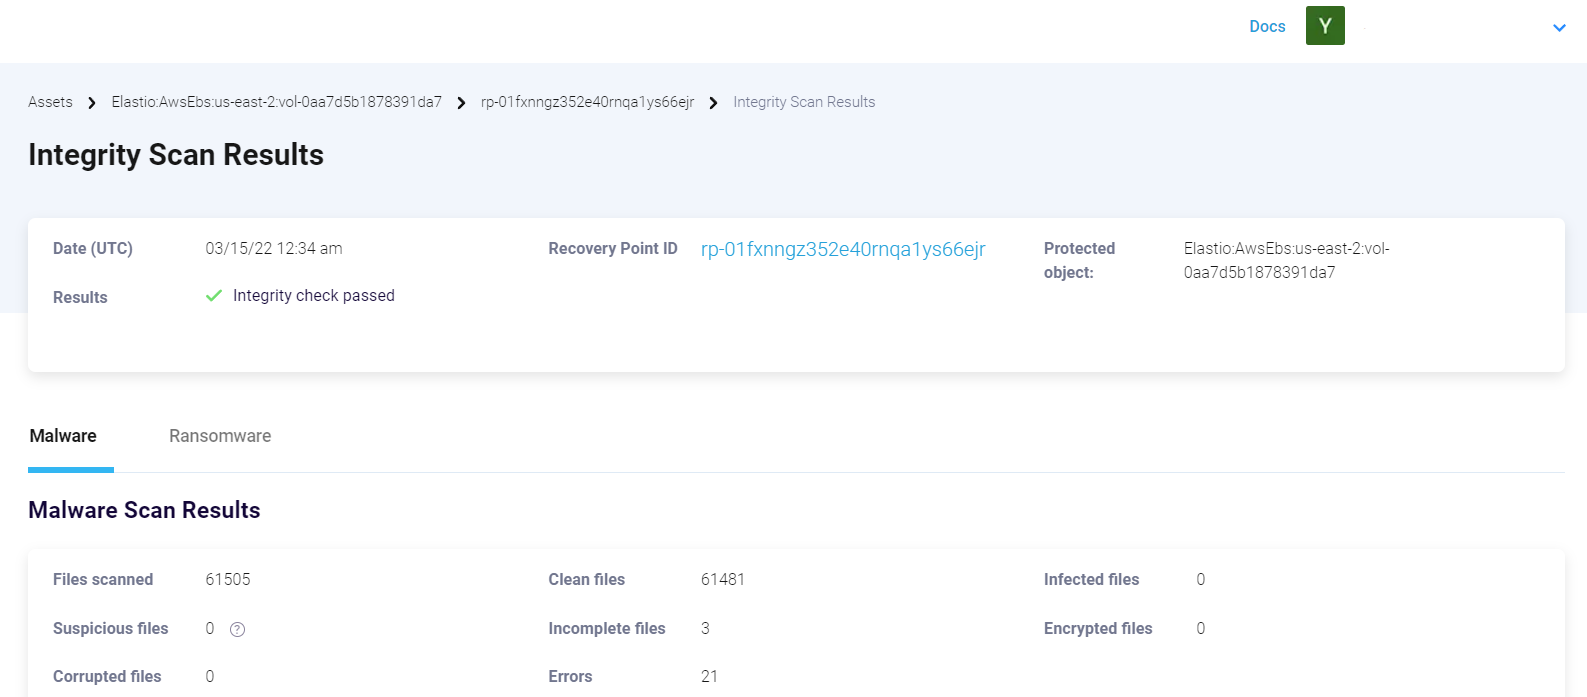
Figure 7: Scan Results