Troubleshooting
Table of Contents
- Default EBS encryption enabled with a customer-managed KMS key Elastio does not have permission to use
- VPC misconfigurations
- Adding URLs accessed by Elastio to the whitelist
- Enable VSS for an AWS EC2 instance
- Wrong AWS account or region
- Cloud Connector is not present in the selected region
- The assets are not displayed in the Elastio Tenant
- A default vault is missing
- Integrity scan fails
- Deploying the Elastio CFN in the wrong AWS account
- EC2 backup fails
- Block mount fails
In this section you can find the most frequent failure modes and how to work around them.
Default EBS encryption enabled with a customer-managed KMS key Elastio does not have permission to use
EBS volume backup fails if it is encrypted with a customer-managed KMS key that Elastio does not have access to. This also affects EC2 backups, as well as scans of EC2 instances, EBS volumes, and AWS Backup recovery points, in case they are encrypted in a similar way.
This manifests as the following error message in backup or scan jobs that you can see in your Tenant on Jobs page or in Elastio CLI:
"Ebs operation has failed: Failed to access volume. Most likely there is a problem with encrypted volume and permissions. Check permissions for KMS key: {KMS key ARN}"
Same issue would manifest differently in different job kinds, for instance an example of AWS EBS snapshot scan error:
"Mount of AWS EBS snapshots '{snapshot-id}' failed. Details: Failed to mount '{snapshot-id}' device due to error: Failed to decrypt volume. KMS Key: {KMS key ARN}"
It happens because Elastio’s background job task roles don’t have permission to use the KMS key used for the EBS encryption. It might occur if there is an encryption policy for all newly created EBS volumes or if a single volume was created with a KMS key that Elastio cannot access.
In case such errors are observed in your environment, you would receive an email with the list of affected assets and KMS keys that you will need to adjust. Alternatively, you can locate the KMS key ID on the Jobs / Cloud Connector page, accessible through the navigation bar in the top right corner of the Elastio Tenant page. Filter the jobs list to only display Failed jobs, then locate the one(s) with the errors like in the example(s) above and copy KMS key ID(s). Save them somewhere for the following steps.
To remediate the issue, go to AWS Console / KMS, locate the key in question. Add a tag elastio:authorize with the value true. The tag should be added to all affected keys.
Please note: In the cases where the KMS key is shared from another AWS account, the KMS key policy should be additionally modified to allow access from the account where Elastio is deployed. See example policy below:
{
    "Version": "2012-10-17",
    "Id": "key-default-1",
    "Statement": [
        {
            "Sid": "Enable IAM User Permissions",
            "Effect": "Allow",
            "Principal": {
                "AWS": [
                    "arn:aws:iam::KMS_KEY_ACCOUNT:root",
                    "arn:aws:iam::CLOUD_CONNECTOR_ACCOUNT:root",
                 ]
            },
            "Action": "kms:*",
            "Resource": "*"
        }
    ]
}
Replace the KMS_KEY_ACCOUNT with the AWS account ID where the KMS key is located. Replace the CLOUD_CONNECTOR_ACCOUNT with the AWS account ID of the AWS account where Elastio is deployed.
Once these steps are completed, this error should not occur anymore for the keys that were modified.
VPC misconfigurations
Deploying a vault in a private VPC without an Internet Gateway for all subnets in the VPC with “auto-assign public IPv4” address enabled results in the AWS Batch job for the backup getting stuck in Runnable state. An error message isn’t delivered.
Currently Elastio shows the VPC misconfiguration warning upon deployment if the compute environment of the background job has a subnet with public_ip_on_launch toggle disabled. If the subnet has public_ip_on_launch enabled, the VPC misconfiguration warning is not displayed. Additionally, Amazon ECS (and AWS Batch respectively) doesn’t work as expected if the public subnet doesn’t have IGW interface attached to the subnet and a routing rule for the IGW.
Note: The VPC misconfiguration warning displayed is The Cloud Connector will be deployed into a private subnet and will need manual configuration. Please see documentation for more details. One of our cloud team members will reach out with assistance. The warning can be safely ignored if the subnets you deploy the vault into have a NAT gateway with access to the Internet, in particular access to all AWS API endpoints.
To resolve the networking issues, create a private subnet with a NAT gateway. The instructions below will help you to do that:
- Create a public NAT in the public subnet.
- Go to the private subnet route table and route
0.0.0.0/0through the NAT. - The public subnet route table should have a route
0.0.0.0/0to IGW interface.
Note: The selected VPC should have a subnet with “auto-assign public IPv4” address enabled, as well as a subnet in every Availability Zone within the region. If you plan to use Elastio only within the VPC, deploy the vault entirely in private subnets with NAT gateways. In this case the vault will only be accessed from within the private subnet. Mount backups from your workstations will become possible only after setting up a VPN tunnel into the VPC with a network path from the VPN tunnel to the private subnets, where the vault is running.
Adding URLs accessed by Elastio to the whitelist
If the VPC in the AWS organization is configured in a way that requires whitelisting addresses accessed from within the environment, the following URLs need to be whitelisted:
To allow Elastio communicate to AWS APIs and pull Elastio container images:
| URL | Port(s) |
|---|---|
| *.amazonaws.com | 443 |
| public.ecr.aws | 443 |
| *.cloudfront.net | 80 and 443 |
To grant access to the ransomware database Elastio uses for iScan:
| URL | Port(s) |
|---|---|
| iscan.elastio.com | 80 and 443 |
To enable connection to malware definitions used by iScan:
| URL | Port(s) |
|---|---|
| ocsp.digicert.com | 80 |
| oemeval001-94027265-32ef-489b-ae6c-27b60ba758fd.2d7dd.cdn.bitdefender.net | 80 and 443 |
| elastio-df5cb85e-a1f5-44a4-8e15-4566fdfbf679.2d7dd.cdn.bitdefender.net | 80 and 443 |
In order to check if the whitelist took effect, you can run the following script:
#!/usr/bin/env bash

set -euxo pipefail

# AWS endpoints
curl -IL https://iam.amazonaws.com
curl -IL https://sts.us-east-1.amazonaws.com
curl -IL https://s3.us-east-1.amazonaws.com
curl -IL https://lambda.us-east-1.amazonaws.com
curl -IL https://batch.us-east-1.amazonaws.com
curl -IL https://ecs.us-east-1.amazonaws.com
curl -IL https://ssm.us-east-1.amazonaws.com
curl -IL https://kms.us-east-2.amazonaws.com
curl -IL https://events.us-east-1.amazonaws.com
curl -IL https://sqs.us-east-1.amazonaws.com
curl -IL https://logs.us-east-1.amazonaws.com

# AWS ECR
curl -IL http://public.ecr.aws
curl -IL https://public.ecr.aws

# Elastio CLI repo
curl -IL https://d3579xtt6v2nmt.cloudfront.net

# Iscan malware and ransomware definitions
curl -IL https://iscan.elastio.com
curl -IL http://iscan.elastio.com
curl -IL http://oemeval001-94027265-32ef-489b-ae6c-27b60ba758fd.2d7dd.cdn.bitdefender.net
curl -IL https://oemeval001-94027265-32ef-489b-ae6c-27b60ba758fd.2d7dd.cdn.bitdefender.net
curl -IL http://ocsp.digicert.com
curl -IL https://elastio-df5cb85e-a1f5-44a4-8e15-4566fdfbf679.2d7dd.cdn.bitdefender.net
curl -IL http://elastio-df5cb85e-a1f5-44a4-8e15-4566fdfbf679.2d7dd.cdn.bitdefender.net
Enable VSS for an AWS EC2 instance
Without the VSS being enabled for the Windows instances, only crash-consistent backups can be created. This kind of backup can create snapshots with inconsistent data on the systems under heavy load, so the data cannot be properly scanned for threats or restored from such recovery points. To avoid such risks it is recommended to enable the VSS in AWS. This instruction will walk you through the necessary steps to configure VSS and enable it on the instances you need it on.
In case, the instance is run with an IAM role attached to it, the role should be expended to include the AWS managed VSS policy - AWSEC2VssSnapshotPolicy:
- Navigate to the IAM / Roles section of your AWS Console.
- Search for the role attached to the instance in question.
- Click on the Role Name.
- In the Permissions / Policies section, press the “Add Permissions” drop-down and click on the “Attach policies” option.
- On the page that opens, search for the policy with the name
AWSEC2VssSnapshotPolicy. - Check the checkbox next to the
AWSEC2VssSnapshotPolicypolicy. - Click the “Add Permissions” button.
If the instance lacking VSS does not have a role attached to it, an IAM role will have to be created and attached to the instance for the VSS to work:
- In the navigation pane, select Iam / Roles, and then - “Create role”.
- Under Select type of trusted entity, select AWS Service.
- Select EC2, and then “Next: Permissions”.
- In the list of policies, check the boxes next to
AmazonSSMManagedInstanceCoreandAWSEC2VssSnapshotPolicypolicies, then press “Next: Tags”. - For Role name, enter the name
VssSnapshotRole. Role name is arbitrary, you can choose your own. - Press “Create role”. The system returns you to the Roles page.
- Navigate to EC2 / Instances in your AWS Console.
- Find the instance in question, click on it’s instance ID.
- On the page that opens, in the top right corner locate the “Actions” drop-down.
- In the “Actions” drop-down, select “Security” and then - “Modify IAM role”.
- Select the role you have created with the VSS permissions and click the “Update IAM role button”.
Then you’ll need to install the VSS components to the Windows EC2 instances:
- Open the AWS Systems Manager console.
- In the navigation pane, select Run Command.
- For Command document, choose
AWS-ConfigureAWSPackage. - For Command parameters, do the following:
- Verify that Action is set to Install.
- For Name, enter
AwsVssComponents. - For Version, leave the field empty so that Systems Manager installs the latest version.
- For Targets, identify the instances on which you want to run this operation selecting instances manually.
- Press Run.
The VSS should become enabled for the instances that you attach the newly created role to.
Elastio CloudFormation stack was unintentionally removed, how can the deployment be fixed?
In the cases where Elastio CloudFormation stack was unintentionally removed, Elastio deployment can be restored without the loss of the previously backed up data.
To do this, you need to go to Your Elastio tenant’s Sources page. Click the “Link Source” button and proceed to deploy the CloudFormation stack as you would for a new install. Do not deploy any Cloud Connectors!
Instead, go to your AWS Console, in the newly created Elastio CloudFormation stack go to Outputs, and locate the terraformStateBucket output, copy the bucket name from it. You will need this bucket name to transfer old Terraform state to. The bucket name would begin with “elastio-account-level-stack-tfstate…” followed by a random suffix.
Go to the AWS S3, and search for the bucket with this name. Additionally you will also need to locate the bucket with a similar name (also starting with “elastio-account-level-stack-tfstate…” but followed by a different random suffix). Copy the object from the old Terraform state bucket to the new one. See this page on how to copy objects between AWS S3 buckets.
When the objects are copied, go back to your Elastio tenant’s Sources page. Press the three-dot menu to the right of the AWS account that you have been reconnecting, select “Repair - {ACCOUNT + REGION}” from the drop-down menu. The selected account region combination should correspond the account and region previous steps took place in. More detailed instructions on how to run repair can be found here.
Once the repair job is complete, you are good to continue using Elastio as if nothing happened.
Wrong AWS account or region
The following error message is displayed when trying to mount a recovery point with a command from the Elastio Tenant in the incorrectly configured CLI that reaches out to the wrong AWS account or region:
ubuntu@ip-172-31-22-46:~$ sudo -E elastio mount rp --rp rp-01g4zdj9c8ay1kx08y39dyq426
Recovery point was not found in vault `{any}` for ID `rp-01g4zdj9c8ay1kx08y39dyq426`
Location:
/home/elastio/.cargo/registry/docs/dl.cloudsmith.io-2dc4edbccd98c64c/cheburashka-4.3.2/docs/logging/mod.rs:592:18
To resolve the issue, run aws sts get-caller-identity to ensure that the account number is the same as the RP’s account number. If those match, run aws configure and check that the region of the CLI matches the region of the recovery point.
Cloud Connector is not present in the selected region
The following error message is displayed when attempting to perform EBS or EC2 backup if the AWS CLI is configured for another region or AWS account:
user@ThinkPad-T15-Gen-1:~$ elastio ec2 backup --instance-id i-0ea486582654d7562
Failed to fetch data for a default vault

Caused by:
   0: Catalog service error
   1: Failed to invoke remote function elastio-catalog-service-read
   2: Function not found: arn:aws:lambda:us-east-1:421555810956:function:elastio-catalog-service-read
   3: Function not found: arn:aws:lambda:us-east-1:421555810956:function:elastio-catalog-service-read

Location:
    /home/elastio/.cargo/registry/docs/dl.cloudsmith.io-2dc4edbccd98c64c/cheburashka-4.2.12/docs/logging/mod.rs:588:18
user@user-ThinkPad-T15-Gen-1:~$
The following error message is displayed when attempting to perform file, block or stream backup in a region that does not have a Cloud Connector installed:
user@user-ThinkPad-T15-Gen-1:~$ elastio file backup ./123.pub
Failed to invoke remote function elastio-jobs-status-service

Caused by:
   0: Function not found: arn:aws:lambda:us-east-1:421555810956:function:elastio-jobs-status-service
   1: Function not found: arn:aws:lambda:us-east-1:421555810956:function:elastio-jobs-status-service

Location:
    /home/elastio/.cargo/registry/docs/dl.cloudsmith.io-2dc4edbccd98c64c/cheburashka-4.2.12/docs/logging/mod.rs:588:18
Run elastio version to ensure that Cloud Connector is deployed in the current region. Run aws sts get-caller-identity to check if the account configured for the AWS CLI is correct. If the region is wrong, change it by running aws configure. In case the wrong account is reached, reconfigure the AWS CLI with the correct keys or profile.
The assets are not displayed in the Elastio Tenant
After logging into an Elastio Tenant and connecting an AWS account, no assets are displayed on the Assets page of the Tenant.
Make sure that there are some EC2 and/or EBS assets in the dedicated account and region - if there are none in the AWS account none will be displayed through Elastio.
A default vault is missing
When attempting to run a backup or a restore through the Elastio CLI, the following error is displayed:
Failed to find default vault. Specify '--vault' option or set the default vault and run again

Location:
    /home/elastio/.cargo/registry/docs/dl.cloudsmith.io-2dc4edbccd98c64c/cheburashka-4.4.0/docs/logging/mod.rs:593:18
Check if the default vault is set by running elastio vault default. If the output is empty, run elastio vault list pick a vault and run elastio vault default vault-name to set some vault as default. Alternatively, you can navigate to this account through Sources page in Elastio Tenant, select a vault and set it as default. In case the vault list comes back empty, create a vault through Sources page in your Tenant.
Note: For the time being, please limit the number of vaults to maximum 4 per region.
Note: You can skip using the --vault flag when you set your default vault. It is no longer necessary to add the vault name every time you run a command that requires the vault. The system will use the default vault if none is specified.
Integrity scan fails
The following error message is displayed when attempting to run iscan against the recovery point that cannot be mounted as the target EBS volume does not have a filesystem.

Figure 1.2: Integrity Scan error message
This error is most likely with new EBS volumes created through AWS Console manually that were not formatted. To resolve the issue, attach said EBS volume to an instance and create a filesystem on it.
Deploying the Elastio CFN in the wrong AWS account
When deploying the Elastio CFN in the wrong AWS account, the following error message appears.
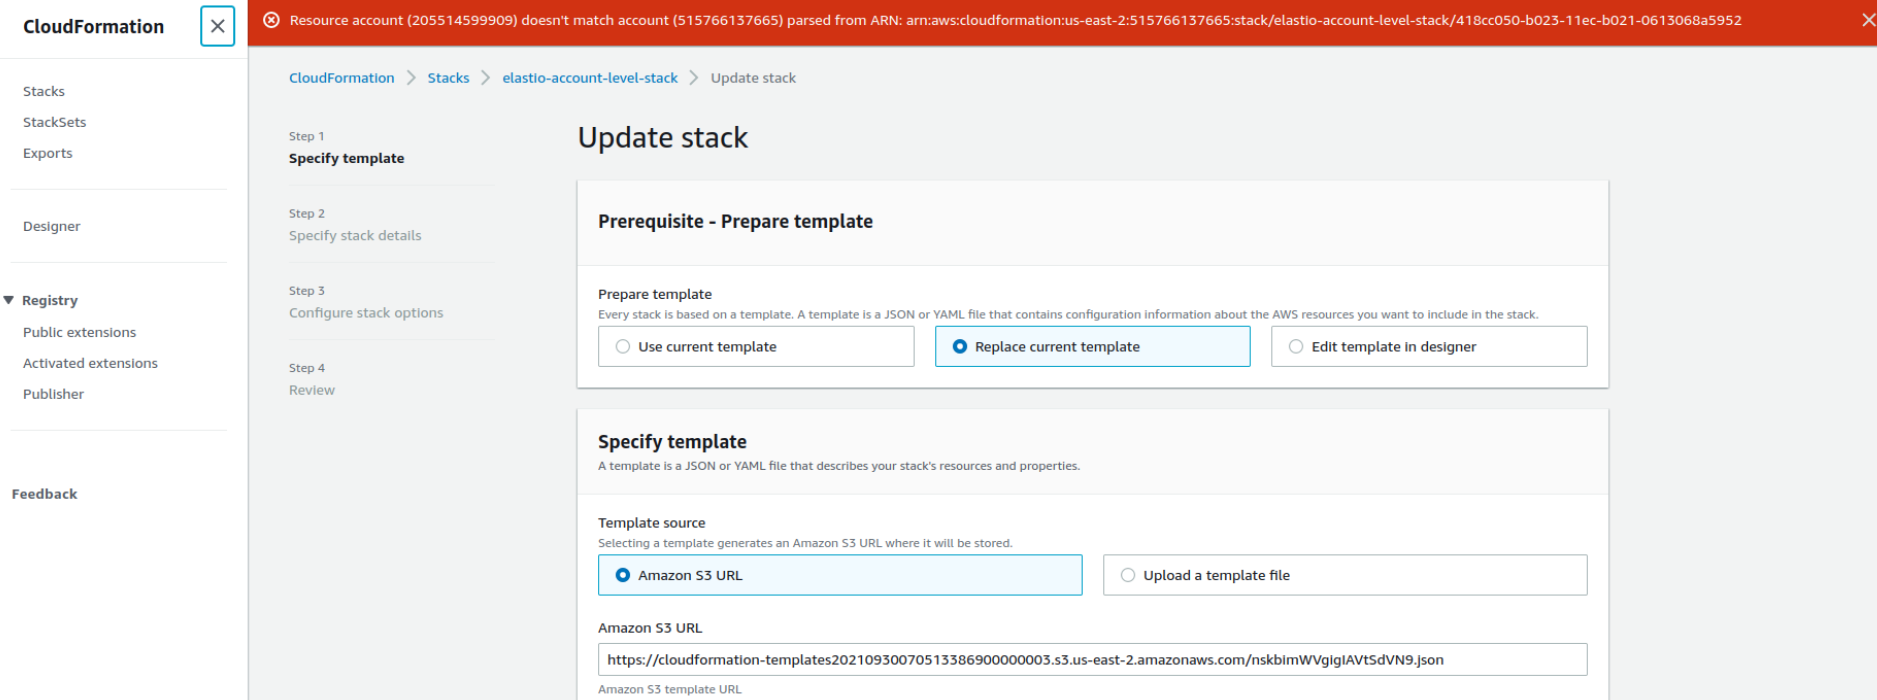
Figure 1.3: The Elastio CFN deploy error message
To resolve the issue, switch to the required resource account on the AWS Management Console.
EC2 backup fails
The following error message is displayed when attempting to perform AWS EC2 backup.

Figure 1.4: AWS EC2 backup error message
The same error in the logs is displayed as follows:
{
    "timestamp": "2022-05-28T07:03:05.344Z",
    "level": "ERROR",
    "fields": {
        "error": [
            "Failed to get volume state, reason Unknown(BufferedHttpResponse {status: 400, body: \"<?xml version=\\\"1.0\\\" encoding=\\\"UTF-8\\\"?>\\n<Response><Errors><Error><Code>InvalidVolume.NotFound</Code><Message>The volume 'vol-05e873f1a99eec441' does not exist.</Message></Error></Errors><RequestID>fe978390-f1f7-4d39-9e0f-b71579561d06</RequestID></Response>\", headers: {\"x-amzn-requestid\": \"fe978390-f1f7-4d39-9e0f-b71579561d06\", \"cache-control\": \"no-cache, no-store\", \"strict-transport-security\": \"max-age=31536000; includeSubDomains\", \"vary\": \"accept-encoding\", \"content-type\": \"text/xml;charset=UTF-8\", \"transfer-encoding\": \"chunked\", \"date\": \"Sat, 28 May 2022 07:03:05 GMT\", \"connection\": \"close\", \"server\": \"AmazonEC2\"} })"
        ],
        "message": "VolumeAwsImpl::state() failed"
    },
    "target": "elastio_agentless::aws::volume",
    "filename": "cli/elastio-agentless/docs/aws/volume.rs",
    "line_number": 415,
    "spans": [
        {
            "availability_zone": "us-east-1c",
            "instance_type": "",
            "op_type": "create_volume_from_snapshot",
            "platform": "aws",
            "volume_iops": 100,
            "volume_size": 0,
            "volume_type": "gp3",
            "name": "AgentlessLabels"
        }
    ],
    "threadId": "ThreadId(6)"
}
The AWS EC2 has a volume encrypted with a key, which Elastio does not have access to. The issue is going to be fixed in the upcoming release.
Block mount fails
When attempting to perform block mount on the supported Linux-based OS without the NBD kernel module installed, the following error message is displayed.
[user@linux ~]$ sudo -E elastio mount rp --rp rp-01g8e24sp9twa14brpan41bq5f

Unknown: Failed to load `nbd` module. Ensure your Linux kernel is compiled with NBD support.

Caused by:

command ["modprobe", "nbd"] exited with code 1

Location:

/home/elastio/.cargo/registry/docs/dl.cloudsmith.io-2dc4edbccd98c64c/cheburashka-4.4.0/docs/logging/mod.rs:593:18
To resolve the issue, make sure that the nbd-client package is installed. Furthermore, make sure that the elastio mount command is executed as root or with sudo.