Policies
Table of Contents
- Protection Policies
- Create a Protection Policy
- EC2/ EBS
- S3
- EFS
- Pause/Resume a Protection Policy
- Edit a Protection Policy
- Execute a Protection Policy
- Delete a Protection Policy
- Retention Policies
Protection Policies
Elastio provides two policy types: Protection Policies to secure assets through backups and cyber threat scans, and Retention Policies for managing recovery point duration and granularity, ensuring alignment with business retention and data compliance requirements.
The Policies page is accessible either through the menu of Elastio Tenant on the top-right corner or through the Onboarding page.
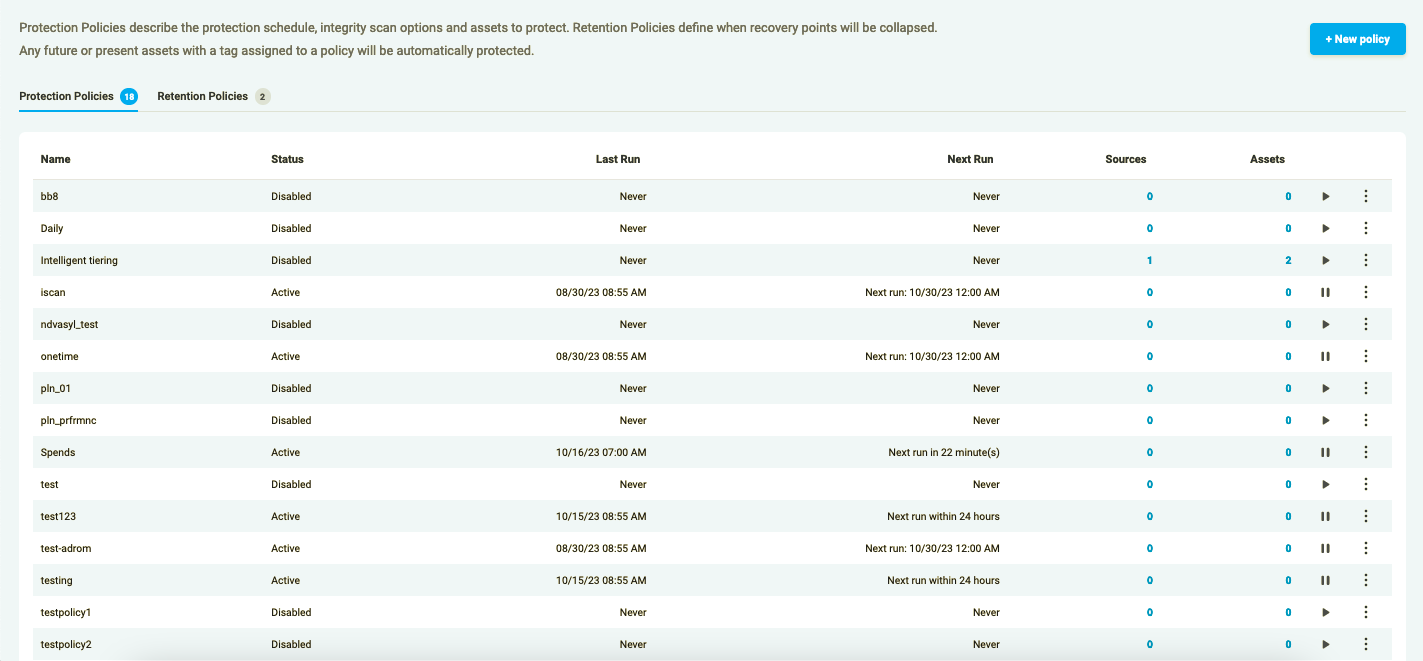
Figure 1.0: Policies Page layout
A Protection Policy is a way of scheduling Elastio backups for certain assets in your AWS account enabled with Elastio.
Protection Policies are flexible policies in which you can define schedule for your backups and select Integrity Scan to be run against the recovery point(s) after the completion of the backups. They are created either for specific Assets or for Assets with associated tags. For now it is possible to create a policy for AWS EC2 and AWS EBS.
Policies can be reused and applied to different assets by their IDs or associated tags.
A protection policy can be paused, resumed, edited, executed and deleted from this page. To modify your Policy, press the 3 dots button on the right of the Policies table row.
Create a Protection Policy
EC2/ EBS
To add a new policy to your account, please follow the steps below:
- Press the “+New Policy” button.
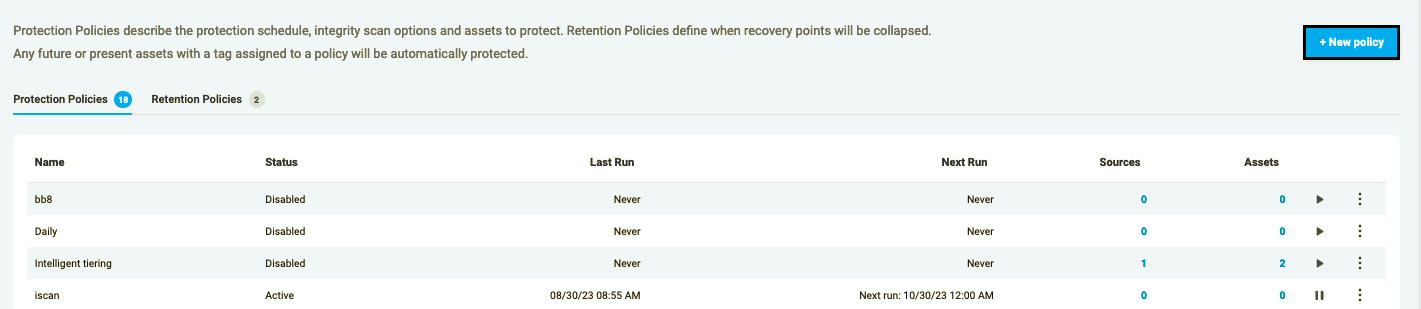
Figure 1.1: Add Policy
- Add a name to your policy and define the schedule for it.
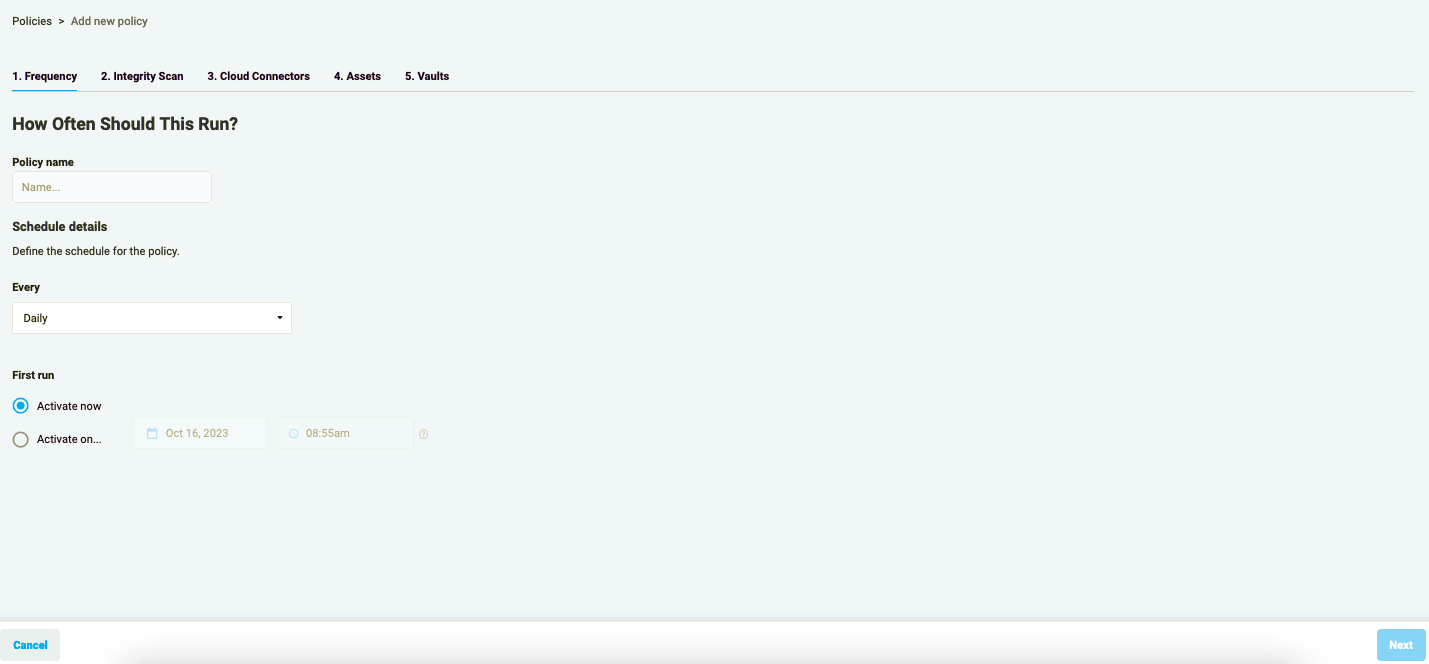
Figure 1.2: Add Policy schedule
Elastio Policy may run every 15 minutes, 30 minutes, every hour, and 12 hours, as well as daily, weekly, and monthly. It can be started immediately or at a set time.
Please note: if you have selected the “Run now” option, you should be aware that the first backup/scan job will run at its earliest availability, initiated at the nearest 15-minute interval. So, a Policy created at HH:25 with the “Run now” option will run at HH:30 and subsequently according to the schedule.
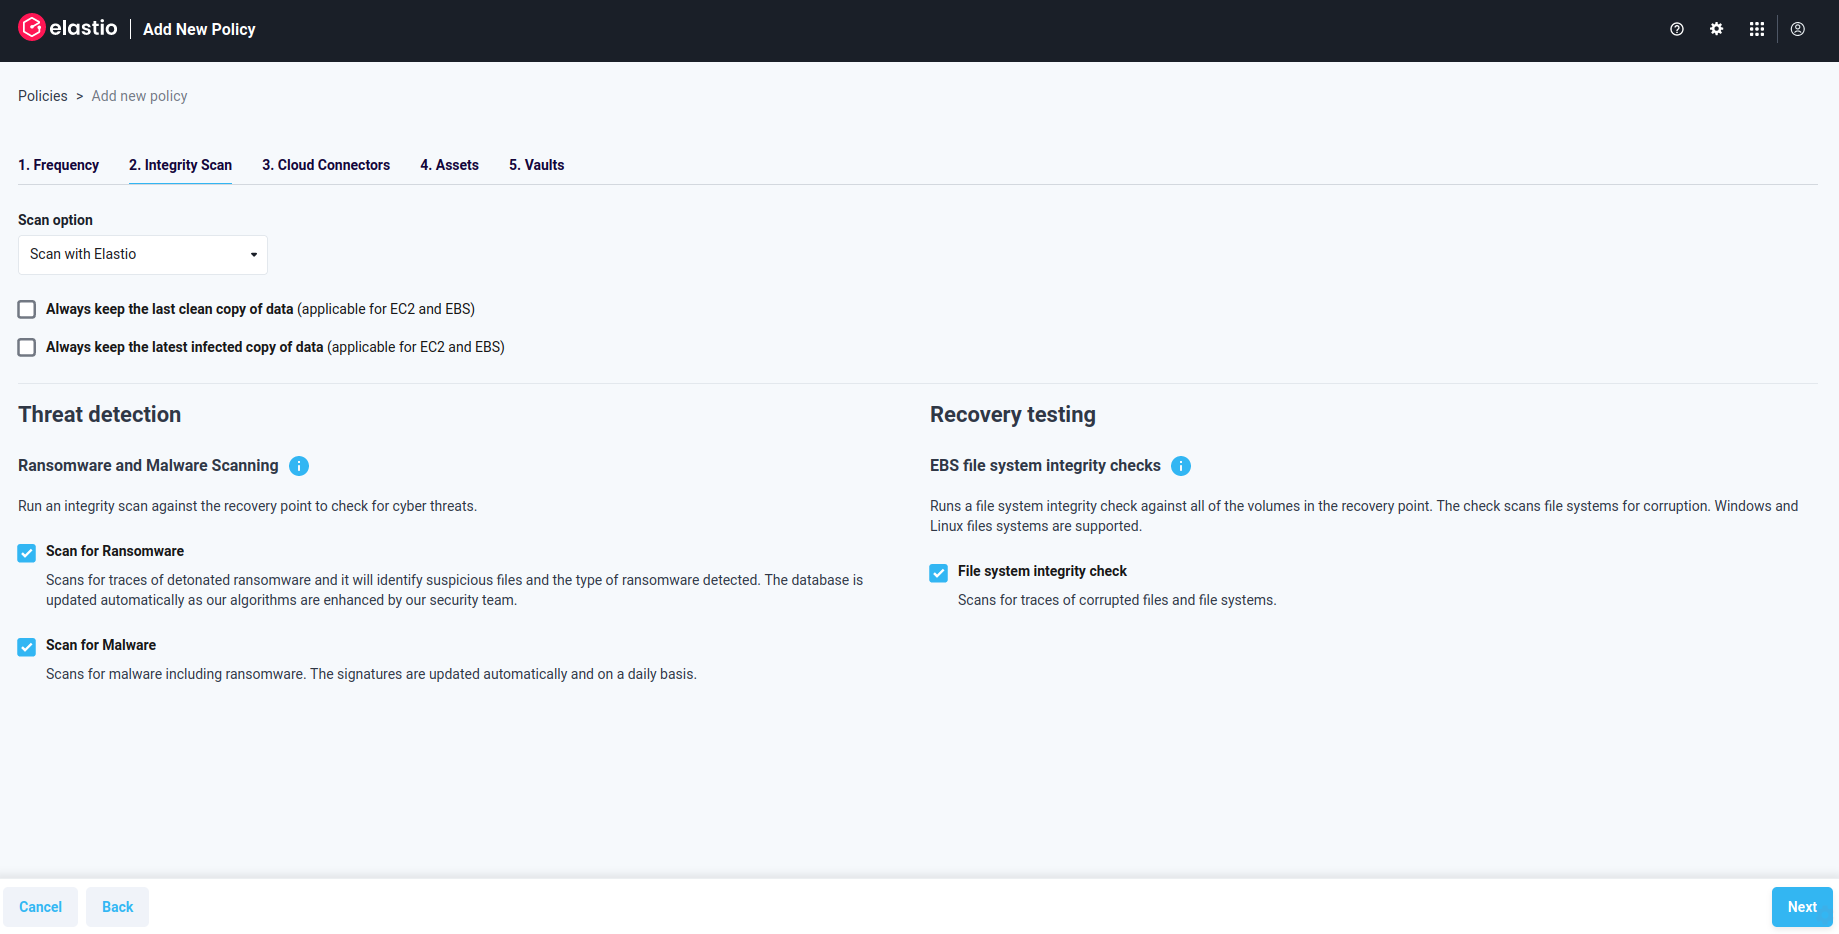
Figure 1.3.1: Add New Policy - Protection Options
- In Step 2 - Protection Options - Scan option drop-down allows you to determine the way the scans will run. Available options are: Live Scan, Scan and backup with Elastio, Backup with Elastio.
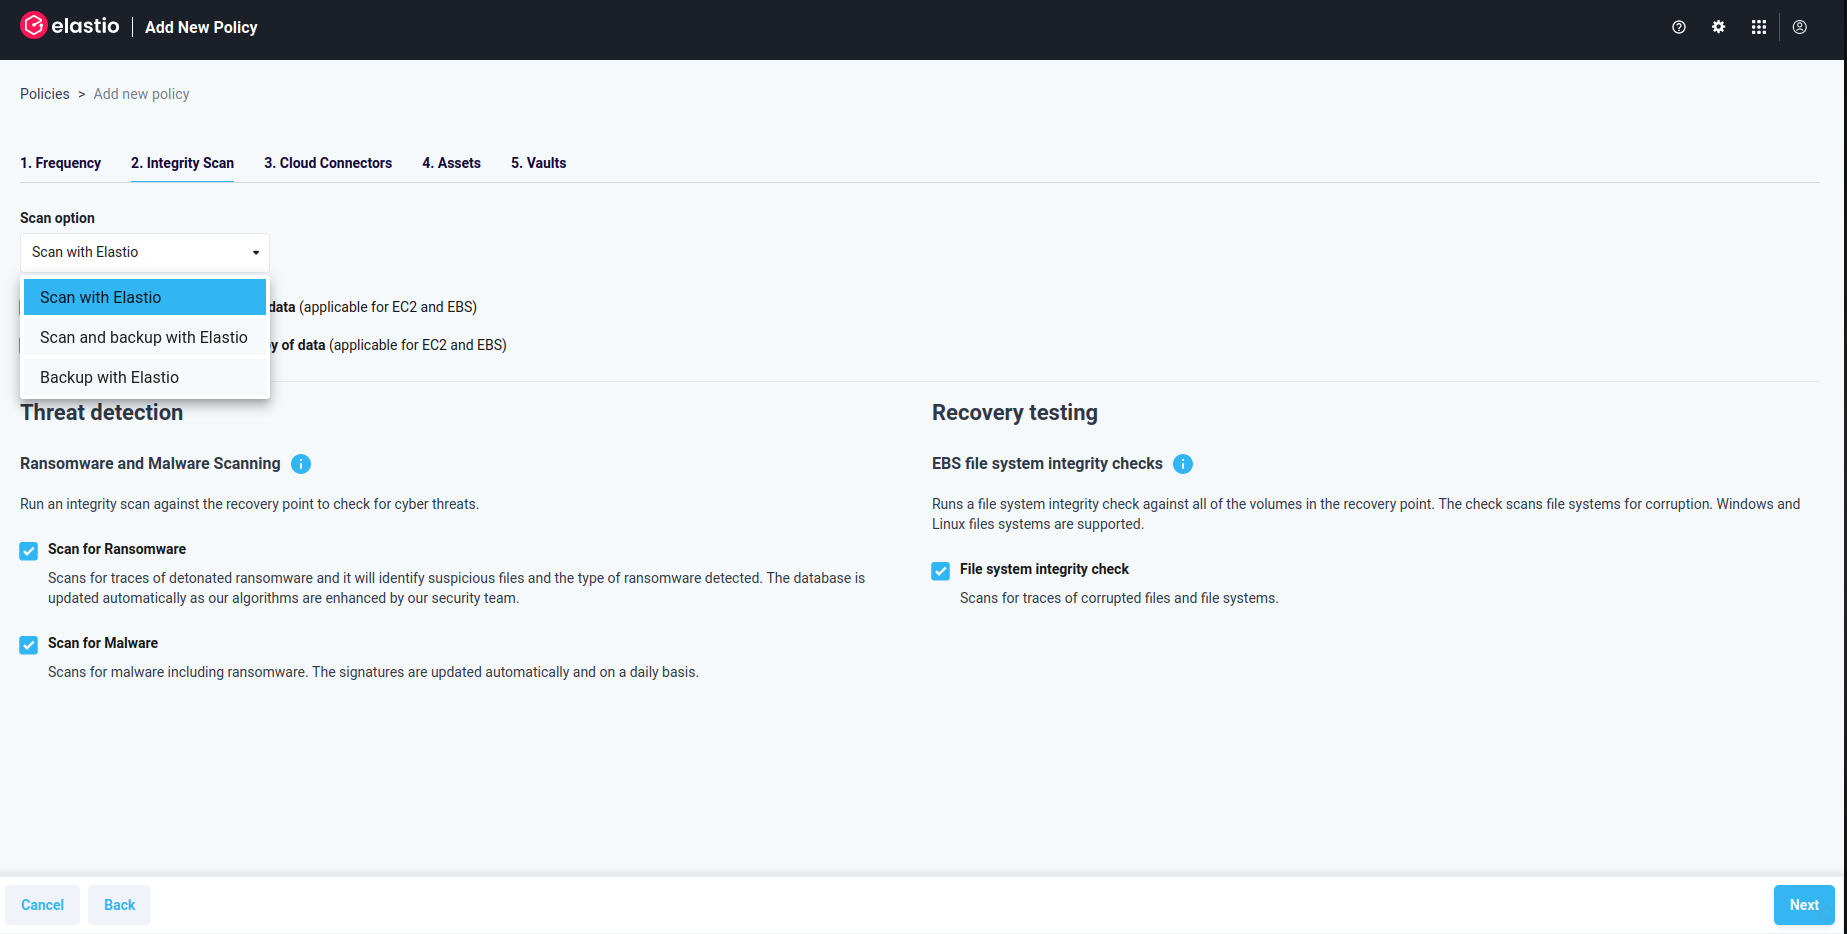
Figure 1.3.2: Add New Policy - Scan options
If you prefer scanning your assets without creating recovery points in Elastio, choose “Live Scan”.
Threat detection allows you to perform Ransomware detection or Malware scans on the assets or recovery points. You have the flexibility to choose either option or both.
Recoverability Check, when enabled, checks the file system of all EBS volumes included in the recovery point for corruption.
High Entropy Anomaly Detection that only works combined with Ransomware Detection, detects file encryption changes over time and alerts when a large percentage of files in a directory are encrypted. This option detects non-ransomware encryption that could be deliberate or malicious.
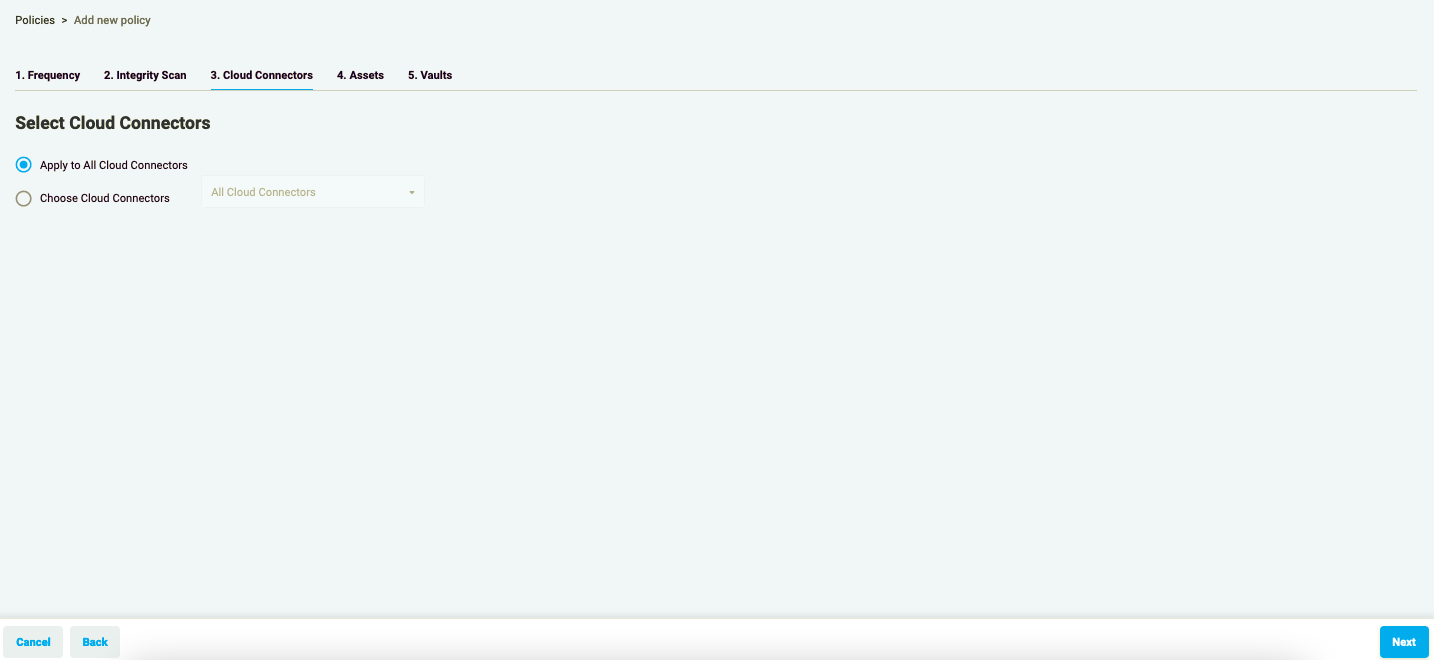
Figure 1.4: Add New Policy - Cloud Connectors
- In Step 3, choose the specific Cloud Connectors where the Policy will operate. By selecting specific Cloud Connectors, the policy’s scope is confined, ensuring it does not impact any other accounts or regions.
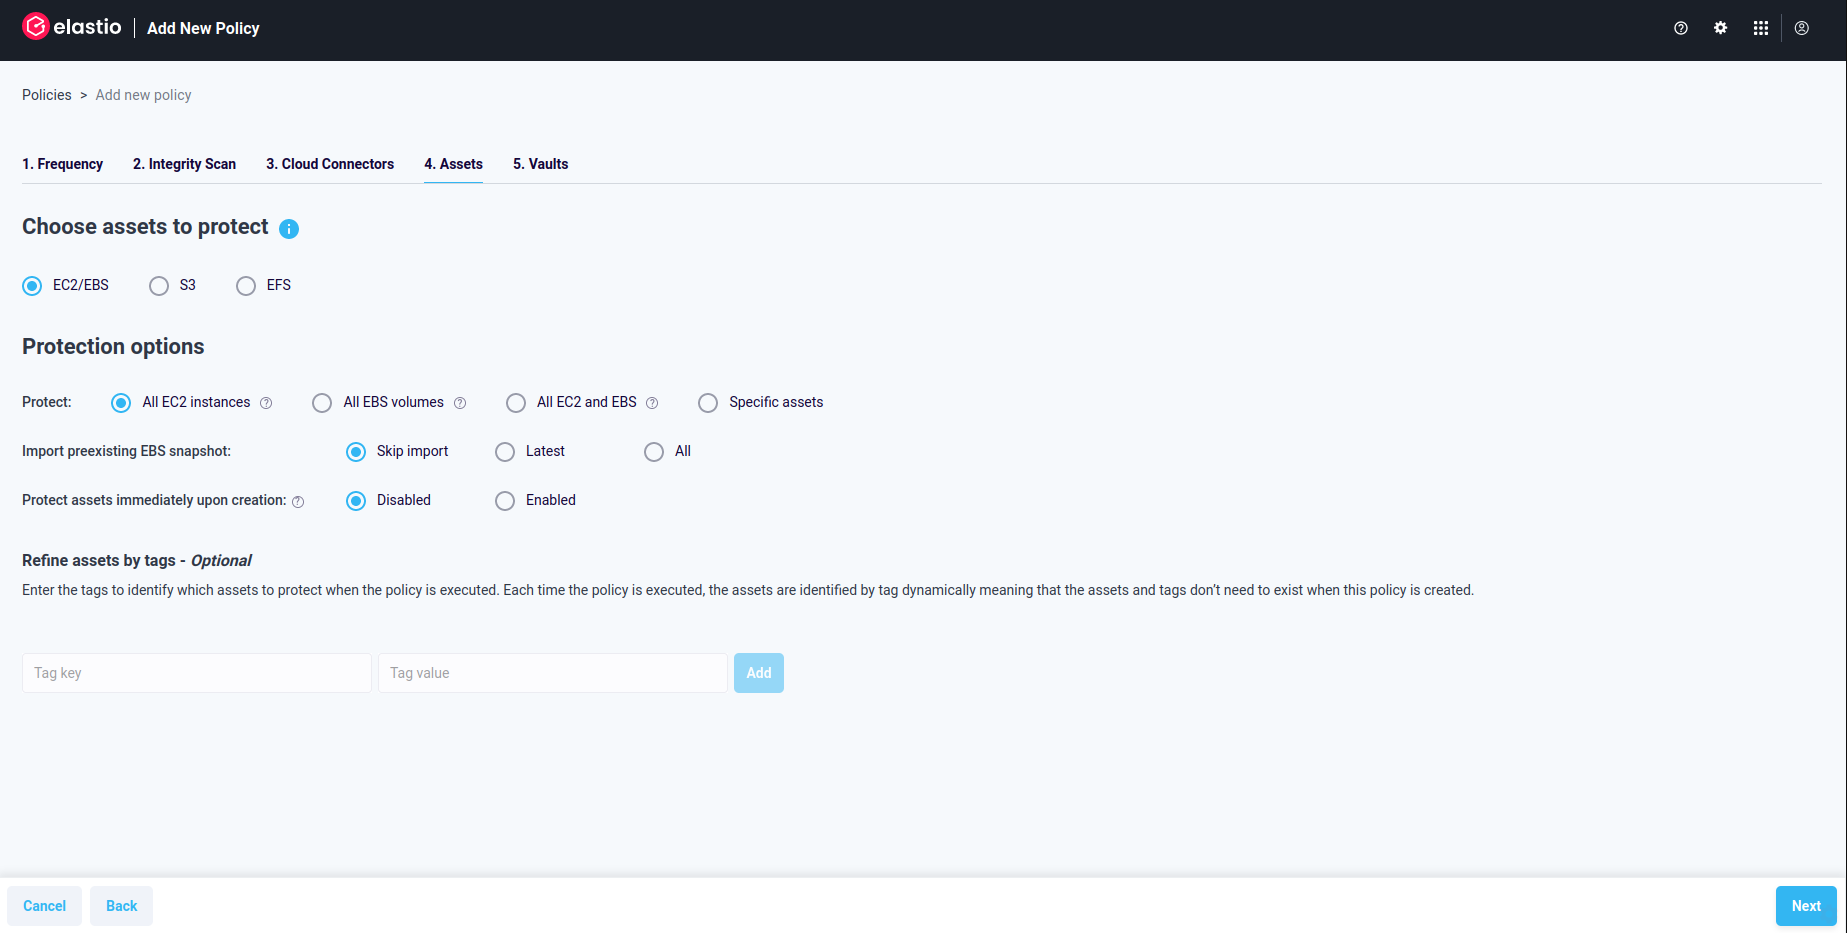
Figure 1.5: EC2/EBS Policy - policy options
- In step 4, identify the assets you wish to secure. You have three primary options for a protection policy: EC2/EBS, S3, and EFS. To safeguard various types of assets, we recommend creating multiple Elastio Protection Policies.
When choosing the EC2/EBS option, you’ll find convenient quick-select choices such as: Protect all EC2 instances, Protect all EBS volumes, and Protect all EC2 and EBS. Selecting any of these ensures that all assets of the chosen type within the AWS accounts linked to your Tenant are protected. You can further refine these selections using tags. This means only the assets of the selected type with the specified tags will be scanned or backed up. Importantly, each time the policy runs, it dynamically identifies assets by their tags. This dynamic process means the assets and tags don’t need to exist at the time of policy creation. Thanks to Elastio’s inventory service, new assets are automatically discovered and incorporated into the policies without manual intervention.
The Import AWS snapshots selector is another feature that allows you to import existing AWS snapshots as Elastio recovery points, enhancing your protection by maintaining a long trail of threat intelligence.
The Protect immediately option ensures that any new assets matching the policy criteria are automatically included in the protection policy, maintaining continuous security in your environment.
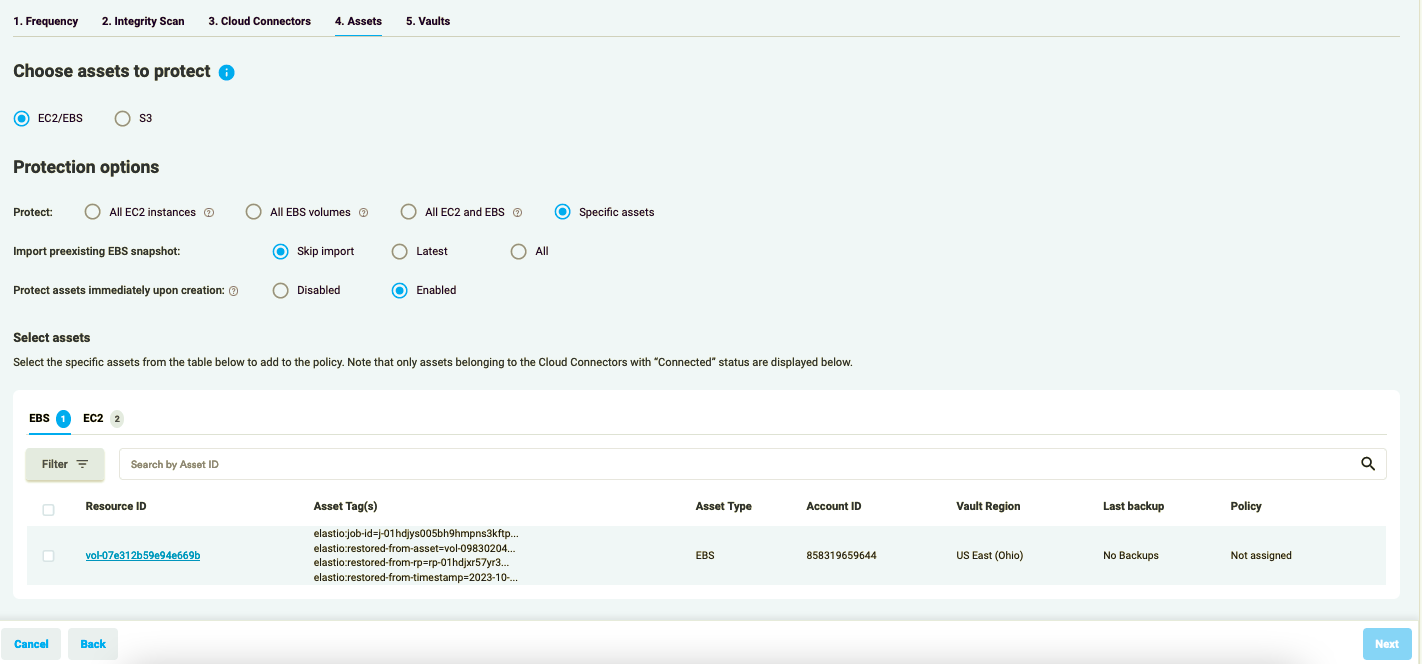
Figure 1.6: EC2/EBS Policy - Specific Assets
You can select Specific Assets from the table below and add them to the Policy.
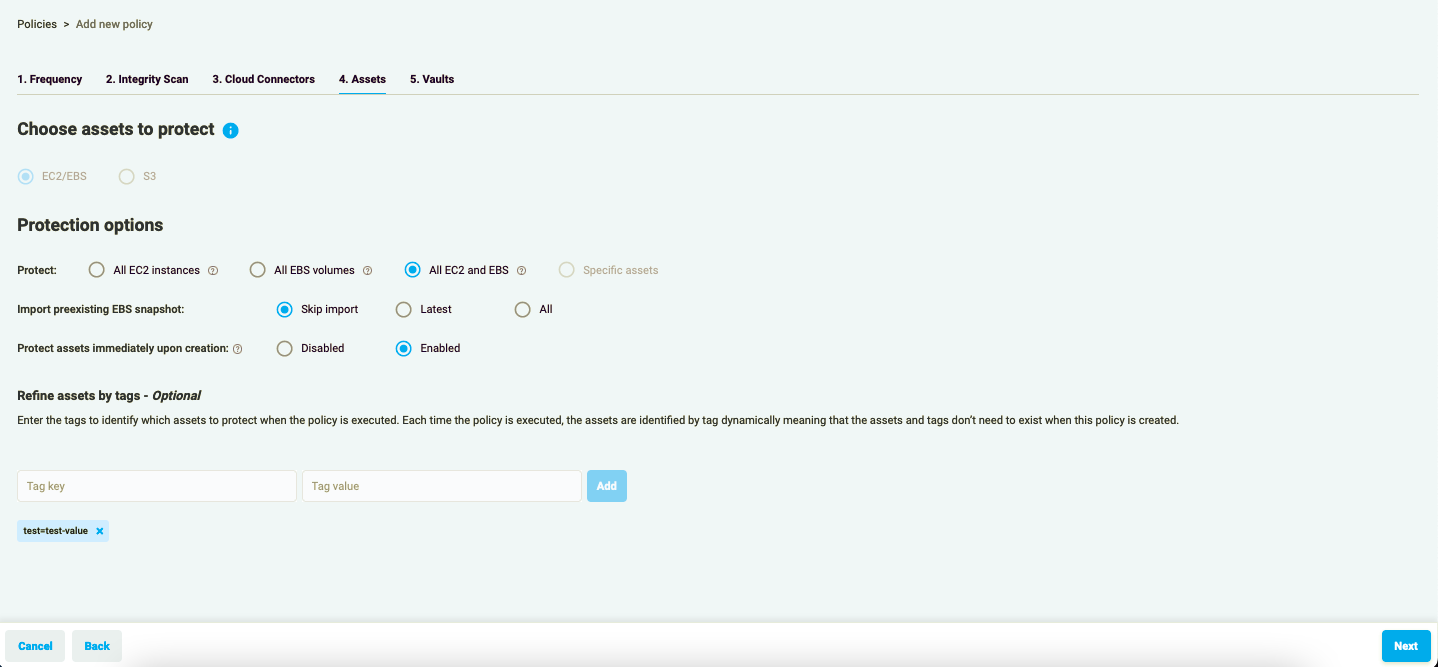
Figure 1.7: EC2/EBS Policy - Assets by tags
You can also select Assets by tags. Enter the tag to identify which assets to protect when the Policy is executed.
Please note: an asset must have a tag to be backed up with a Policy. Each time the Policy is executed, the assets are identified by tag dynamically meaning that the assets and tags don’t need to exist when this Policy is created.
- Step 5 - Vaults - provides you an option to select a vault for every Cloud Connector selected on Step 3. If there is no need to separate the recovery points, leave the selections at the default values.
Press “Save & Run” to complete Protection Policy creation.
Please note: asset count in the Policies table on Policies page will be 0 until the first run of the Policy. Once it runs, the assets count will be updated with the appropriate number.
S3
To add a new policy to your account, please follow the steps below:
- Press the “+New Policy” button.
Figure 2.1: Add Policy
- Add a name to your policy and define the schedule for it.
Figure 2.2: Add Policy schedule
Elastio Policy may run every 15 minutes, 30 minutes, every hour, and 12 hours, as well as daily, weekly, and monthly. It can be started immediately or at a set time.
Please note: if you have selected the “Run now” option, you should be aware that the first backup/scan job will run at its earliest availability, initiated at the nearest 15-minute interval. So, a Policy created at HH:25 with the “Run now” option will run at HH:30 and subsequently according to the schedule.
Figure 2.3.1: Add New Policy - Integrity Scan
- In Step 2 - Integrity Scan - Scan option drop-down allows you to determine the way the scans will run. Available options are: Live Scan, Scan and backup with Elastio, Backup with Elastio.
Figure 2.3.2: Add New Policy - Scan options
If you prefer scanning your assets without creating recovery points in Elastio, choose “Live Scan”.
Threat detection allows you to perform Ransomware detection or Malware scans on the assets or recovery points. You have the flexibility to choose either option or both.
Recovery testing, when enabled, checks the file system of all EBS volumes included in the recovery point for corruption.
Figure 2.4: Add New Policy - Cloud Connectors
- In Step 3, choose the specific Cloud Connectors where the Policy will operate. By selecting specific Cloud Connectors, the policy’s scope is confined, ensuring it does not impact any other accounts or regions.
In order to protect S3 assets, select the respective high - level value. A list of all available S3 buckets will appear.
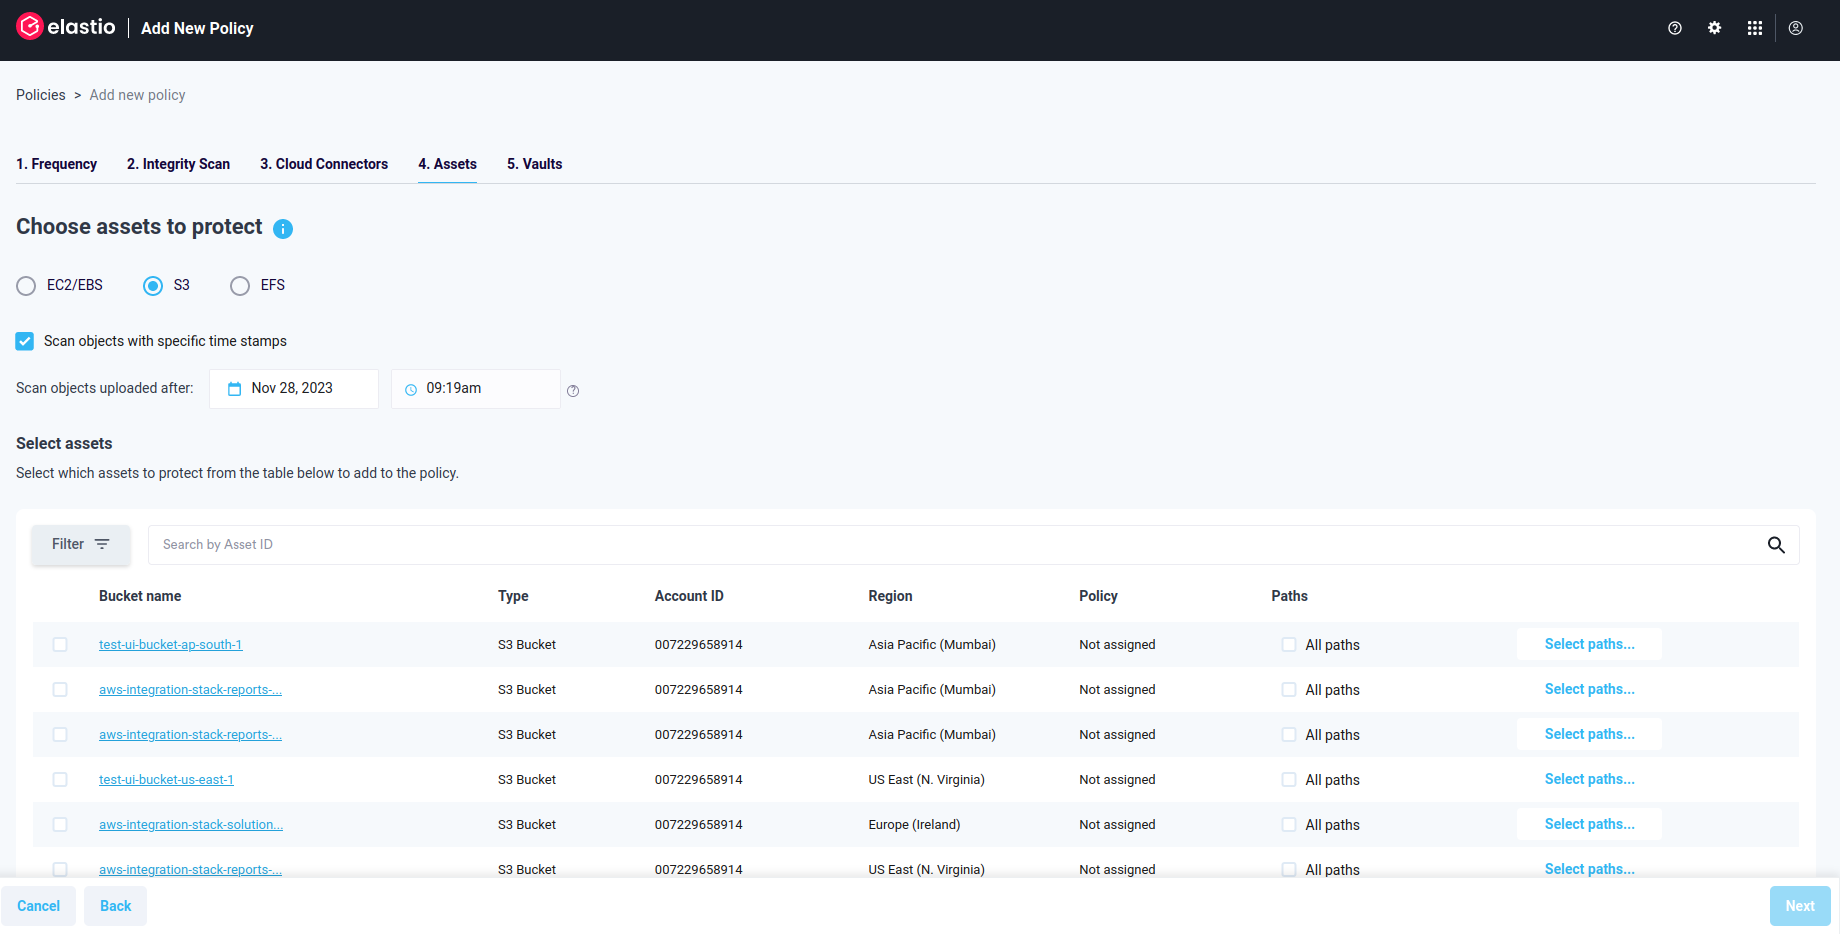
Figure 2.5: S3 Protection Policy
Please note: If the Cloud Connector version is lower than 0.26.0, S3 Protection Policy option is not available.
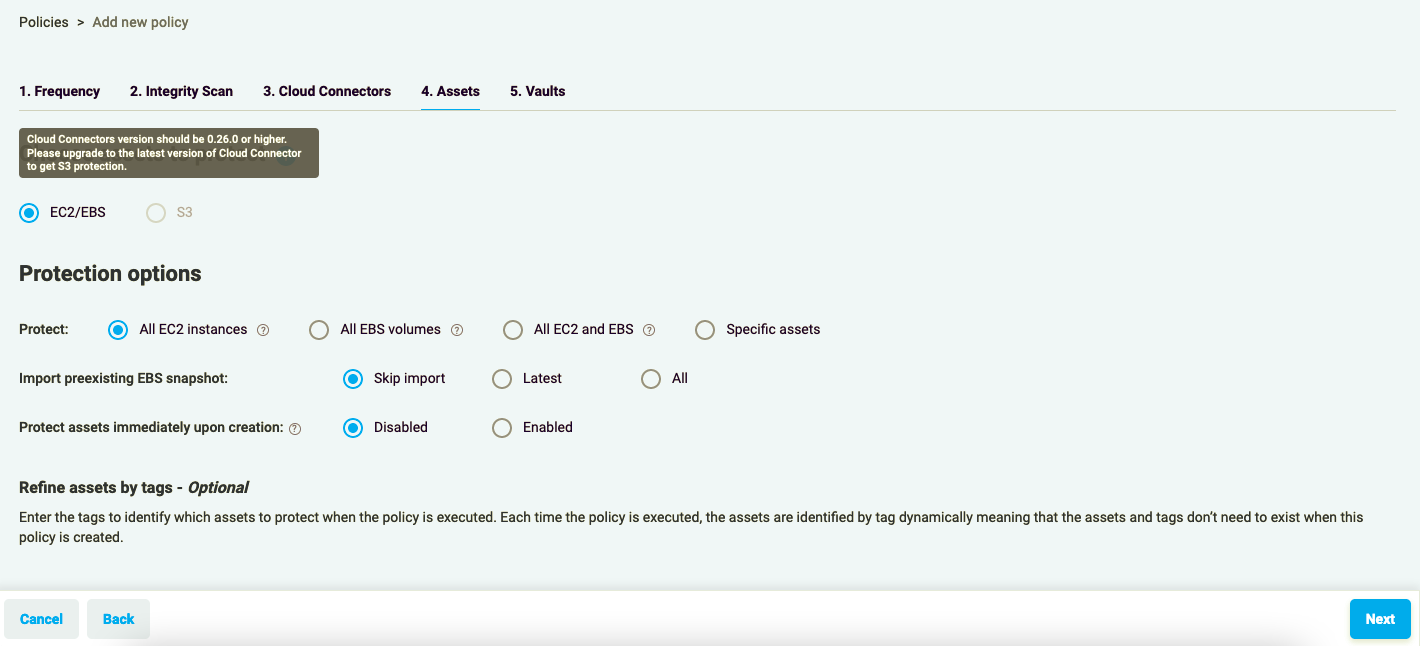
Figure 2.6: S3 Protection Policy unavailable
You can scan all S3 buckets, or select one or more to protect. You can also select an option to scan objects with specific timestamp, and provide the desired value for the timestamp. Or skip this step, in case you want to protect the objects within the bucket regardless of the timestamp.
⚠️ Important! ⚠️ S3 object count, when exceeding certain limits, can negatively impact Elastio S3 scan performance. We do not recommend using the S3 scanning feature on buckets with more than 10 million objects. If you need to scan more than 10M objects in a bucket, please contact Elastio support for assistance.
When you select an S3 bucket, a warning “Please select paths” will appear. You’ll have to either check the “All paths” box, or press the “Select paths..” button.
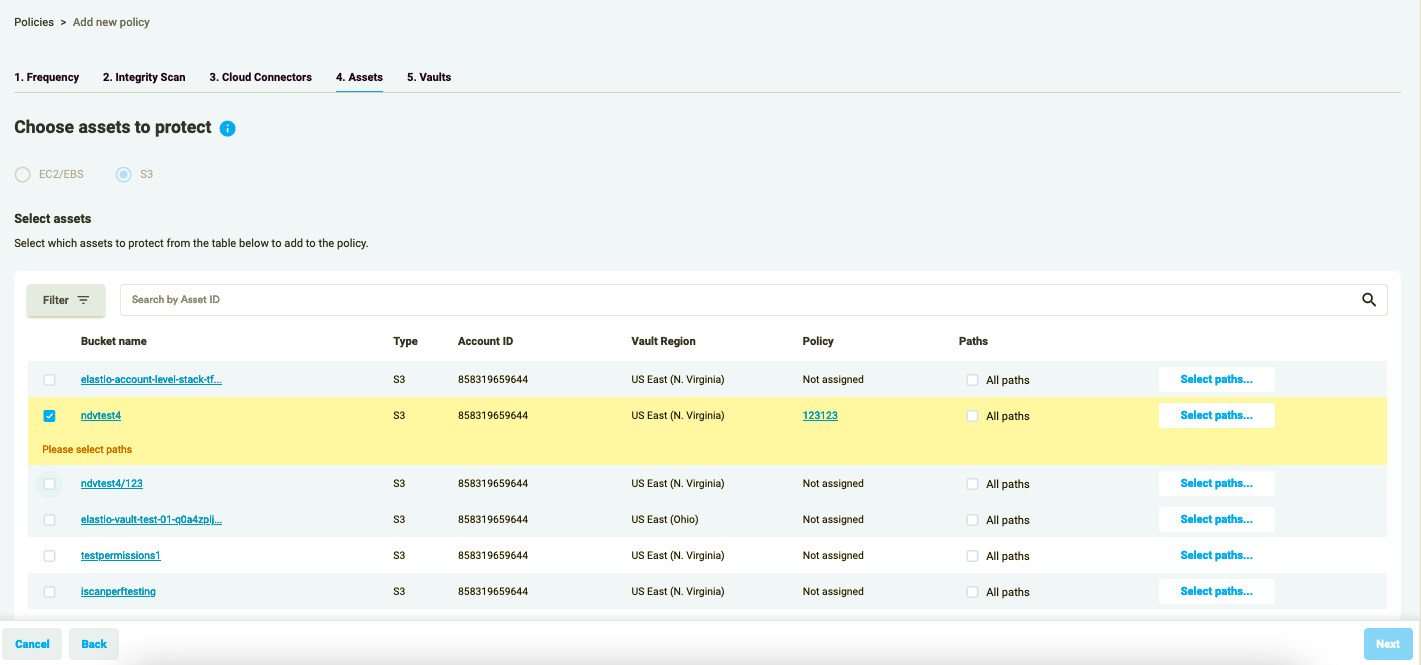
Figure 2.7: S3 Protection Policy - Select paths
“Select paths..” button opens a pop-up window that provides several options for selecting S3 bucket objects. You can put in path(s), prefix(es) or glob(s), according to your needs.
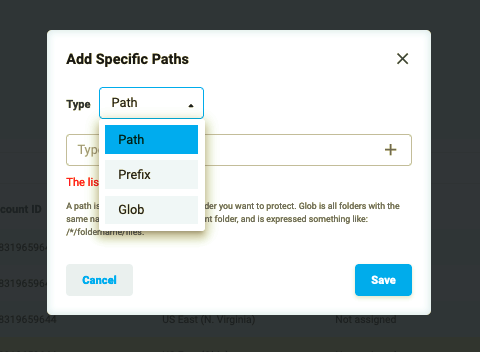
Figure 2.8: S3 Protection Policy - Select paths selectors
Please note: that Elastio does not access your data and, as a result, cannot offer auto-correction for input values or pre-made selectors for paths. Objects are selected based solely on the provided values; hence, if no objects match these values, no protection will be applied.
When the desired values are provided, press “Save”. You will return to the S3 assets list. Press the “Next” button to proceed.
- Step 5 - Vaults - provides you an option to select a vault for every Cloud Connector selected on Step 3. If there is no need to separate the recovery points, leave the selections at the default values.
Press “Save & Run” to complete Protection Policy creation.
Please note: asset count in the Policies table on Policies page will be 0 until the first run of the Policy. Once it runs, the assets count will be updated with the appropriate number.
Elastio now provides an option to use S3 scan with the changelog feature enabled, which will ensure that after the initial full scan only newly added objects will be scanned. To find out more, please see this section.
EFS
To add a new policy to your account, please follow the steps below:
- Press the “+New Policy” button.
Figure 3.1: Add Policy
- Add a name to your policy and define the schedule for it.
Figure 3.2: Add Policy schedule
Elastio Policy may run every 15 minutes, 30 minutes, every hour, and 12 hours, as well as daily, weekly, and monthly. It can be started immediately or at a set time.
Please note: if you have selected the “Run now” option, you should be aware that the first backup/scan job will run at its earliest availability, initiated at the nearest 15-minute interval. So, a Policy created at HH:25 with the “Run now” option will run at HH:30 and subsequently according to the schedule.
Figure 3.3.1: Add New Policy - Integrity Scan
- In Step 2 - Integrity Scan - Scan option drop-down allows you to determine the way the scans will run. Available options are: Live Scan, Scan and backup with Elastio, Backup with Elastio.
Figure 3.3.2: Add New Policy - Scan options
If you prefer scanning your assets without creating recovery points in Elastio, choose “Live Scan”.
Threat detection allows you to perform Ransomware detection or Malware scans on the assets or recovery points. You have the flexibility to choose either option or both.
Recovery testing, when enabled, checks the file system of all EBS volumes included in the recovery point for corruption.
Figure 3.4: Add New Policy - Cloud Connectors
- In Step 3, choose the specific Cloud Connectors where the Policy will operate. By selecting specific Cloud Connectors, the policy’s scope is confined, ensuring it does not impact any other accounts or regions.
To protect EFS, select the EFS radio button on the top of the page. You will see a list of all EFS available for protection.
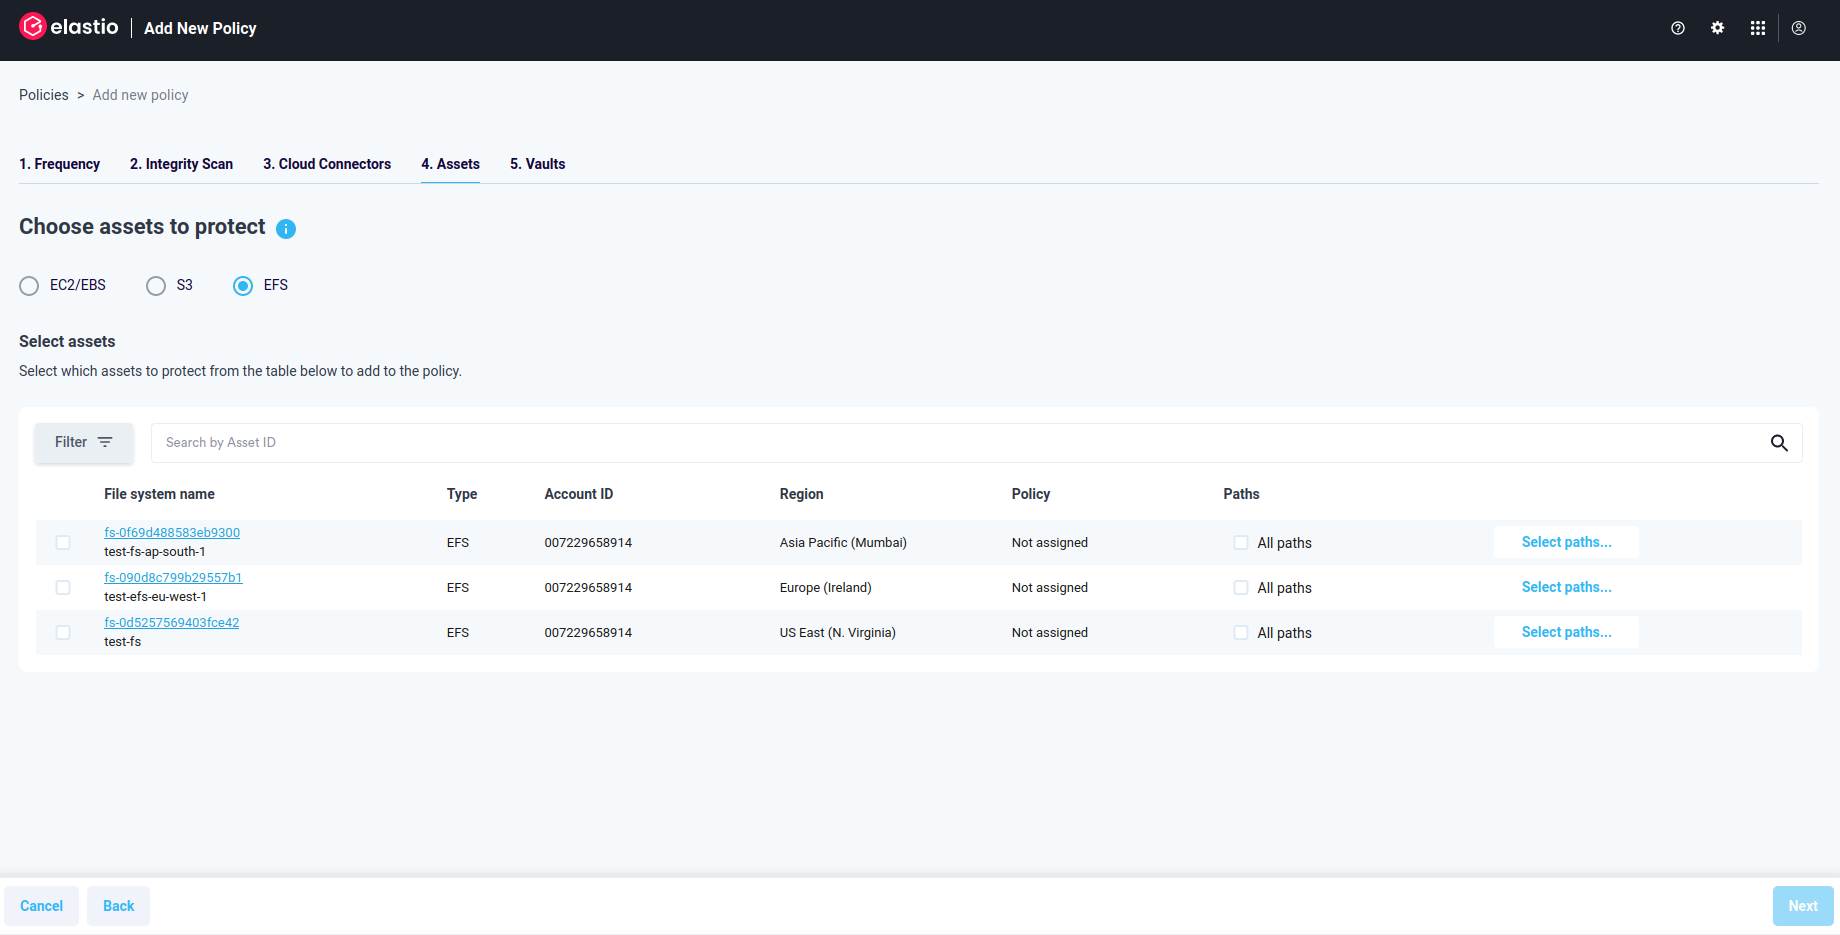
Figure 3.5: EFS Protection Policy
⚠️ Please, note: EFS mount points should be available in all subnets where the Elastio vault is installed, for the scan to work correctly. Those can be configured at the time of EFS creation or by adding it at a later time. See example list of mount points below:
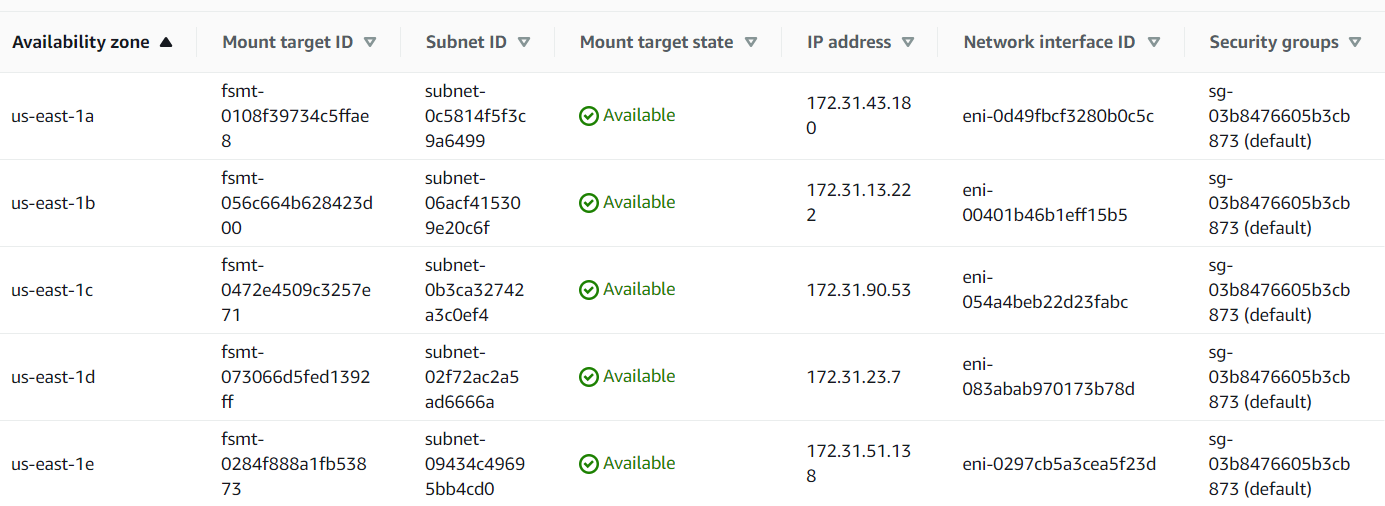
Figure 3.6: EFS mount points
Select an EFS you would like to protect. Once you do that, a warning “Please select paths” will appear.
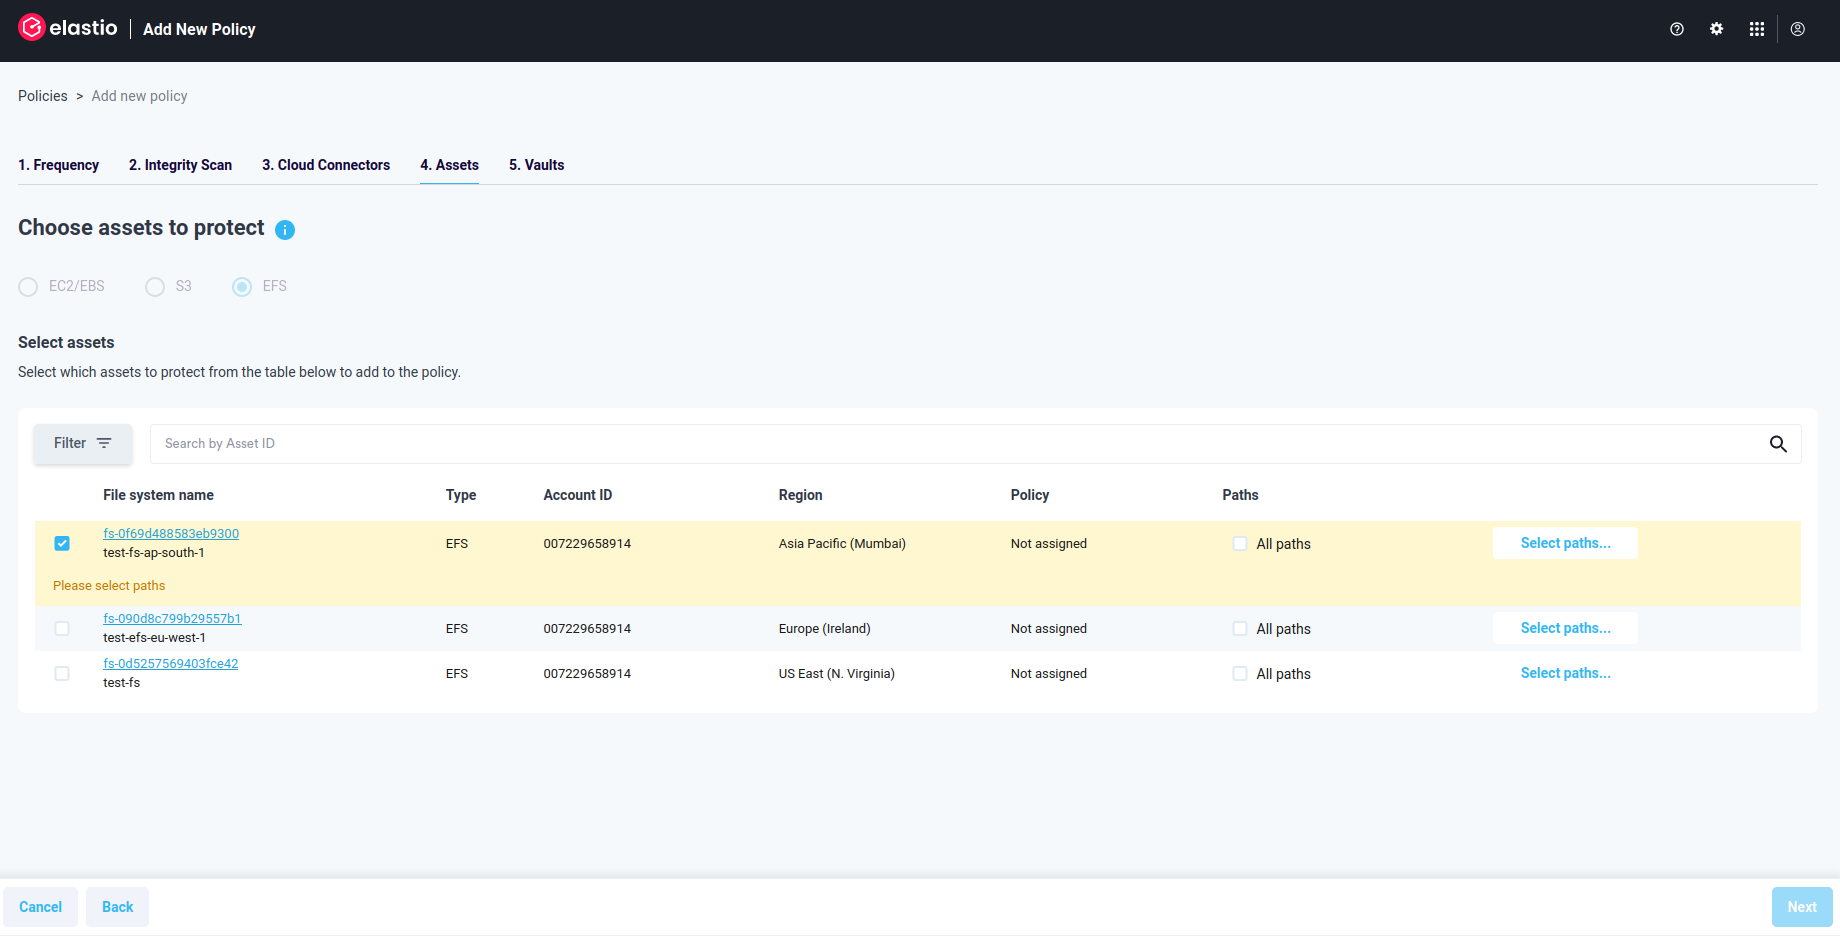
Figure 3.7: EFS Protection Policy - Select paths
You can select “All paths” by checking the respective box.
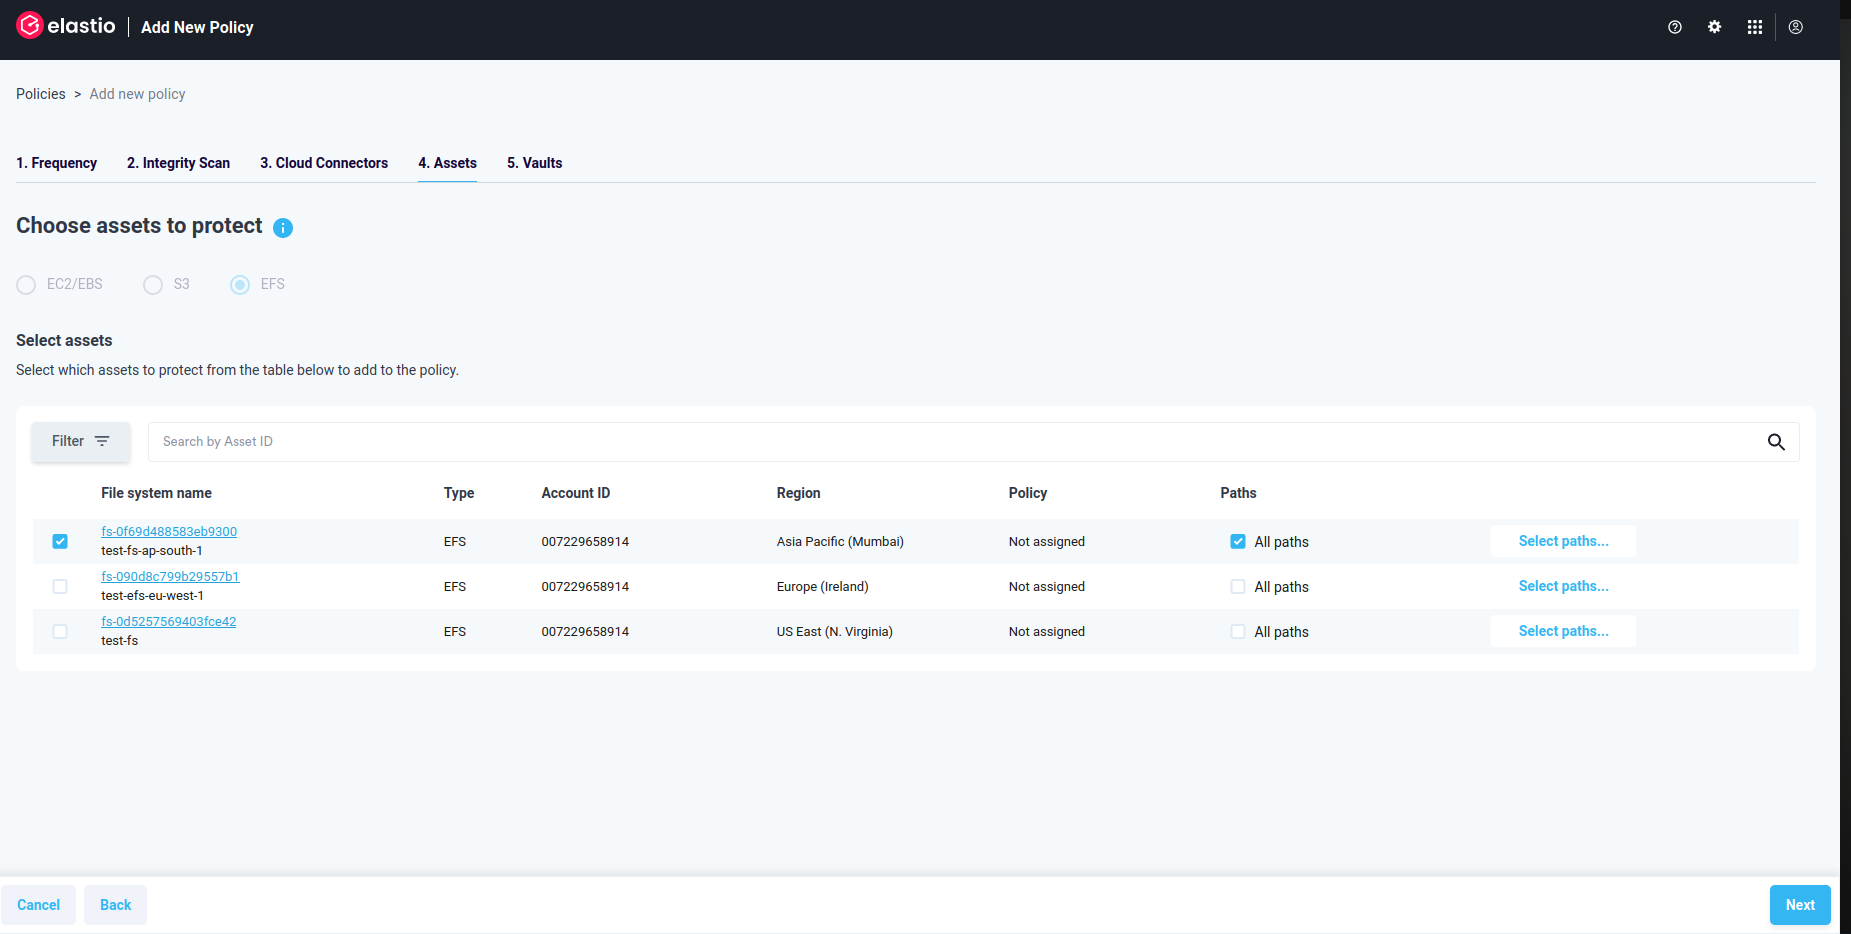
Figure 3.8: EFS Protection Policy - All paths
Alternatively, you can select the files to be protected manually by adding path(s) or glob(s) in the pop-up window that opens when you press the “Select paths…” button
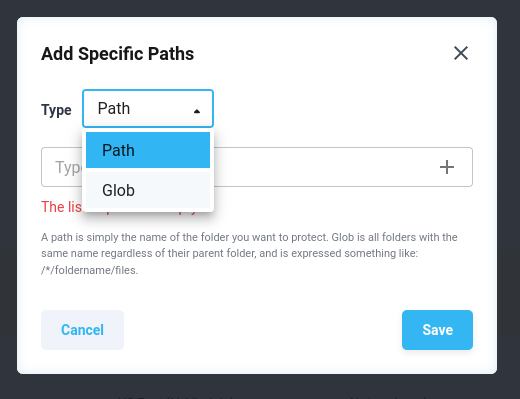
Figure 3.9: EFS Protection Policy - Select paths options
Once you type in a path or a glob, press the “+” button, and it will appear in the list below.
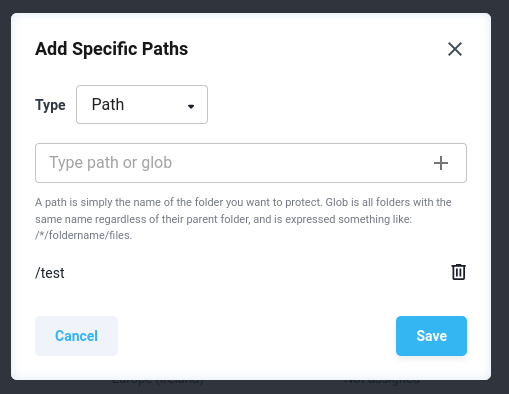
Figure 3.10: EFS Protection Policy - Selected paths options
Once you’ve selected all required paths, press “Save” and proceed with the policy creation to Step 5.
- Step 5 - Vaults - provides you an option to select a vault for every Cloud Connector selected on Step 3. If there is no need to separate the recovery points, leave the selections at the default values.
Press “Save & Run” to complete Protection Policy creation.
Please note: asset count in the Policies table on Policies page will be 0 until the first run of the Policy. Once it runs, the assets count will be updated with the appropriate number.
Pause/Resume a Protection Policy
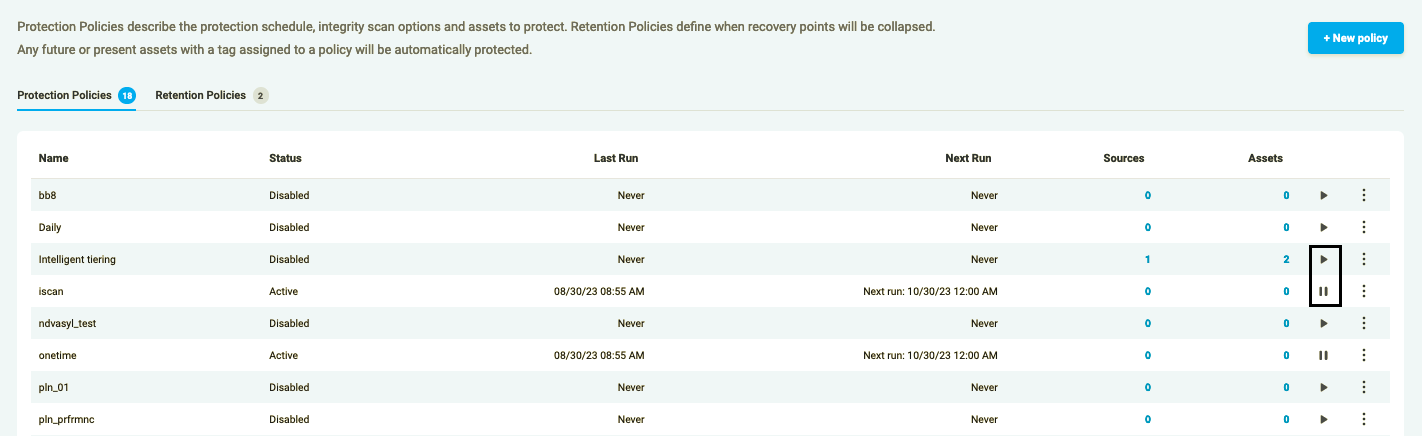
Figure 3.1: Pause/Resume Policy
To pause/resume your Policy, press the “Pause/Resume” sign on the right. Depending on the current status of the policy the status will change: for Started policies it should become Paused and the Policy will not be executed until re-enabled, for Paused the status becomes Started and the Policy will continue to run as scheduled.
Edit a Protection Policy
Once you press the “Edit” button in the drop-down list under the three-dots button on the right of the policy row, the Edit policy page opens.
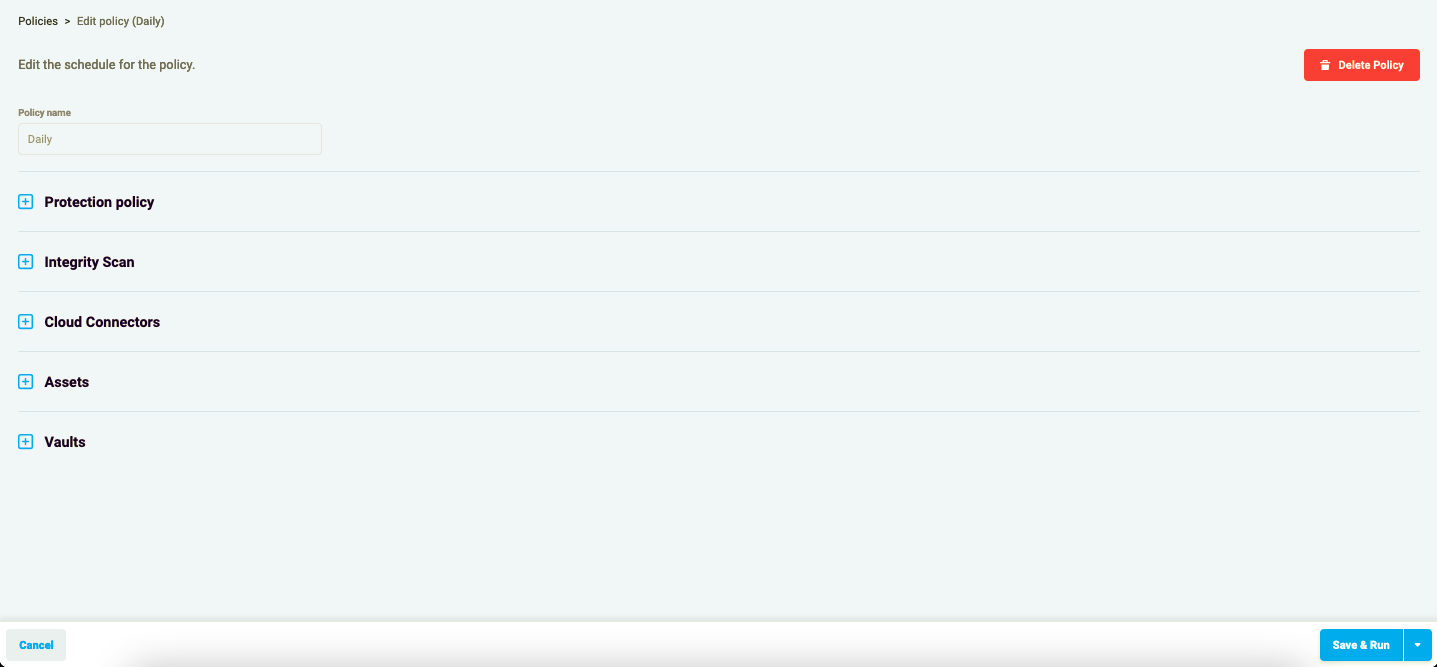
Figure 4.1: Edit Policy
To edit the schedule for the policy, go to the Protection Policy section and modify the schedule.
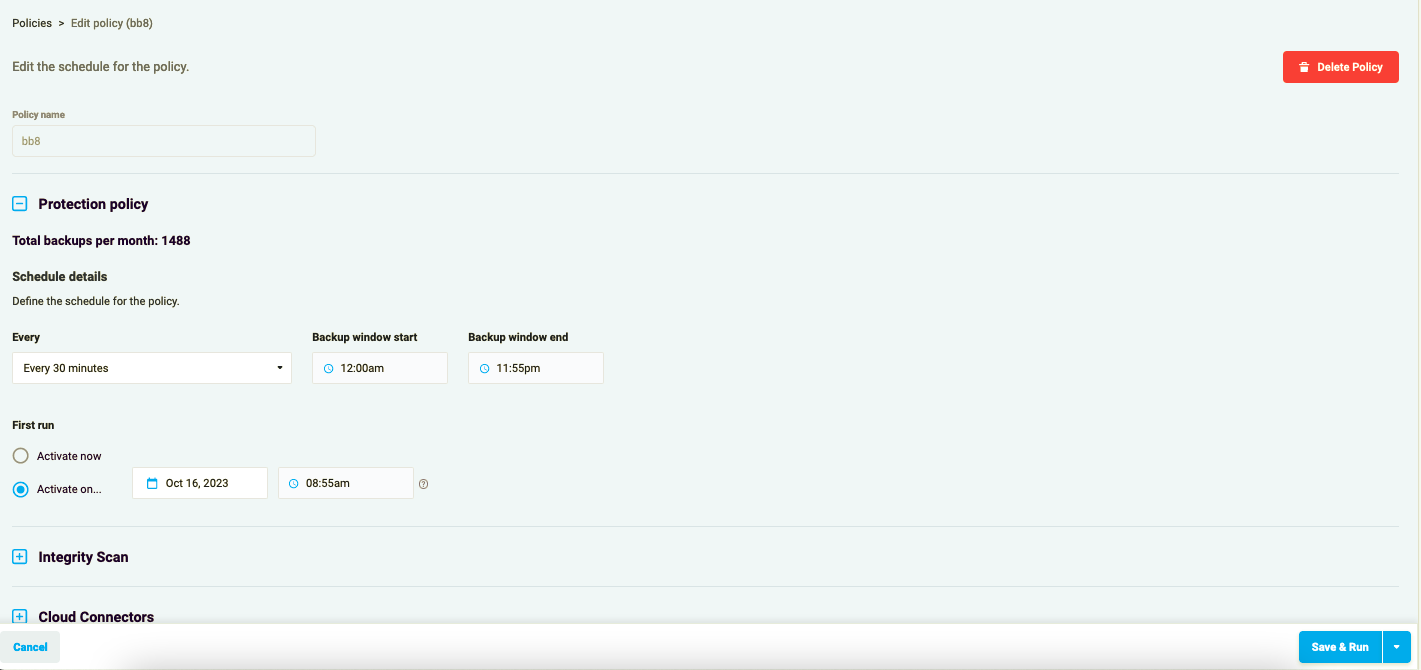
Figure 4.2: Schedule Policy
Three threat detection options are available in policies. Malware scans and ransomware detection to determine if there is any activity on your systems from malicious actors. Additionally, a file system check is available for the recovery points to ensure that the file system of the backed up systems is intact.
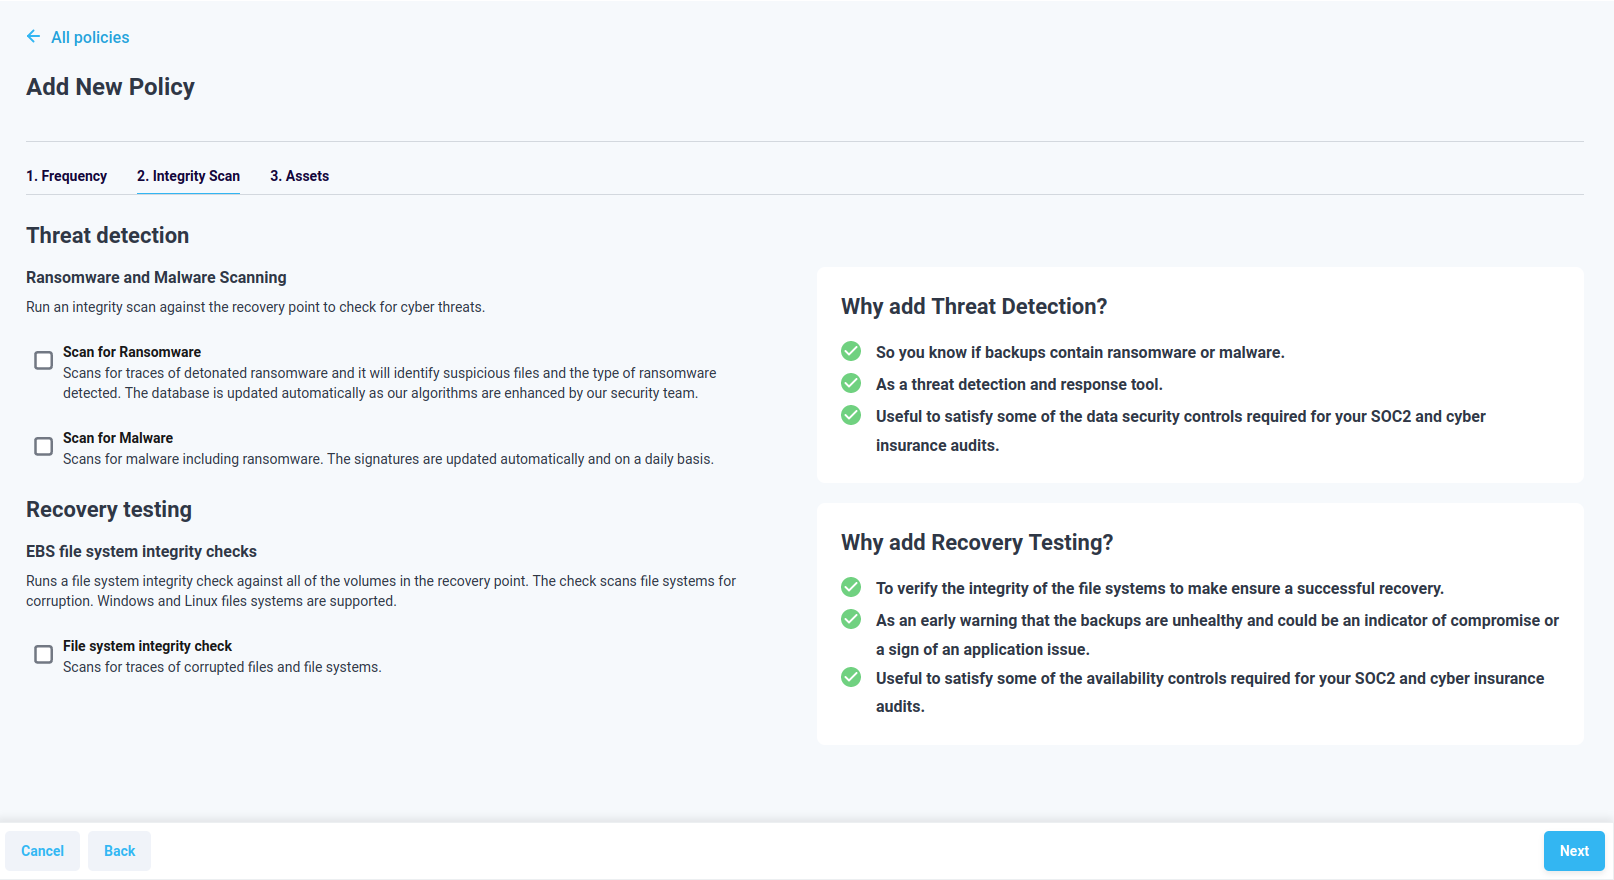
Figure 4.3.1: Select threat Detection
In case the version of your stack is less than 0.22 the file system check option will not be available. You’ll need to upgrade all of our sources to access it.
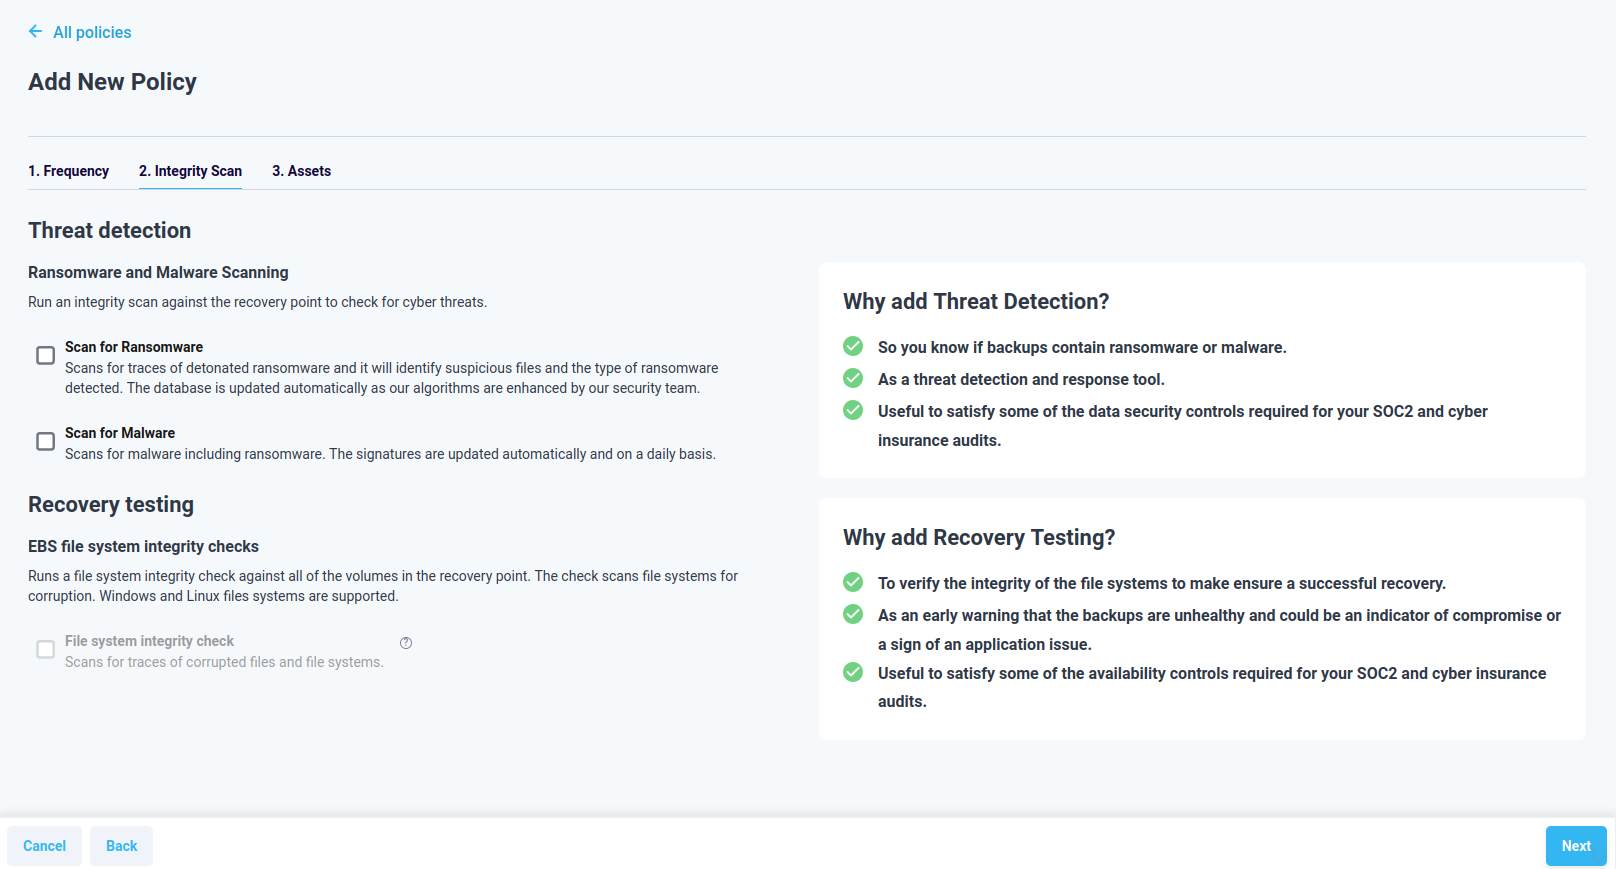
Figure 4.3.2: Select threat Detection disabled
To change the assets for a certain Policy, go to the Assets section and select (or unselect) the assets.
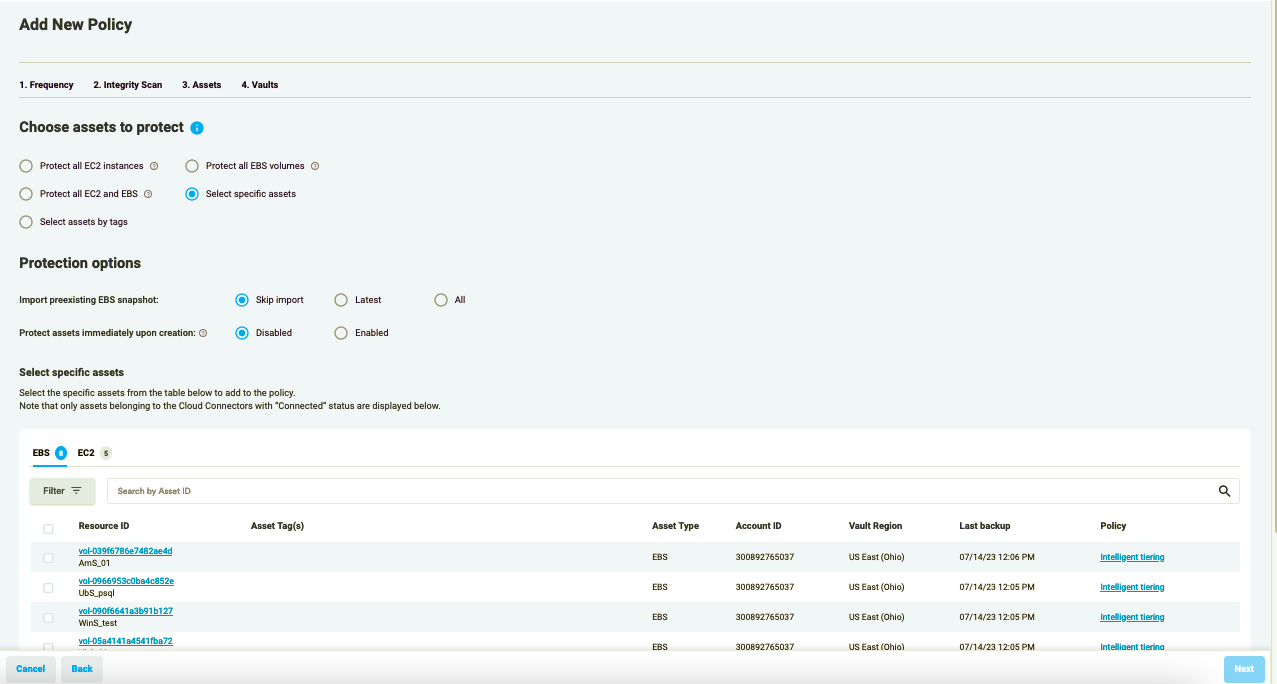
Figure 4.4: Change Asset
Once all the modifications are in place, press the “Renew” button to save changes.
Execute a Protection Policy
Elastio’s execute functionality allows you to start the policy on demand. To perform the operation, press the “Execute” button in the drop-down list under the three-dots button on the right of the Policy row. Currently, the policy will run as configured, in future more granularity will be added.
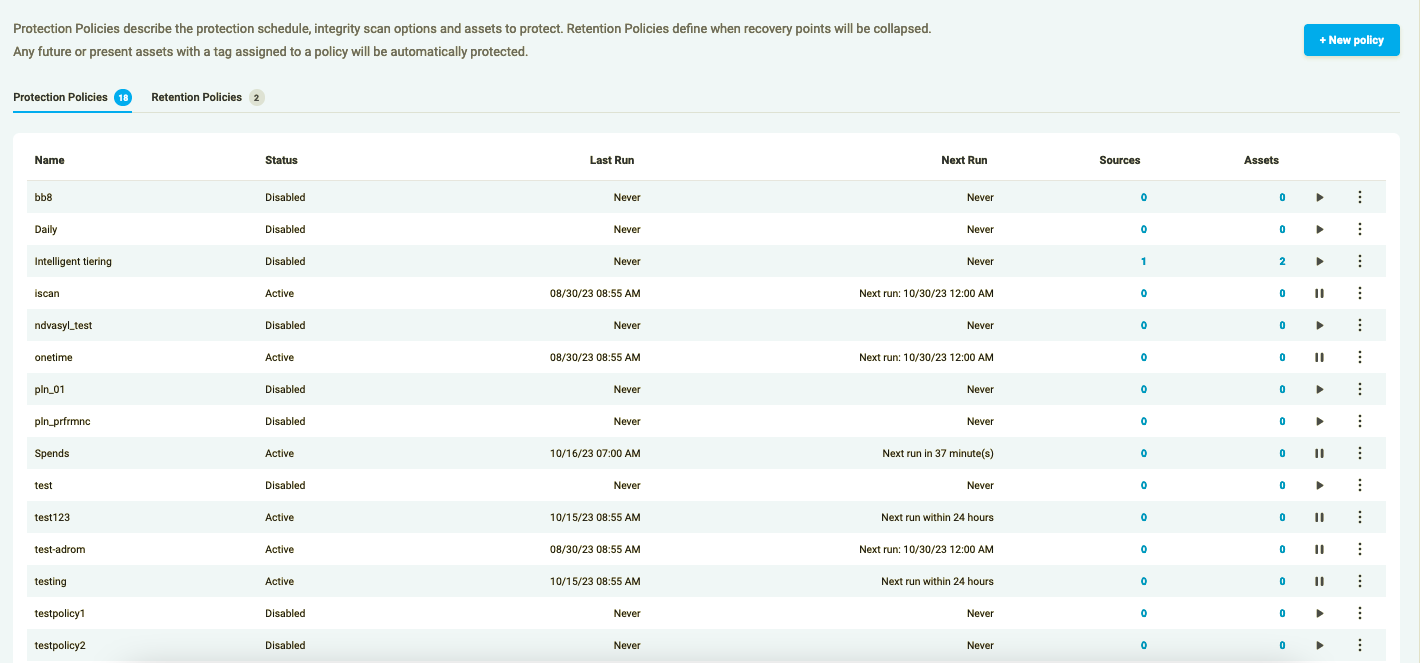
Figure 5: Execute Policy
Delete a Protection Policy
To delete a policy, follow to the Edit policy page. Press the “Delete” button and confirm the action by selecting “Yes” in the confirmation pop-up. Pressing “No” will cancel policy deletion.
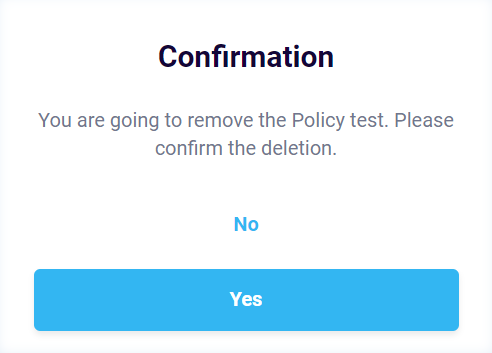
Figure 6.1: Delete Confirmation
You can also delete your Policy by pressing “Delete” on the right of the policies table row in the three-dots button drop-down.
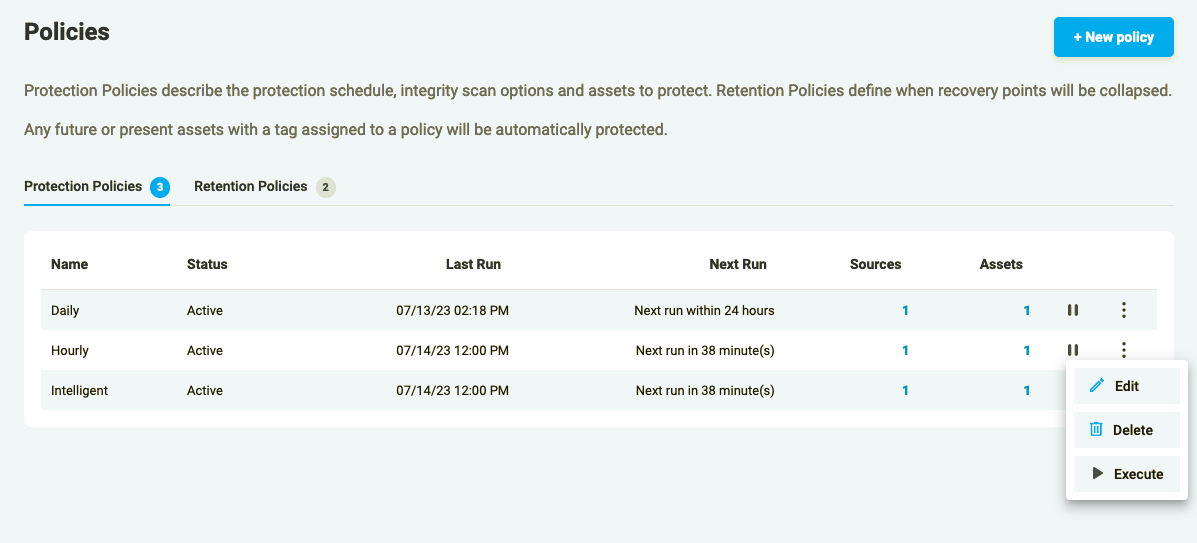
Figure 6.2: Delete Policy
Please note: Default policies are editable only and cannot be deleted.
In case you want to backup some assets manually, you can install the Elastio CLI and back up your assets through it.
Retention Policies
A retention policy helps you specify how long you want to preserve the recovery points. There is a default retention policy that you can turn on with reasonable editable defaults. Additionally, you can create your own retention policies to match specific assets, for example by tags. Only one retention policy is applied per asset, and if there is a custom retention policy that matches the asset, it will always supersede the default.
Retention policies page carries a list of retention policies, provides option to create a new retention policy, enable, disable, edit and delete the existing ones.
Figure 7: Retention Policies Page
Add a New Retention Policy
To add a new retention policy press the “+ New Policy” button in the top right corner of the screen. A new page will open.
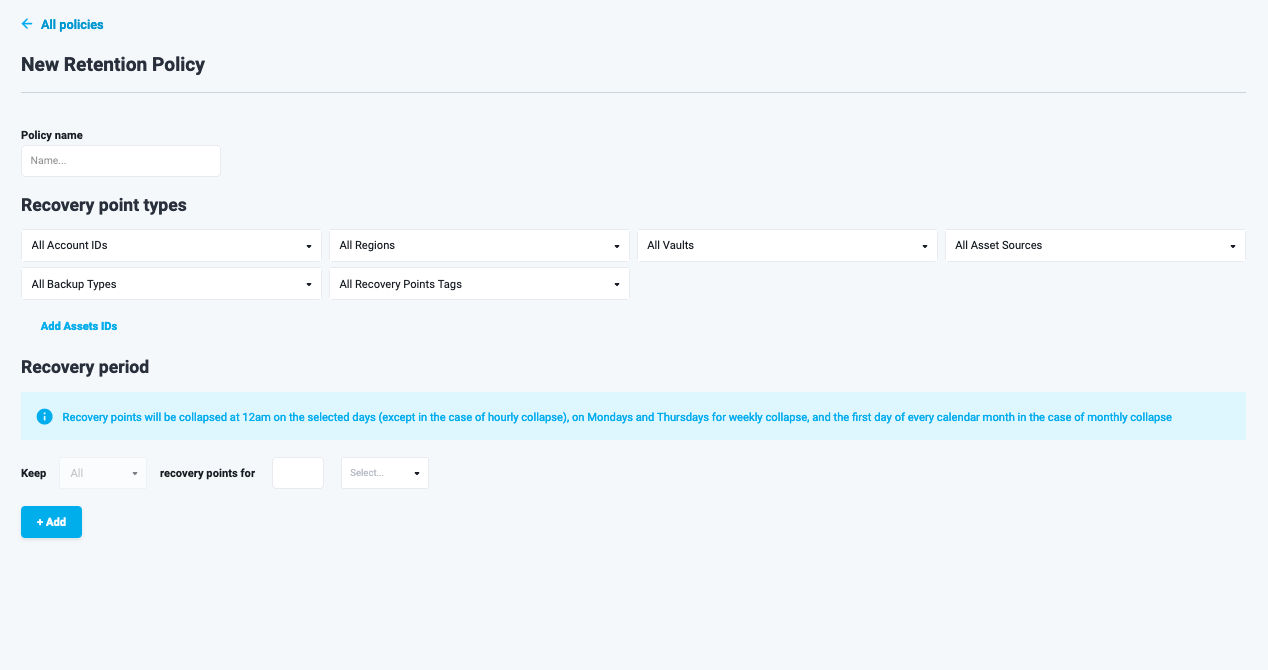
Figure 8: Retention Policy creation
Enter a name for the new retention policy. Then select assets to include the recovery points for in the “Recovery point types” section. After that set a recovery period.
For recovery period you can set specific rules for:
- All
- Hourly
- Daily
- Weekly
- Monthly
- Yearly
Once you have set up all rules, press “Save” to save the retention policy.
Edit Order
To edit the ordering of the retention policies, press the “Edit Order” button on the right. You will be able to drag and drop the retention policies to change the priority of their application.
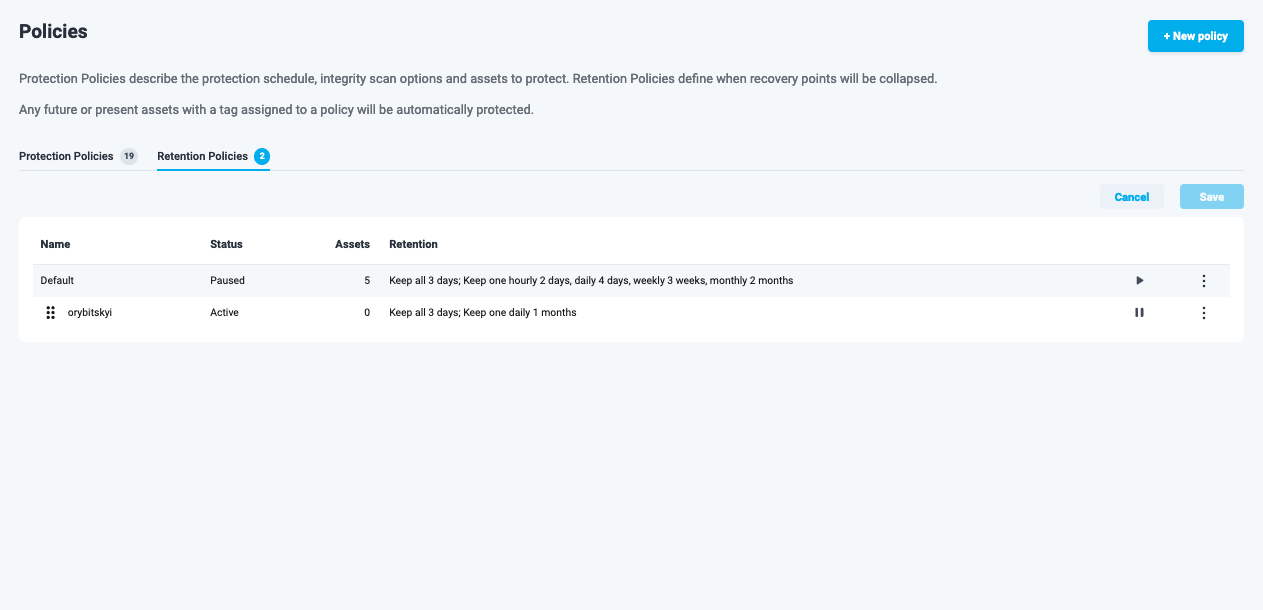
Figure 9: Retention Policies ordering
Please note: Only custom retention policies can be reordered. The default policy will always stay on top.
Edit Retention Policy
Both default and custom retention policies can be edited. The difference is, default policy is applicable to all recovery points within a tenant, while custom policy can only be created for specific ones. As a result, when editing the default policy you an only control the recovery period, while in custom retention policies assets can be edited as well.
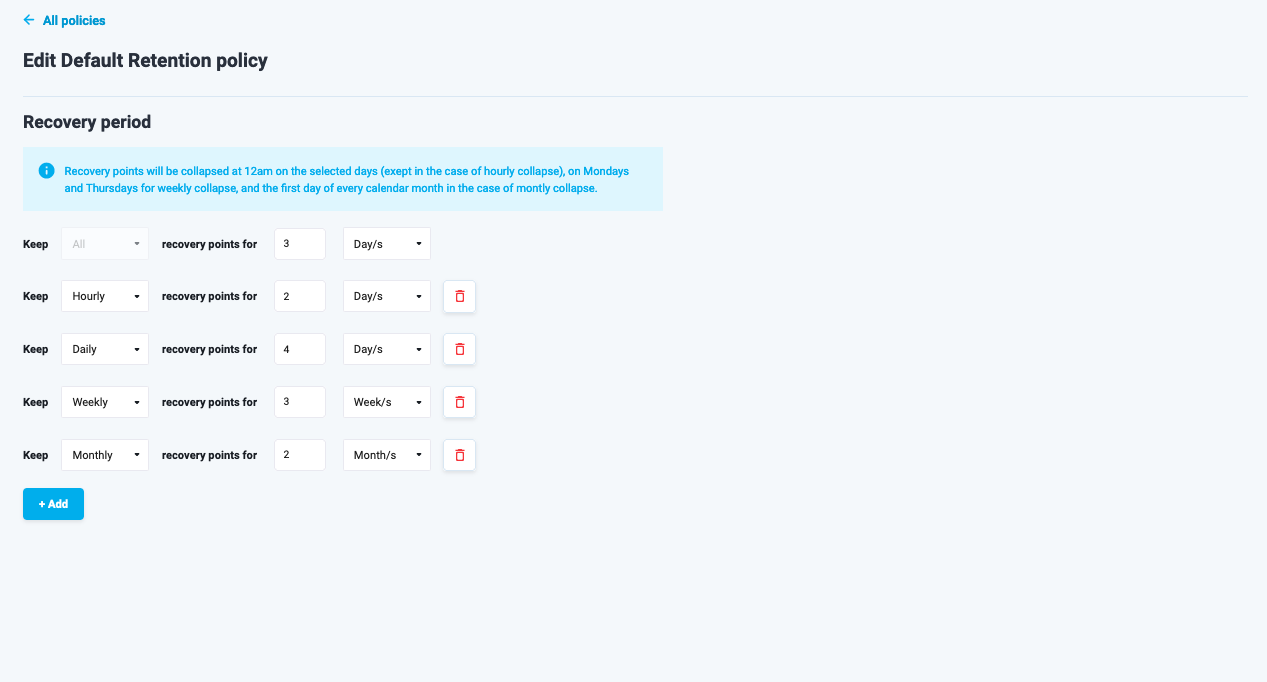
Figure 10: Edit Default Retention Policy