Reports
Table of Contents
Elastio is a powerful backup solution that keeps your data safe and secure. It features continuous anti-malware and anti-ransomware protection that scans your recovery points for security threats. Additionally, Elastio performs file system checks on your recovery points to ensure there are no file system integrity issues.
You can access the results of all integrity checks performed through the Reports section of the Elastio tenant console. Elastio also offers a Compliance Reports Page where you can generate detailed reports on each ransomware, malware, and file system check performed, or more general compliance reports as required and save them in various formats.
To access the Compliance Reports Page, simply log into your Elastio Tenant and navigate to the Reports tab in the left-side menu. With Elastio, you can be sure that your backups are always in compliance with various regulations and are safeguarded against malware and ransomware attacks.
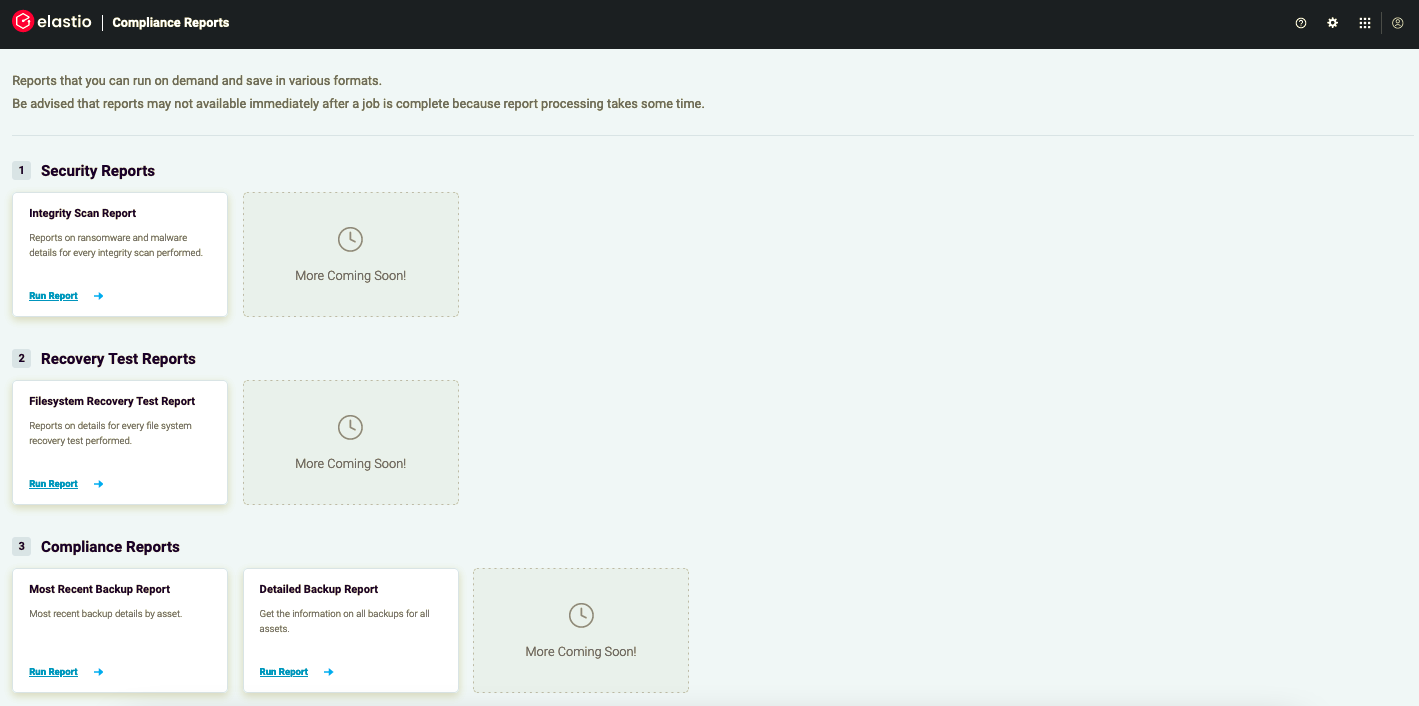
Figure 1: Compliance Reports page
To run a report of a certain kind, click on the Run Report button.
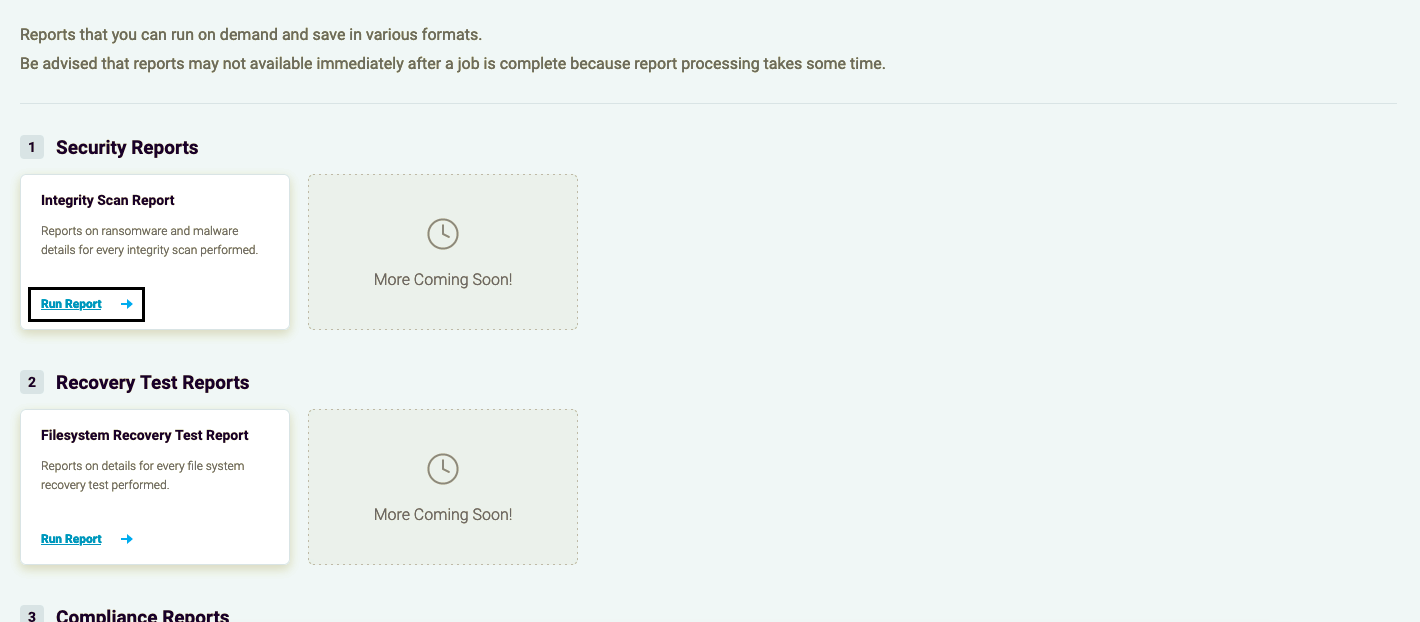
Figure 2: Run Report button
Security Reports
Head over to the Security Reports page to find a handy table listing all the recovery points that were previously scanned. The table provides a wealth of information, including the date when the Integrity Scan was run against each recovery point. You’ll also see the Account ID and Regions where Cloud Connector has been deployed. It’s an easy and convenient way to keep tabs on your recovery points and ensure that they’re secure.
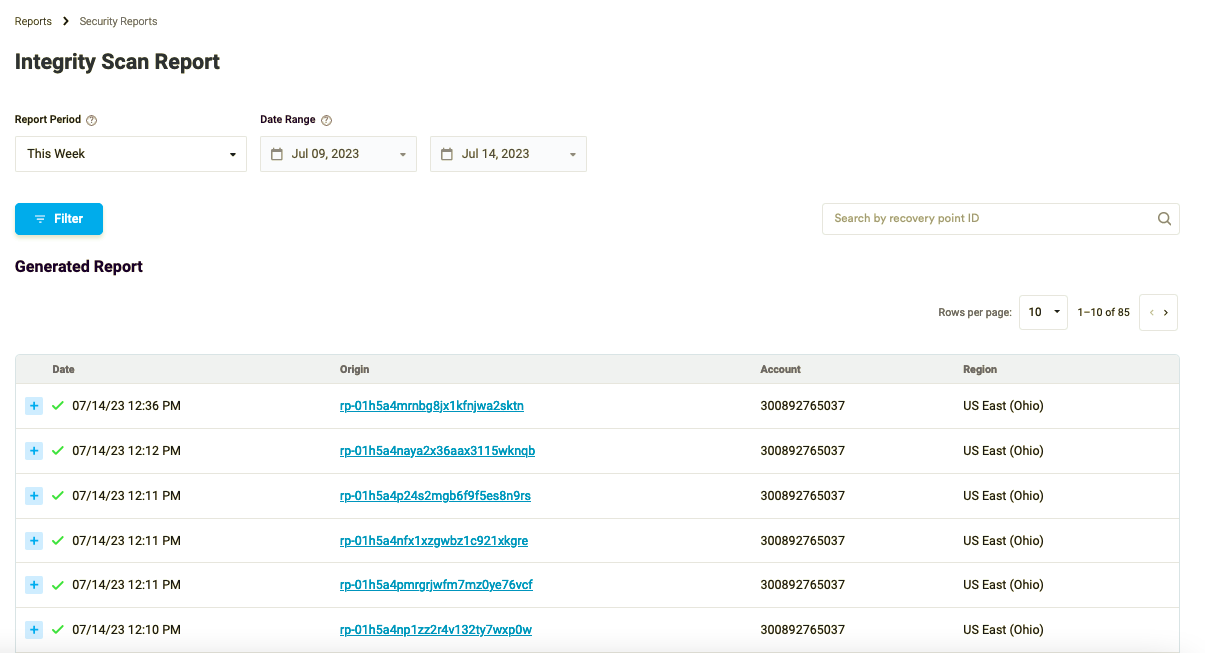
Figure 3: The Recovery Points table
You can filter the reports by applying one of the filters from the drop-down list.
Figure 4: Reports Filter
Applying multiple filters to the reports will show multiple results accordingly.
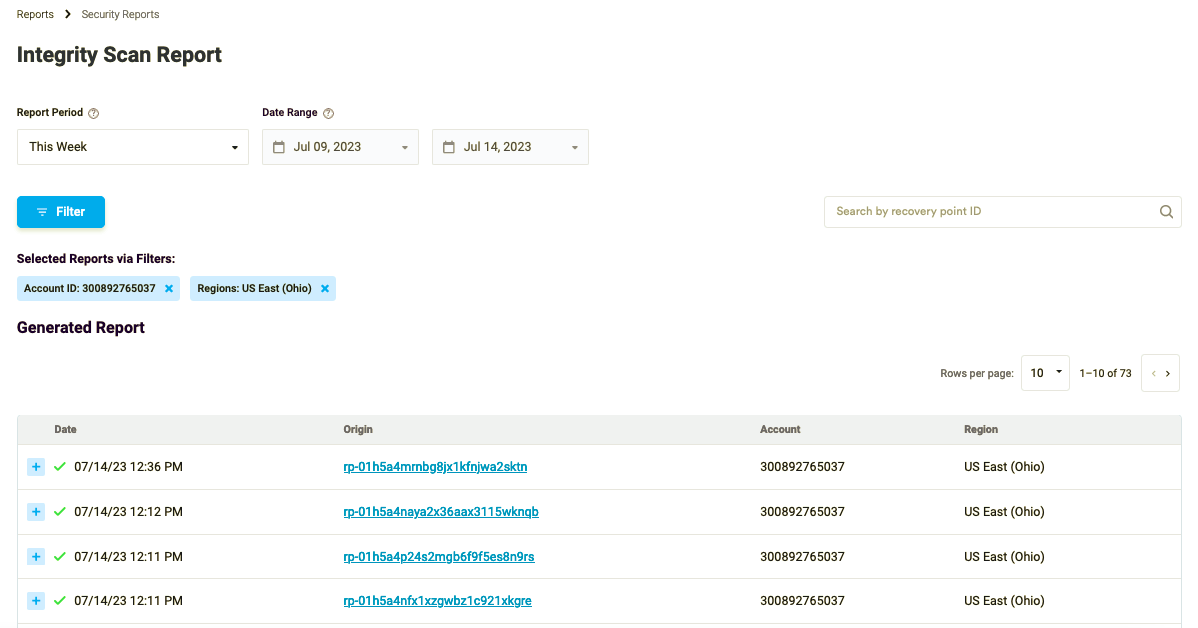
Figure 5: Reports Filters
Clicking on the recovery point will display the information related to the recovery point and the protected asset.
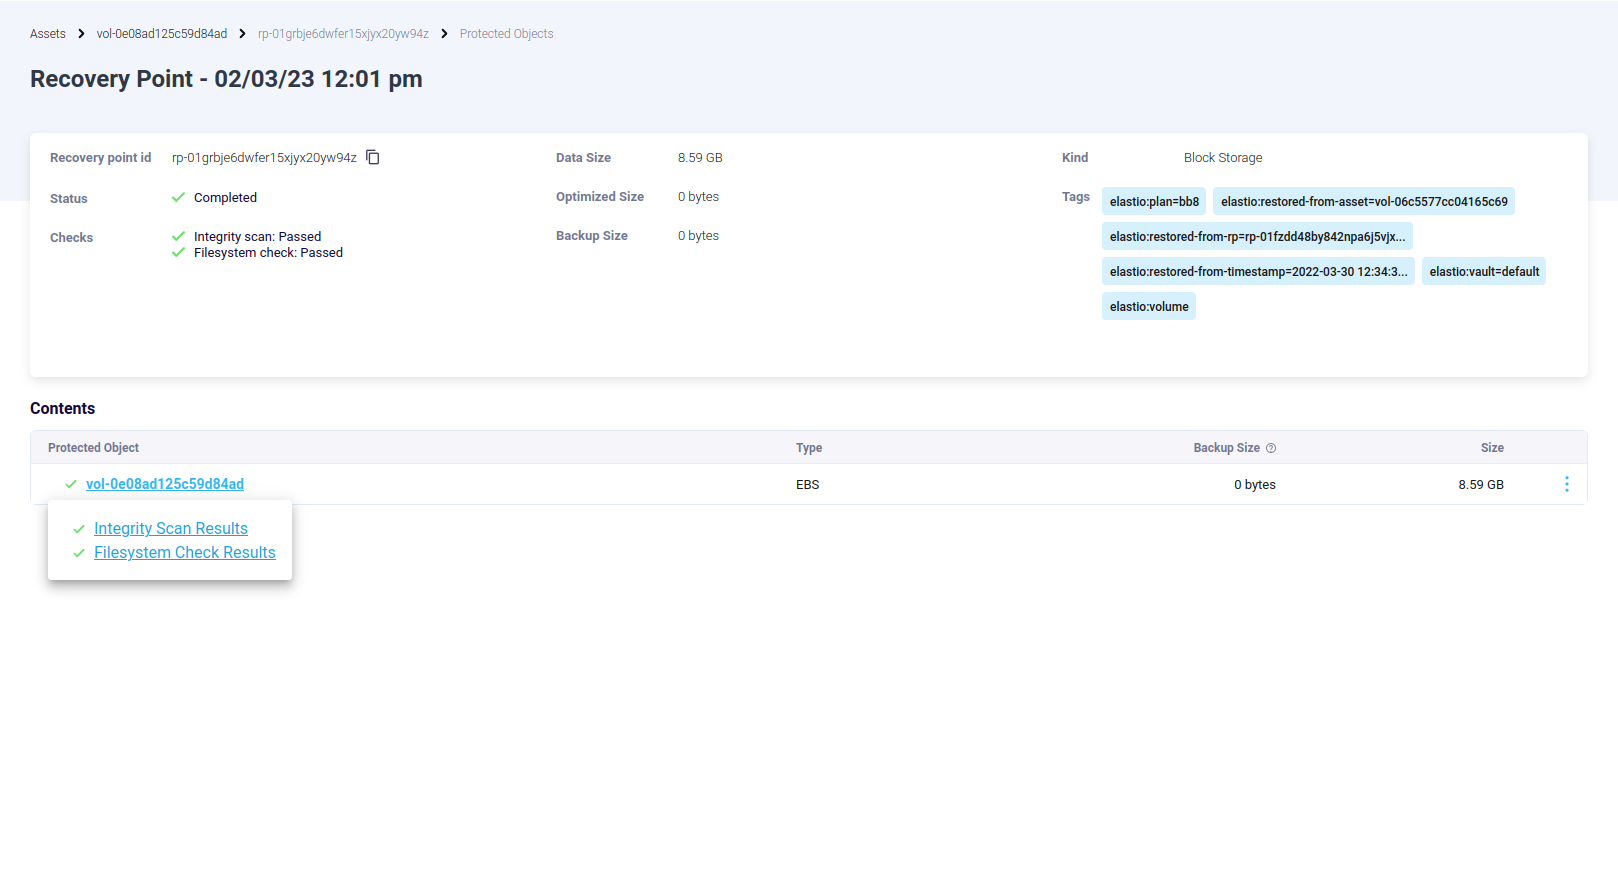
Figure 6: Recovery Point page
Clicking on the asset will display the Integrity Malware and Ransomware Scan Results.
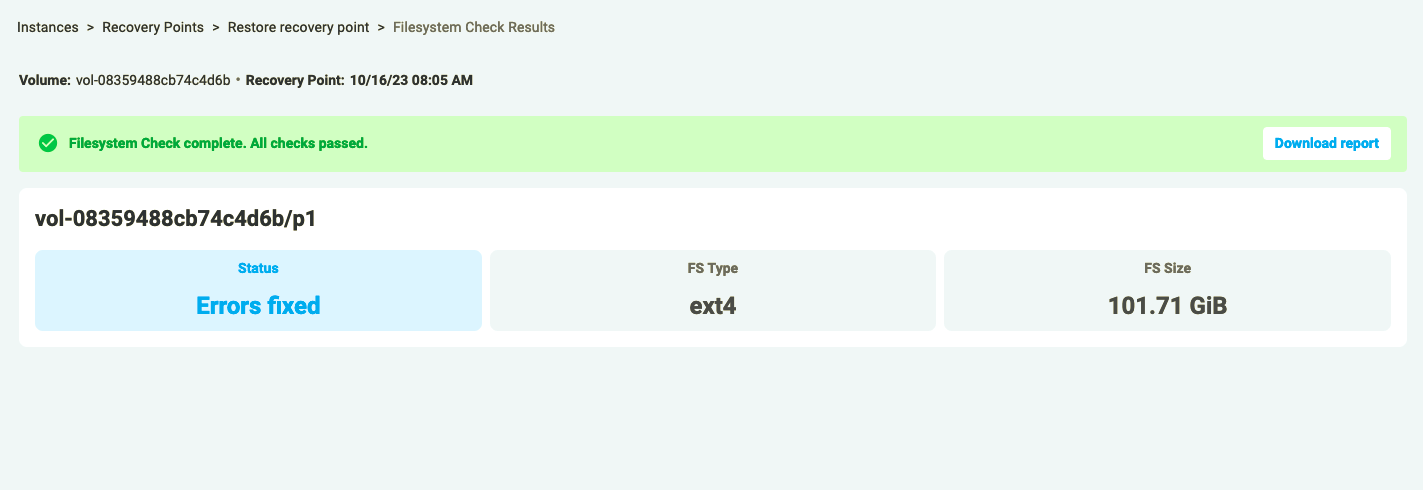
Figure 7: Scan Results
Alternatively, you can access the ransomware and malware check results for every recovery point checked on the per asset basis. To do so, navigate to the Assets page.
Figure 8: Assets Page layout
Clicking on the asset will display the list of the recovery points with their respective integrity scan status to the left. The green icon means that no malware or ransomware was identified, and if the icon is red - a vulnerability was found.
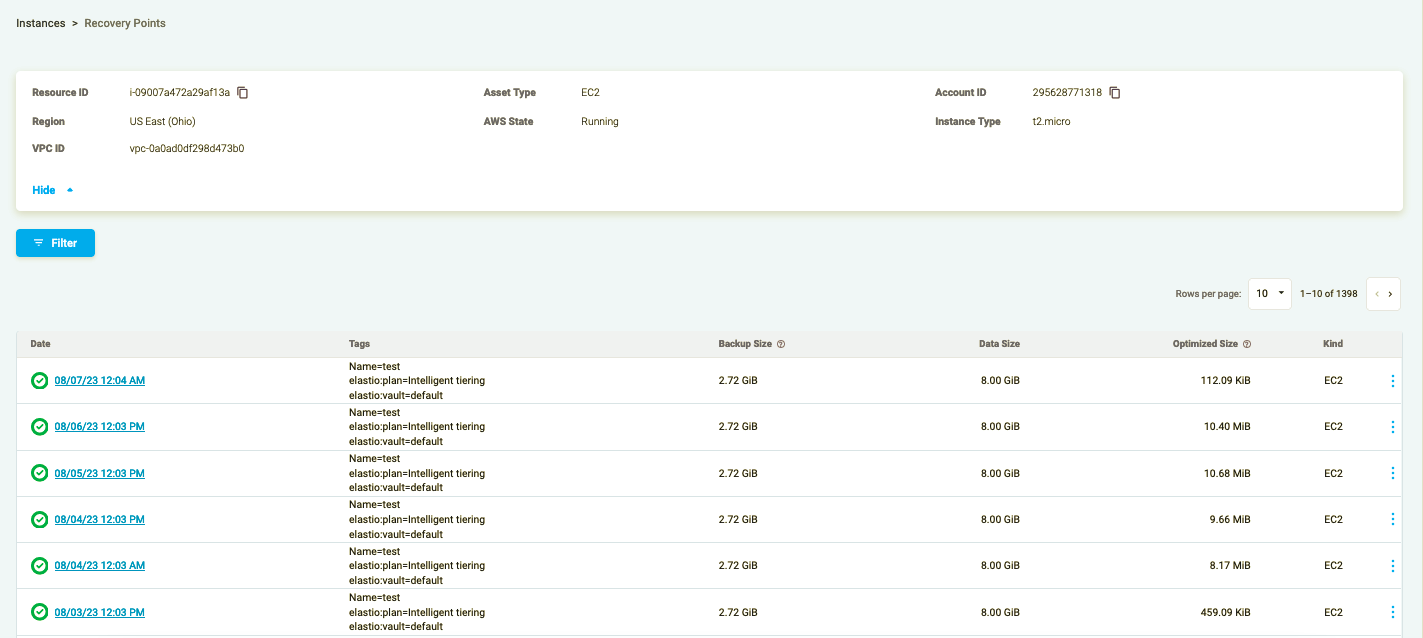
Figure 9: Assets Scan results
Recovery Test Reports
Want to know if your recovery points are ready to go in case of a disaster? Elastio’s Recovery Test Reports have got you covered.
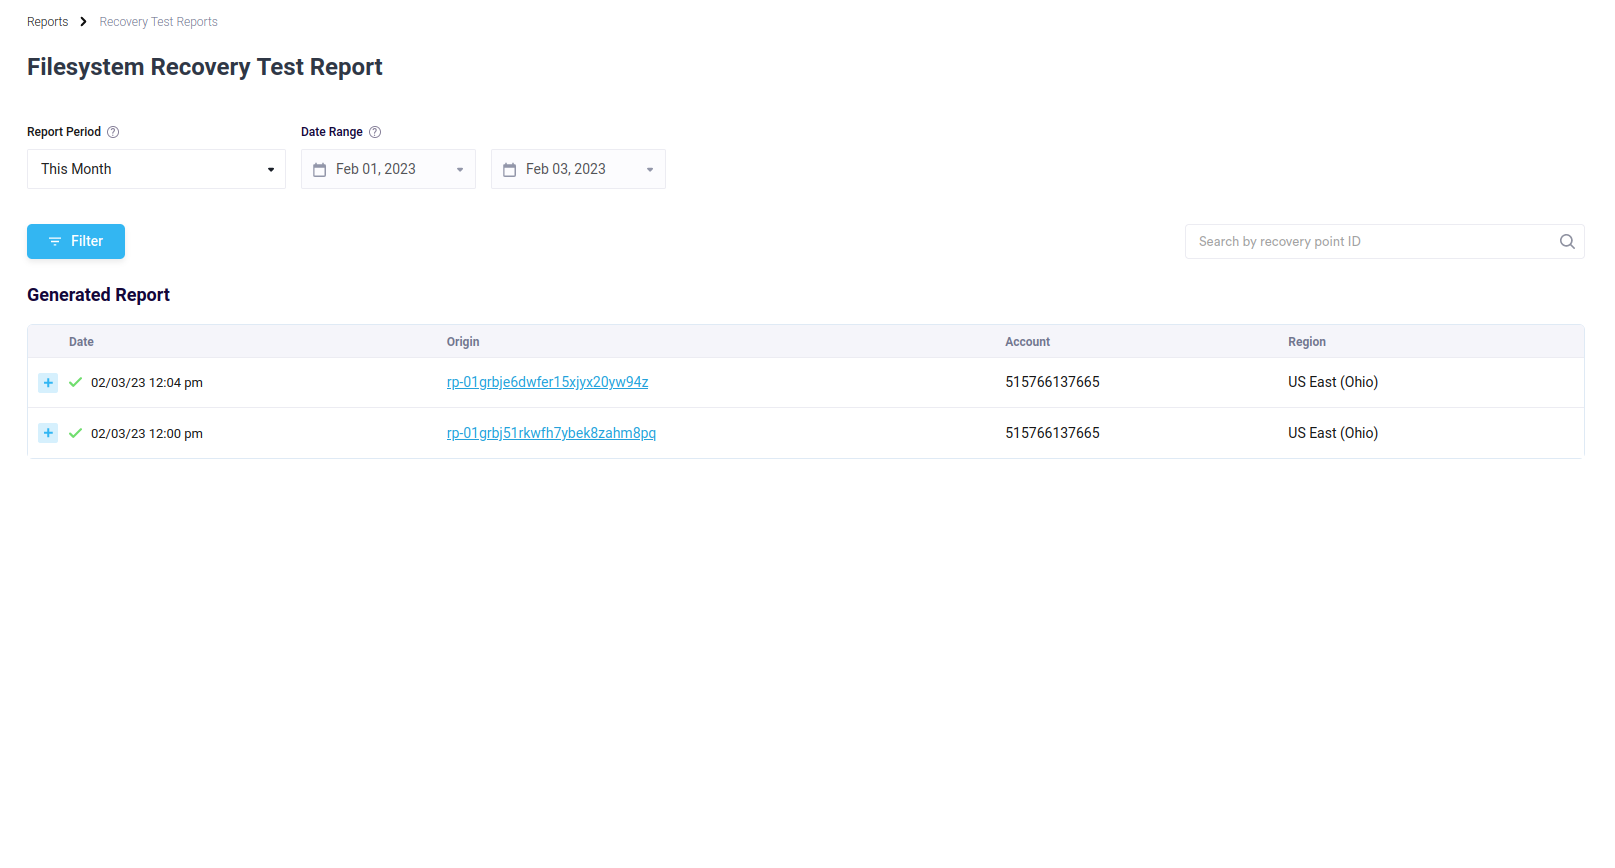
Figure 10: Recovery Test Reports page
Simply click on the “Run Report” button in the Filesystem Recovery Test Report section, and voila - a new page carrying all the file system integrity scan reports for the current month will open up. You’ll see the date that each scan was run, the origin (or recovery point) that was scanned, as well as the account number and region. And if you want even more details about a particular recovery point, just click on the recovery point ID and you’ll be taken straight to the recovery point page.
With Elastio’s Recovery Test Reports, you can rest easy knowing that your recovery points are always ready to be used at a moment’s notice.
Figure 11: Recovery Point page
By clicking the data item ID a pop-up will open for the recovery points where 2 or more reports are present. By selecting the file system integrity report will open the report page.
Alternatively, if the row on the Recovery Test Reports page is expanded by clicking the “+” button to the left of the date value, a new line will carry a link to view the filesystem check report. To open the report, click the “View report” link here.
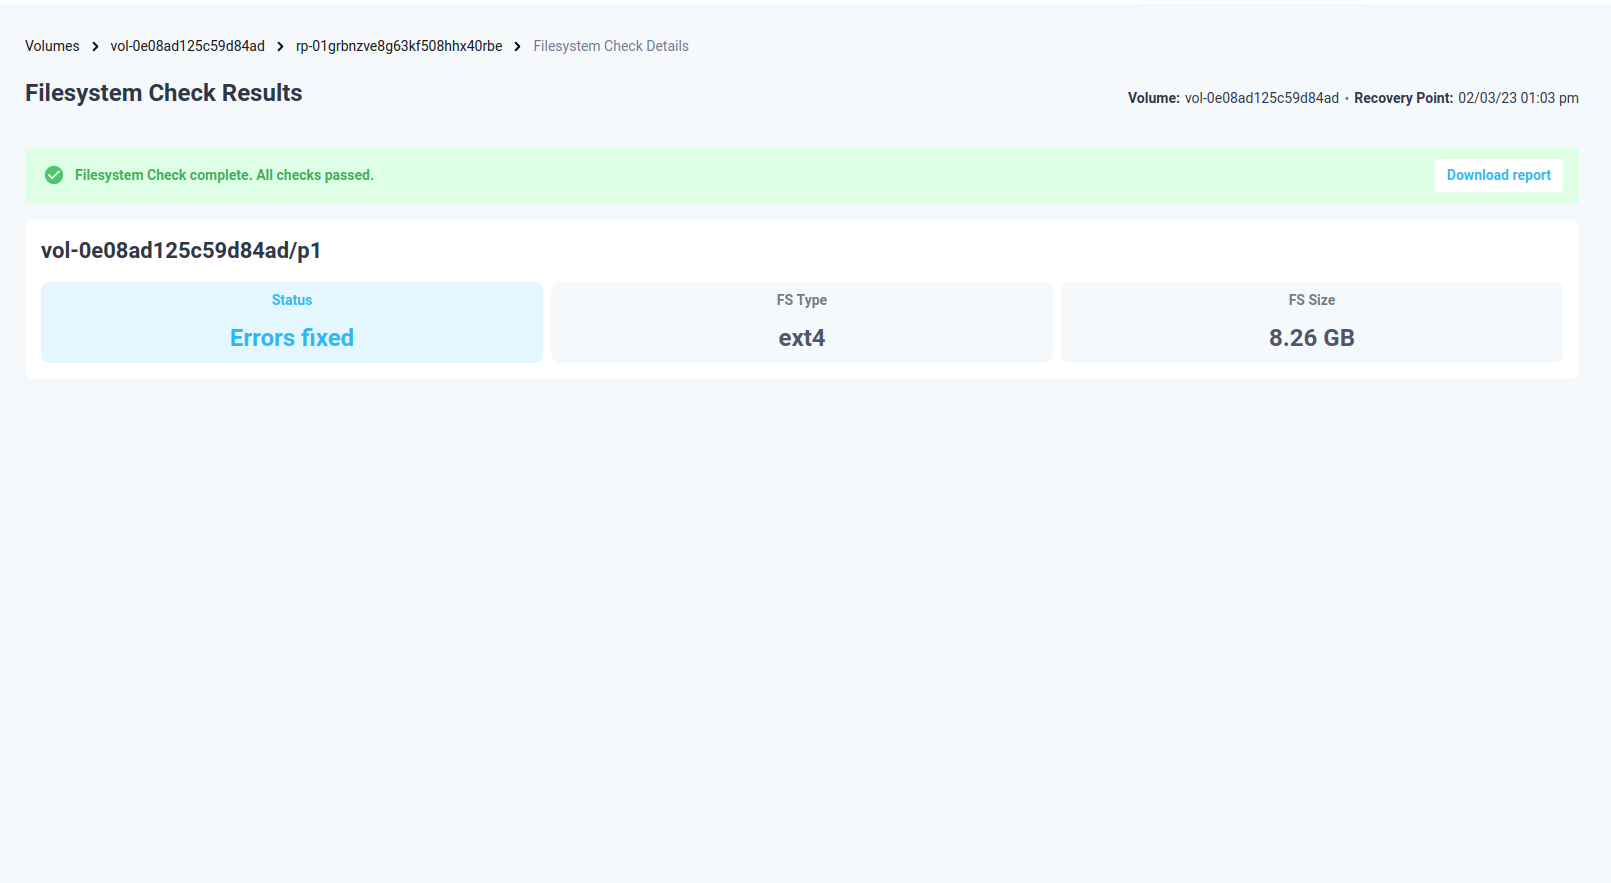
Figure 12: Filesystem Check Report page
Compliance reports
Keeping up with compliance regulations can be a headache, but Elastio’s got you covered. In the Compliance Reports section, you’ll find a variety of reports to help you stay on top of your backups and ensure that they’re always in compliance.
At the moment, you can access two report types: the Most Recent Backup Report and the Detailed Backup Report. But don’t worry - more report types are on the way! With Elastio’s Compliance Reports, you can rest assured that you’re always in compliance with regulations, no matter how complex they may be.
Most Recent Backup Report
By clicking on the “Run Report” button under the Most Recent Backup Report a new page will open.
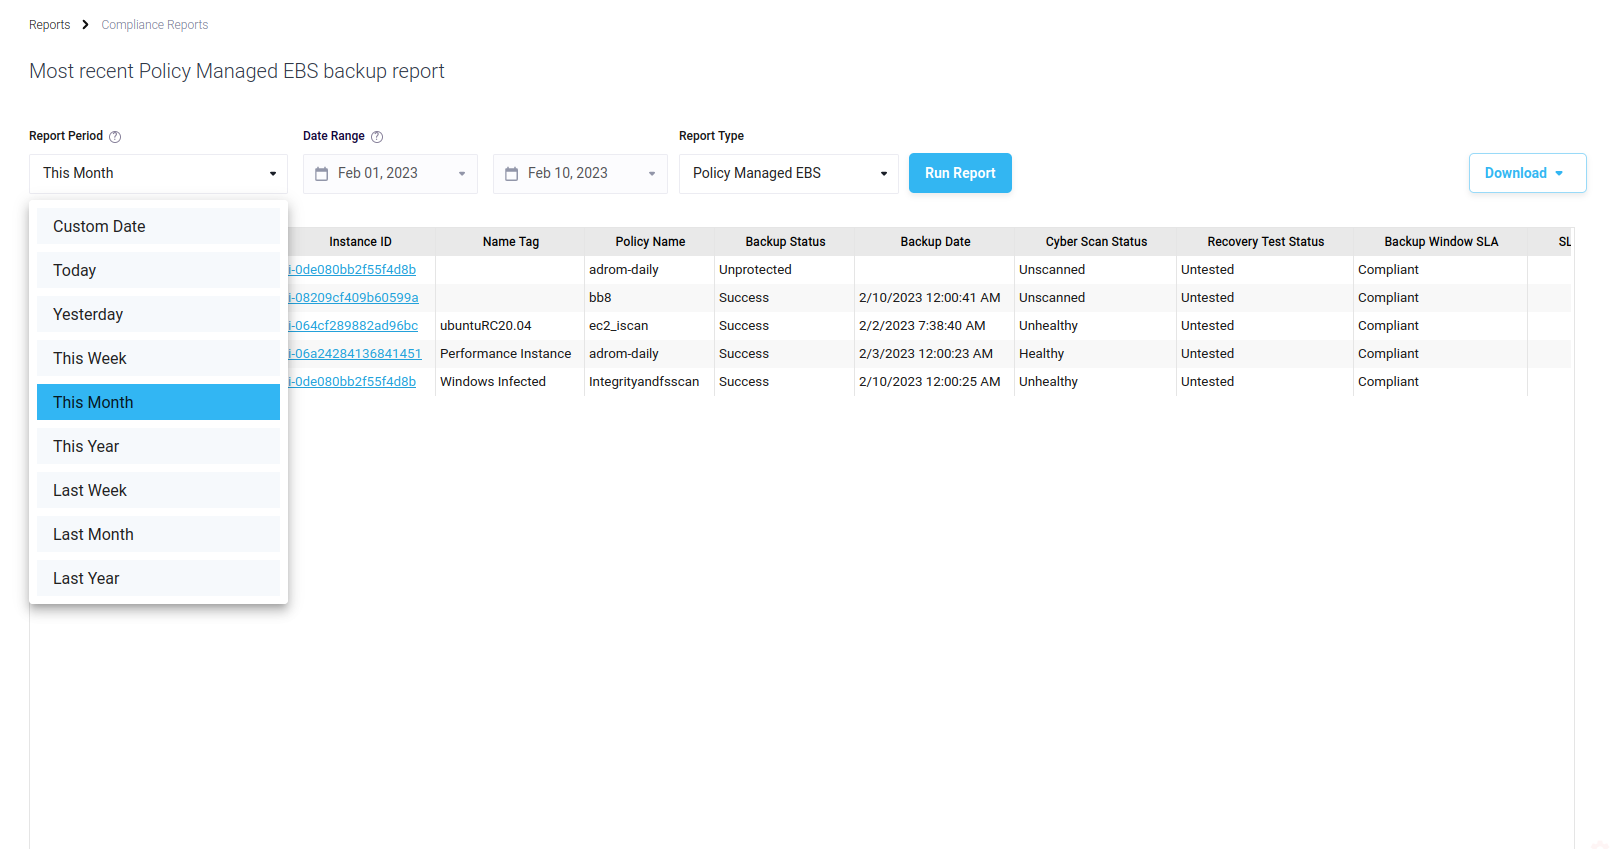
Figure 13: Most Recent Backup Report selectors
You can select the time range from the drop down list or enter it manually. Additionally, you can change the report kind. Available kinds are:
- Policy Managed EC2
- Policy Managed EBS
- Customer Managed EC2
- Customer Managed EBS
- Customer Managed Block
- Customer Managed File
- Customer Managed Stream
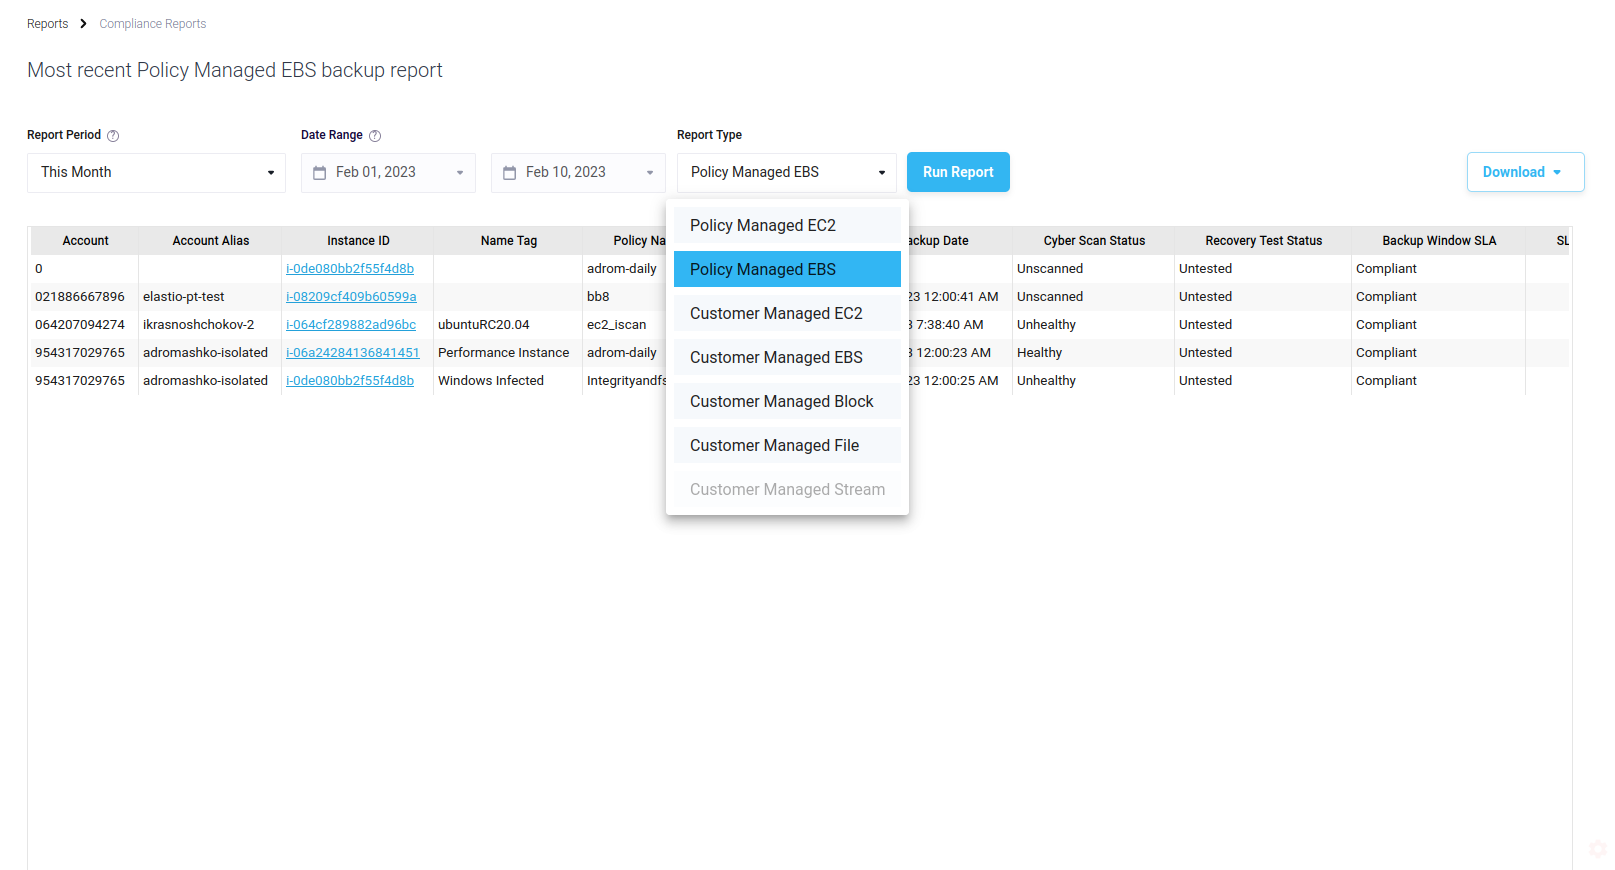
Figure 14: Most Recent Backup Report kinds
If a kind is inactive that would mean that you do not have any assets of that kind in the selected time frame.
The report can be exported in different formats. At the moment the available formats are: XLSX, DOCX and CSV.
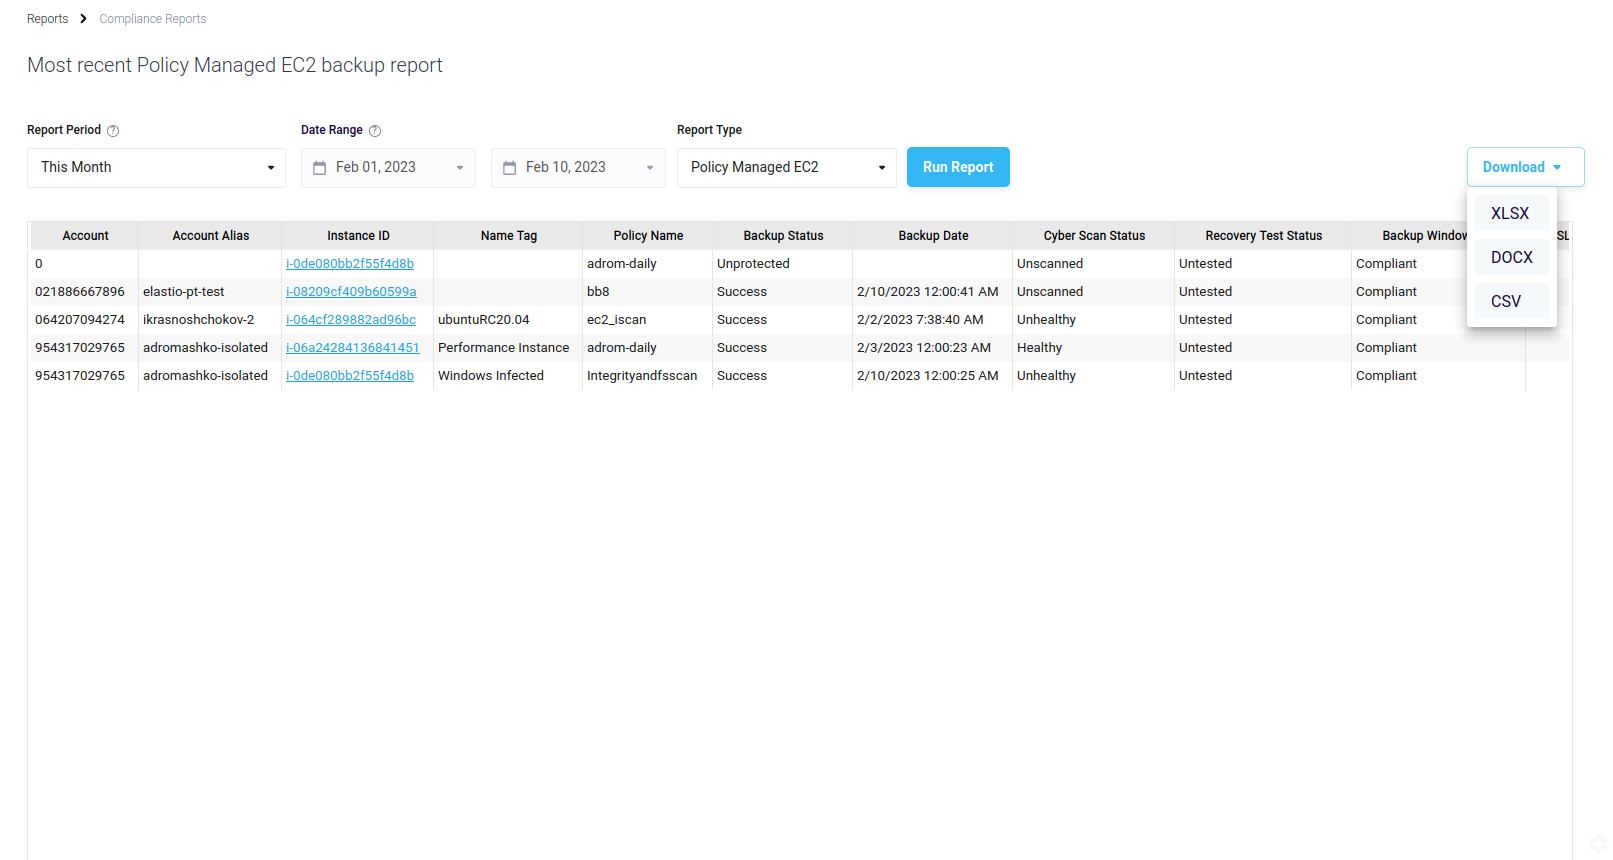
Figure 15: Most Recent Backup Report export
Detailed Backup Report
If you need detailed information about your backups, click the “Run report” button under the Detailed Backup Report name in the Compliance Reports section, and a new page will open up.
On this page, you’ll see date sectors and another “Run report” button. Simply select the time frame you’re interested in, hit the button, and voila - your detailed report will be generated. It’s an easy and convenient way to get all the information you need about your backups, so you can rest easy knowing that everything is up-to-date and in compliance.
When the report is ready you will be able to download it in different formats: XLSX, DOCX and CSV.
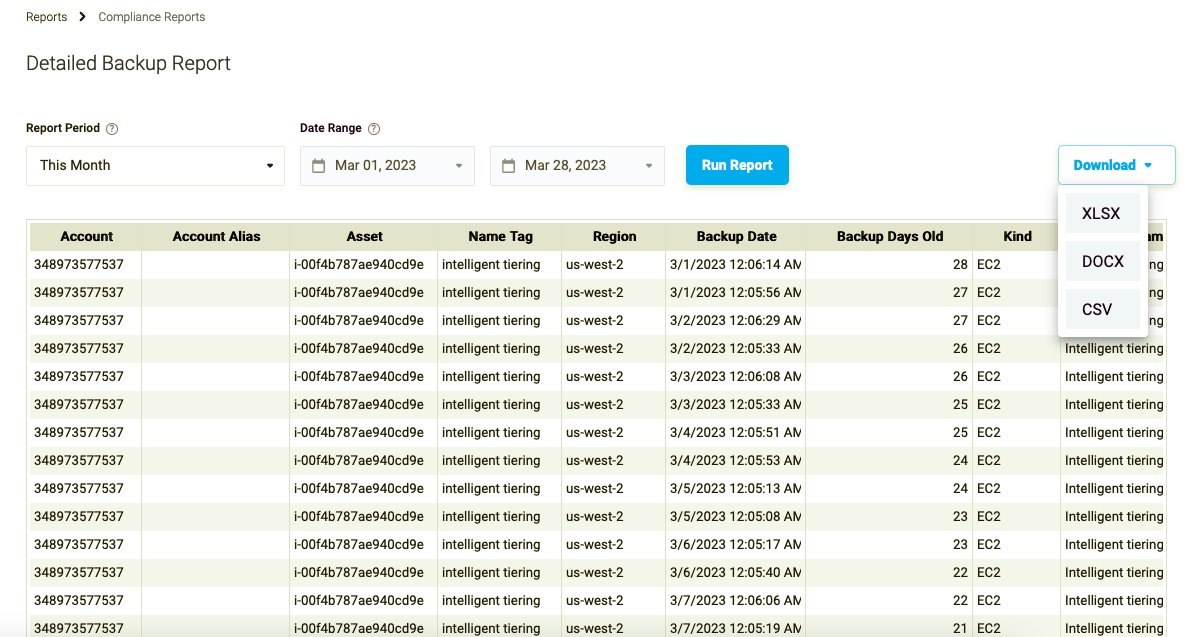
Figure 16: Detailed Backup Report export
AWS Ransomware and Malware Scan Detail Report
AWS Ransomware and Malware Scan Detail Report allows you to get insight into the malware and / or ransomware scans performed on the AWS assets. This report is downloaded directly to your machine in PDF format. It contains general summary representing the number of infected assets, files, affected accounts and regions etc. Additionally it contains a complete detailed list of infected assets, infected files and completed scans.
In order to generate the AWS Ransomware and Malware Scan Detail Report on the Reports page of your tenant in the Compliance Reports section press the “Run now!” button under the “AWS Ransomware and Malware Scan Detail Report”. You will be redirected to the AWS Ransomware and Malware Scan Detail Report page.
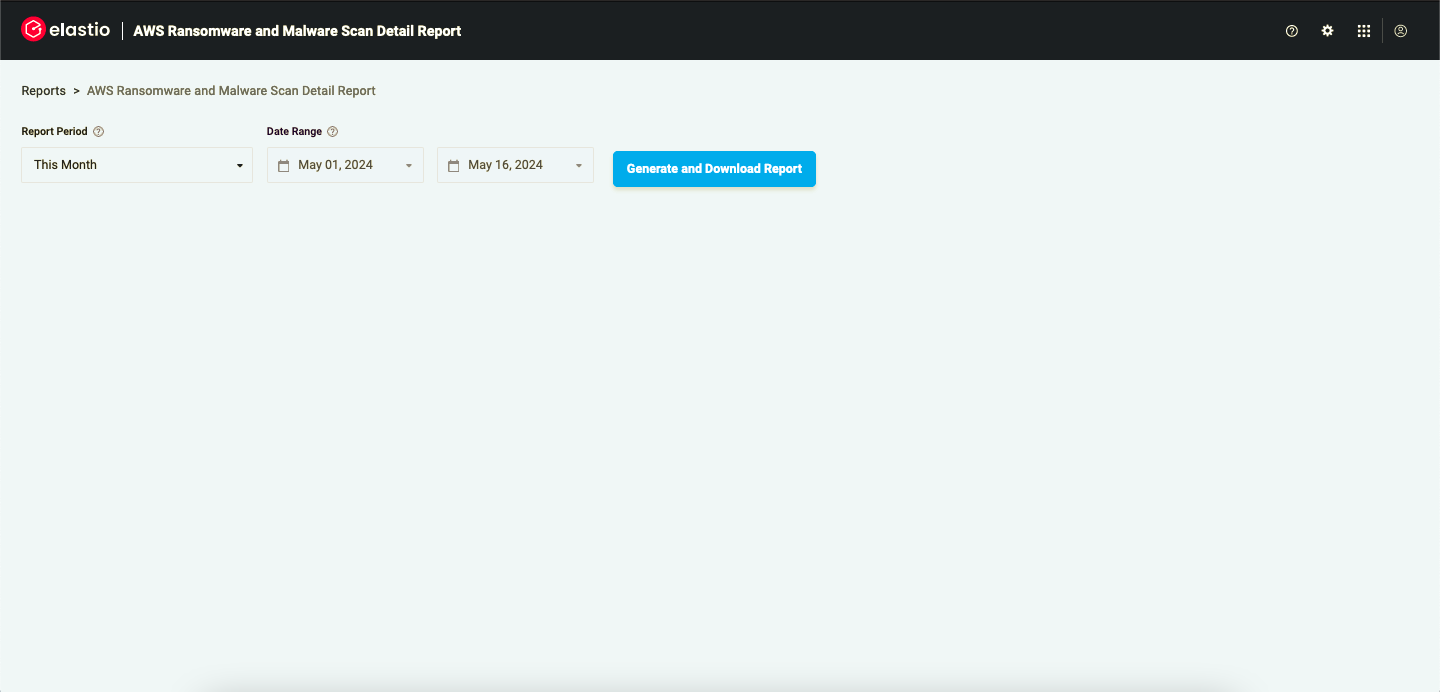
Figure 17: AWS Ransomware and Malware Scan Detail Report
Select the time frame you are interested in (by default the current month is selected), then press the “Generate and Download Report” button. A file will be downloaded to your machine.
First page of this report displays a summary: number of infected assets, files and scans performed.
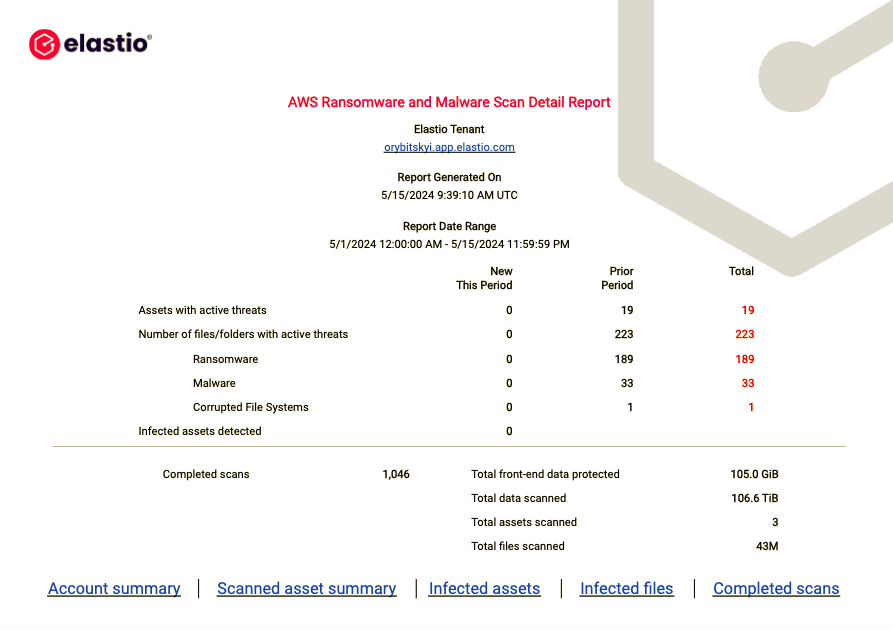
Figure 18: AWS Ransomware and Malware Scan Detail Report - Overview
The next section of the report represents the Account Summary: Account, Protected Assets, Active Threats, Front-end Data Protected (GIB) and Cumulative Data Scanned (GIB).
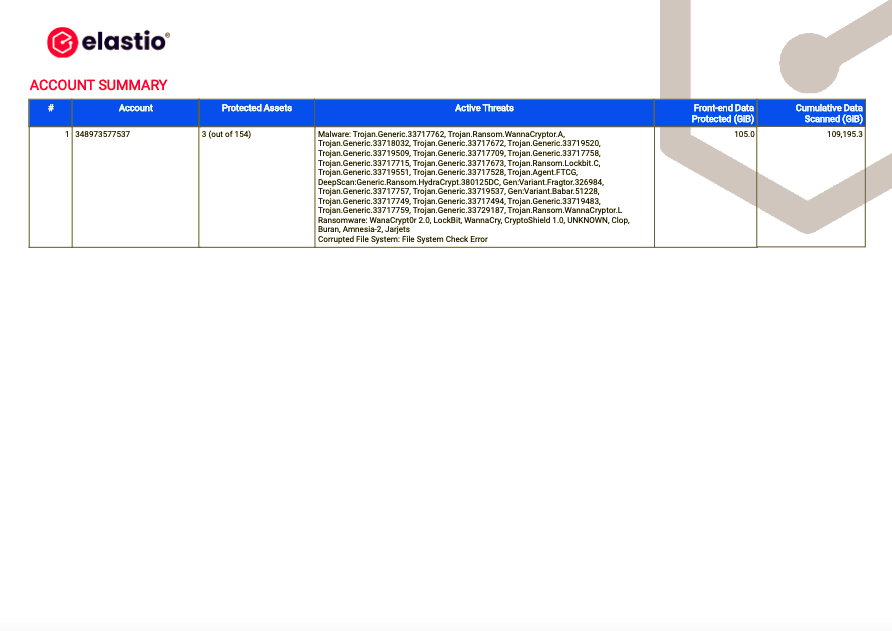
Figure 19: AWS Ransomware and Malware Scan Detail Report - Account Summary
Next section of the report is the Scanned Asset Summary. It contains Account, Region, Asset Name, Asset Type, Active Threats, From-end Date Protected (GIB), and Cumulative Data Scanned (GIB).
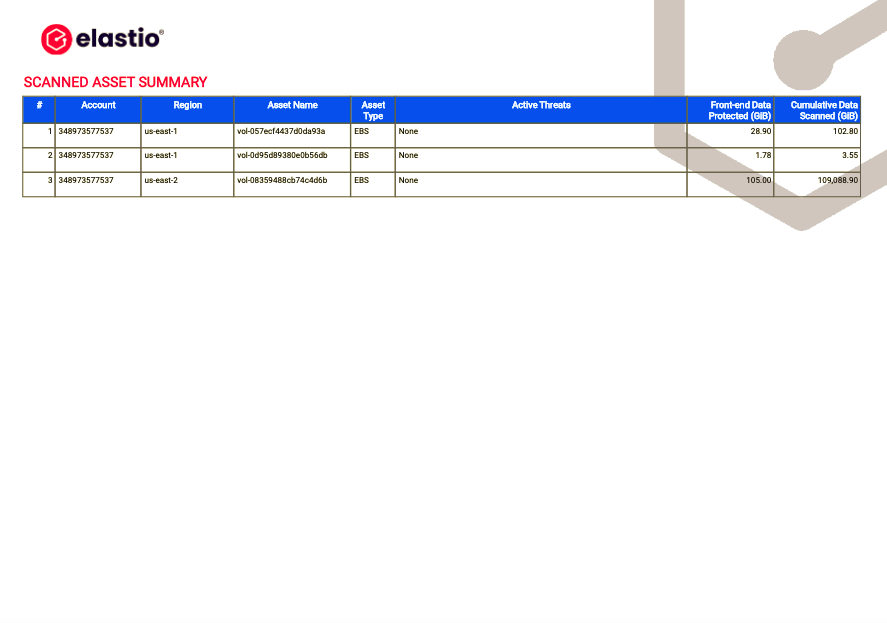
Figure 20: AWS Ransomware and Malware Scan Detail Report - Scanned Asset Summary
In the next section of the report the list of all Infected Assets can be found. They are listed in the table containing the following information: Account, Region, Asset Name, First Detected (date), Asset type and Threats (a list of malware and ransomware threats detected).
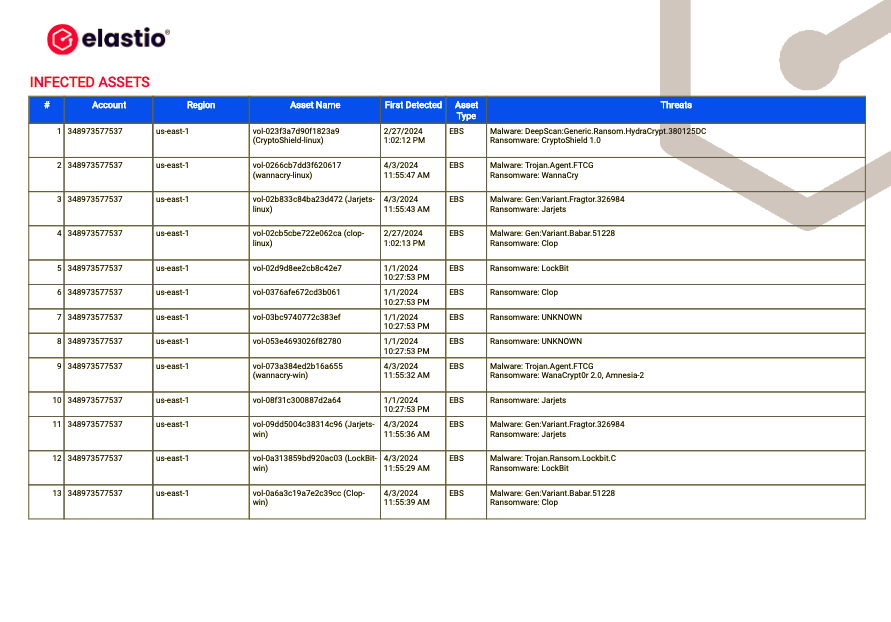
Figure 21: AWS Ransomware and Malware Scan Detail Report - Infected Assets
In the following section of the report Infected Files you can find a complete list of all files determined to contain malware or ransomware. Account, Region, Asset, Threat Path, Threat Name, First Detected (UTC), First Detected Recovery Point ID and Asset Type are displayed in the table.
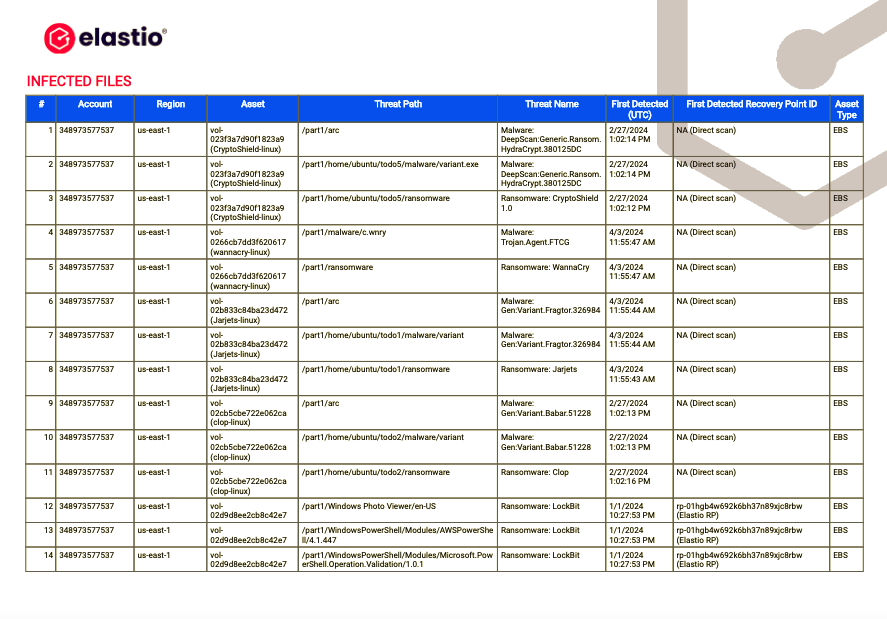
Figure 22: AWS Ransomware and Malware Scan Detail Report - Infected Files
The final report section Completed Scans contains a detailed list of all scans performed. It is separated by the type of the asset being scanned and contains the following fields: Scan Date, Account, Region, Asset, Asset Type, Recovery Point ID, Scan Type, Scan Status, Scanned Data (GIB), Scanned Flles, Last Clean Recovery Point.
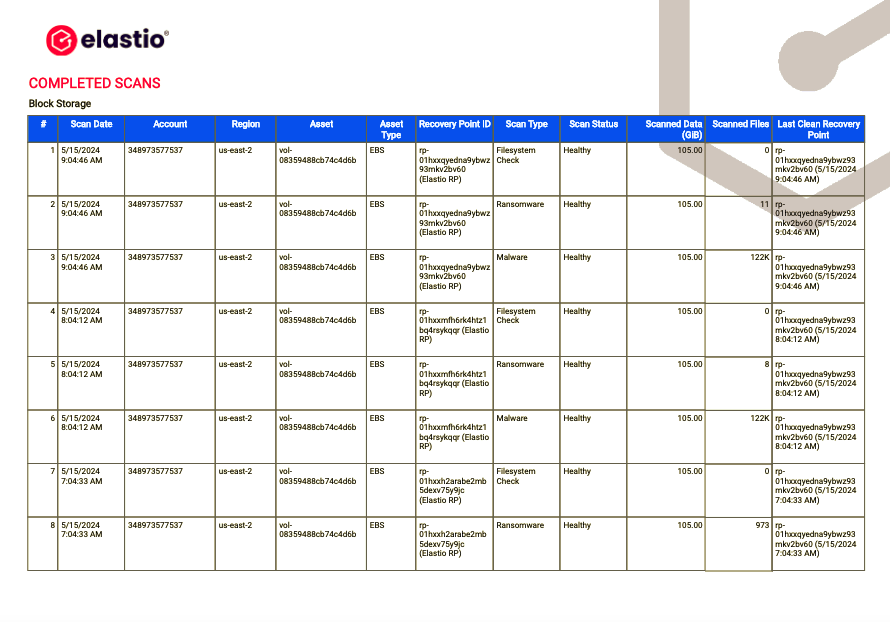
Figure 23: AWS Ransomware and Malware Scan Detail Report - Completed Scans