AWS Restore Test with Elastio
Table of Contents
Elastio integration with AWS Backup Restore Test has been introduced in version 0.30. Supported AWS services are: EC2, EBS, EFS, S3. It can be set up directly in your AWS Console following the steps below.
Integrate Elastio with AWS restore test
In order to use AWS Restore Test with Elastio there are 3 steps that should be completed to set it up.
First, an AWS Backup policy needs to be configured for the assets that you are interested in backing up and then running Elastio against said recovery points. The policy has to tag the recovery points with a specific tag that Elastio then will pick up and act upon. The tag is: “elastio:restore-test”, the value can be one of the three options:
- scan
- ingest
- ingest-and-scan
Depending on the value of the tag, the resulting AWS recovery points will be scanned by Elastio, ingested as Elastio recovery points or both.
Secondly, you have to deploy the AWS Backup reference architecture stack for integration of AWS Backup Restore Test with Elastio, hosted by AWS here.
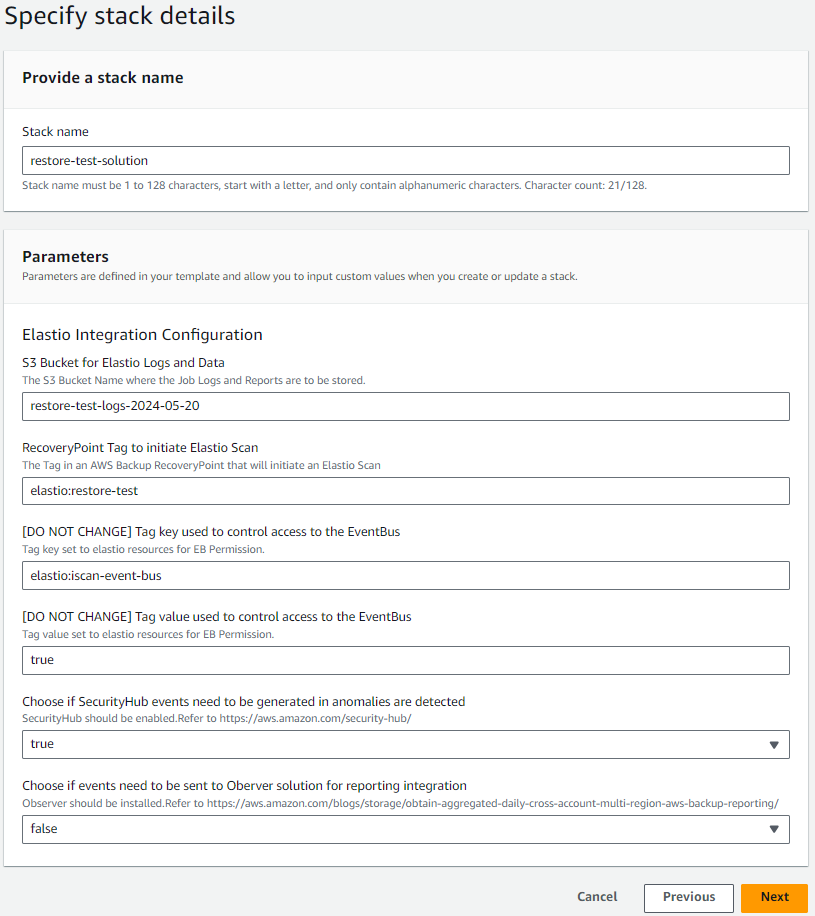
Figure 1: Elastio Restore Test CFN
The final step would be to setup the AWS Recovery Test. You can find instruction on how to set it up here.
⚠️ Important! ⚠️ If the Elastio vault is deployed into subnets in multiple availability zones, or if the AWS Backup restore test runs the restore in an availability zone where the Elastio vault is not deployed, Elastio will automatically copy the restored EBS volumes to the AZ where the Elastio scan job is running. This may take some time and therefore the restore test might take longer. To avoid this, ensure that the Elastio vault is deployed into a single subnet in a single AZ, and ensure that Restore Test is restoring into this same AZ.
Restore test AWS recovery points in LAG vault with Elastio
Elastio can now be integrated with AWS restore test of the recovery points stored in a LAG vault, assuring complete isolation of the production workloads from third-party tools. The isolation is achieved through using separate accounts: one for the production workloads, another for the LAG vault storing the backups and an optional third for Elastio scans execution. See example setup explained below.
Elastio recovery testing using LAG vault and Elastio running in the same account can be achieved using 2 accounts, the setup is as follows:
-
Account 1 or also known as workload account should be configured with AWS backup vault, AWS backup plan and a resource for the backup, for example an EC2 instance. AWS backup plan is configured to copy recovery points to LAG vault in the Account 2.
-
Account 2 or vault account contains AWS LAG vault. This accounts’ access policy should allow recovery points copy from Account 1. Elastio should be deployed. CFN for scanning restored resources is deployed.
Step-by-step setup
- Go to AWS console in Account 2 and create a new LAG vault with desired retention period.
- Allow copy recovery points from Account 1 to LAG vault.
- 2a. Open created LAG vault and scroll down to Access policy block.
- 2b. Click “Add permissions” and select “Allow account level access to a Backup vault”.
- 2c. In the window that opens specify Account 1 ID.
- Create backup vault in Account 1.
- 3a. First go to KMS and create a new KMS key for new vault encryption.
- 3b. Go to AWS backup and create a new vault encrypted with KMS from step 3a.
- Configure AWS backup plan in Account 1. Go to AWS backup and create a new backup plan with the following setup:
- Vault for backup: select vault created in step 3b.
- Vault for copy: select LAG vault created in step 1.
- Tags added to recovery points: “elastio:restore-test=scan”.
- Install CFN for scanning restored resources in Account 2.
- Install Elastio in Account 2.
- Configure restore testing plan in Account 2.
LAG vault recovery test using three separate AWS accounts should be configured as follows:
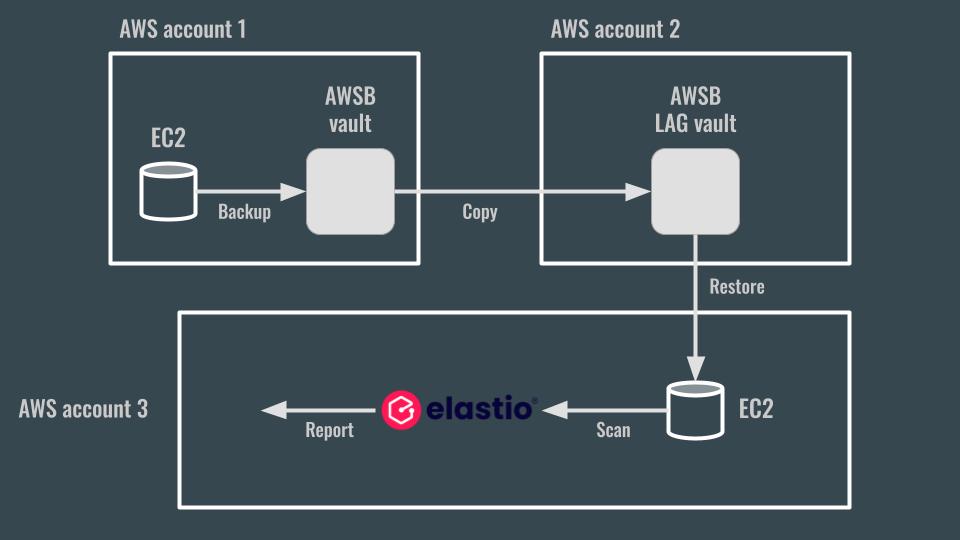
Figure 2: Elastio LAG vault Restore Test schema
-
Account 1 or also known as workload account should be configured with AWS backup vault, AWS backup plan and a resource for the backup, for example an EC2 instance. AWS backup plan is configured to copy recovery points to LAG vault in the Account 2. CFN for recovery points tagging is deployed.
-
Account 2 or vault account contains AWS LAG vault. This vault should be shared with Account 3 and also access policy should allow recovery points copy from Account 1.
-
Account 3 or forensics account has the following setup:
- Elastio is installed and configured
- AWS restore testing is configured to restore recovery points from LAG vault of Account 2
- CFN that enables Elastio scan for restored recovery points is installed
Step-by-step setup
- Go to AWS console in Account 2 and create a new LAG vault with desired retention period.
- Share the LAG vault with Account 3:
- 2a. Open created LAG vault and scroll down to Account sharing block.
- 2b. Click the “Manage sharing” button and create a new resource share.
- Allow copy recovery points from Account 1 to LAG vault.
- 3a. Open created LAG vault and scroll down to Access policy block.
- 3b. Click “Add permissions” and select “Allow account level access to a Backup vault”.
- 3c. In the window that opens specify Account 1 ID.
- Create backup vault in Account 1.
- 4a. First go to KMS and create a new KMS key for new vault encryption.
- 4b. Go to AWS backup and create a new vault encrypted with KMS from step 4a.
- Configure AWS backup plan in Account 1. Go to AWS backup and create a new backup plan with the following setup:
- Vault for backup: select vault created in step 4b.
- Vault for copy: select LAG vault created in step 1.
- Tags added to recovery points: “elastio:restore-test=scan”.
- Install CFN for scanning restored resources in Account 1. Leave all setting by default during installation.
- Install CFN for scanning restored resources in Account 3. Some options can be configured in this account.
- Configure restore testing plan in Account 3 to restore recovery points for scanning from LAG vault of Account 2.